Remote Request Hook
The remote request hook allows witboost to forward all data that is received by an action to a configured URL. For instance, for the Access Request action, this hook allows to forward all the access request data to an external service, through a dedicated endpoint that can handle the request in a specific manner as required by your needs.
You can use the Access Request action in combination with the Remote Request hook to model an external authorization system. Such that users can accept or reject access request on a separate platform outside witboost.
To setup a remote request hook you need to provide:
- A service URL that can accept a JSON body and a POST method. The action's input data will be forwarded when the action is triggered (e.g. the input data for the access request action is the requester information and requested resource information)
- The service must update the hook state once the third-party interaction is completed. The URL where to update the hook status is provided by witboost in the original request's body.
- The witboost's secret key that you generated at installation time, so that your service is authorized to update the hook status on witboost
- If your external service requires complex authorization schema (e.g. OAuth2), you will need to provide a microservice that acts as a proxy between witboost and the target service. The microservice will be in charge of handling the authorization and forwarding the request coming from the remote request hook.
Adding a Remote Request hook to an Action
If you want to add the remote request hook for an action, you can place the hook under the hooks property in the values.yaml. Example on how to add this hook to the Access Request\ action:
# inside your values.yaml
ui:
  appConfig:
    # ... other configurations  ...
    actionHandlers:
      accessRequest:
        # access request configurations
        hooks:
          - type: remoteRequest
            # remote request configurations
Configuring the Remote Request Hook
To configure the target URL where the request must be sent by the remote request hook, along with additional configuration, you can modify the values.yaml accordingly:
# inside your values.yaml
ui:
  appConfig:
    # ... other configurations  ...
    actionHandlers:
      <action name>:
        # action configurations
        hooks:
          - type: remoteRequest
            target: http://simple.example.com:8080/endpoint/v1
Under the target property, we configure the external service to be contacted by defining its full URL.
For more complex scenarios, where you need to pass API Tokens, Bearer tokens or even custom headers attached to the request, you can pass additional headers in the dedicated optional section headers:
# inside your values.yaml
ui:
  appConfig:
    # ... other configurations  ...
    actionHandlers:
      <action name>:
        hooks:
          - type: remoteRequest
            target: http://simple.example.com:8080/endpoint/v1
            headers:
              Authorization: ${EXAMPLE_AUTH_HEADER}
              # ...or interpolating a value into part of a string,
              # Authorization: Bearer ${EXAMPLE_AUTH_TOKEN}
If you need to override the default baseUrl that is given to your external service in the respondToUrl parameter you can use the patchBaseUrl field in this way:
# inside your values.yaml
ui:
  appConfig:
    # ... other configurations  ...
    actionHandlers:
      <action name>:
        hooks:
          - type: remoteRequest
            target: http://simple.example.com:8080/endpoint/v1
            patchBaseUrl: https://my-custom-domain.com/api/actionHandler
patchBaseUrl is the base URL of the action handler API.
This way, the respondToUrl received by your external service will be https://my-custom-domain.com/api/actionHandler/hooks/{id}.
You can leverage this option for cases in which witboost is not directly accessible from other clusters or networks on your infrastructure.
Implementing a compliant service for the Remote Request Hook API
If you need to provide a microservice, as for the example use-case described above, it will need to fulfill the following contract:
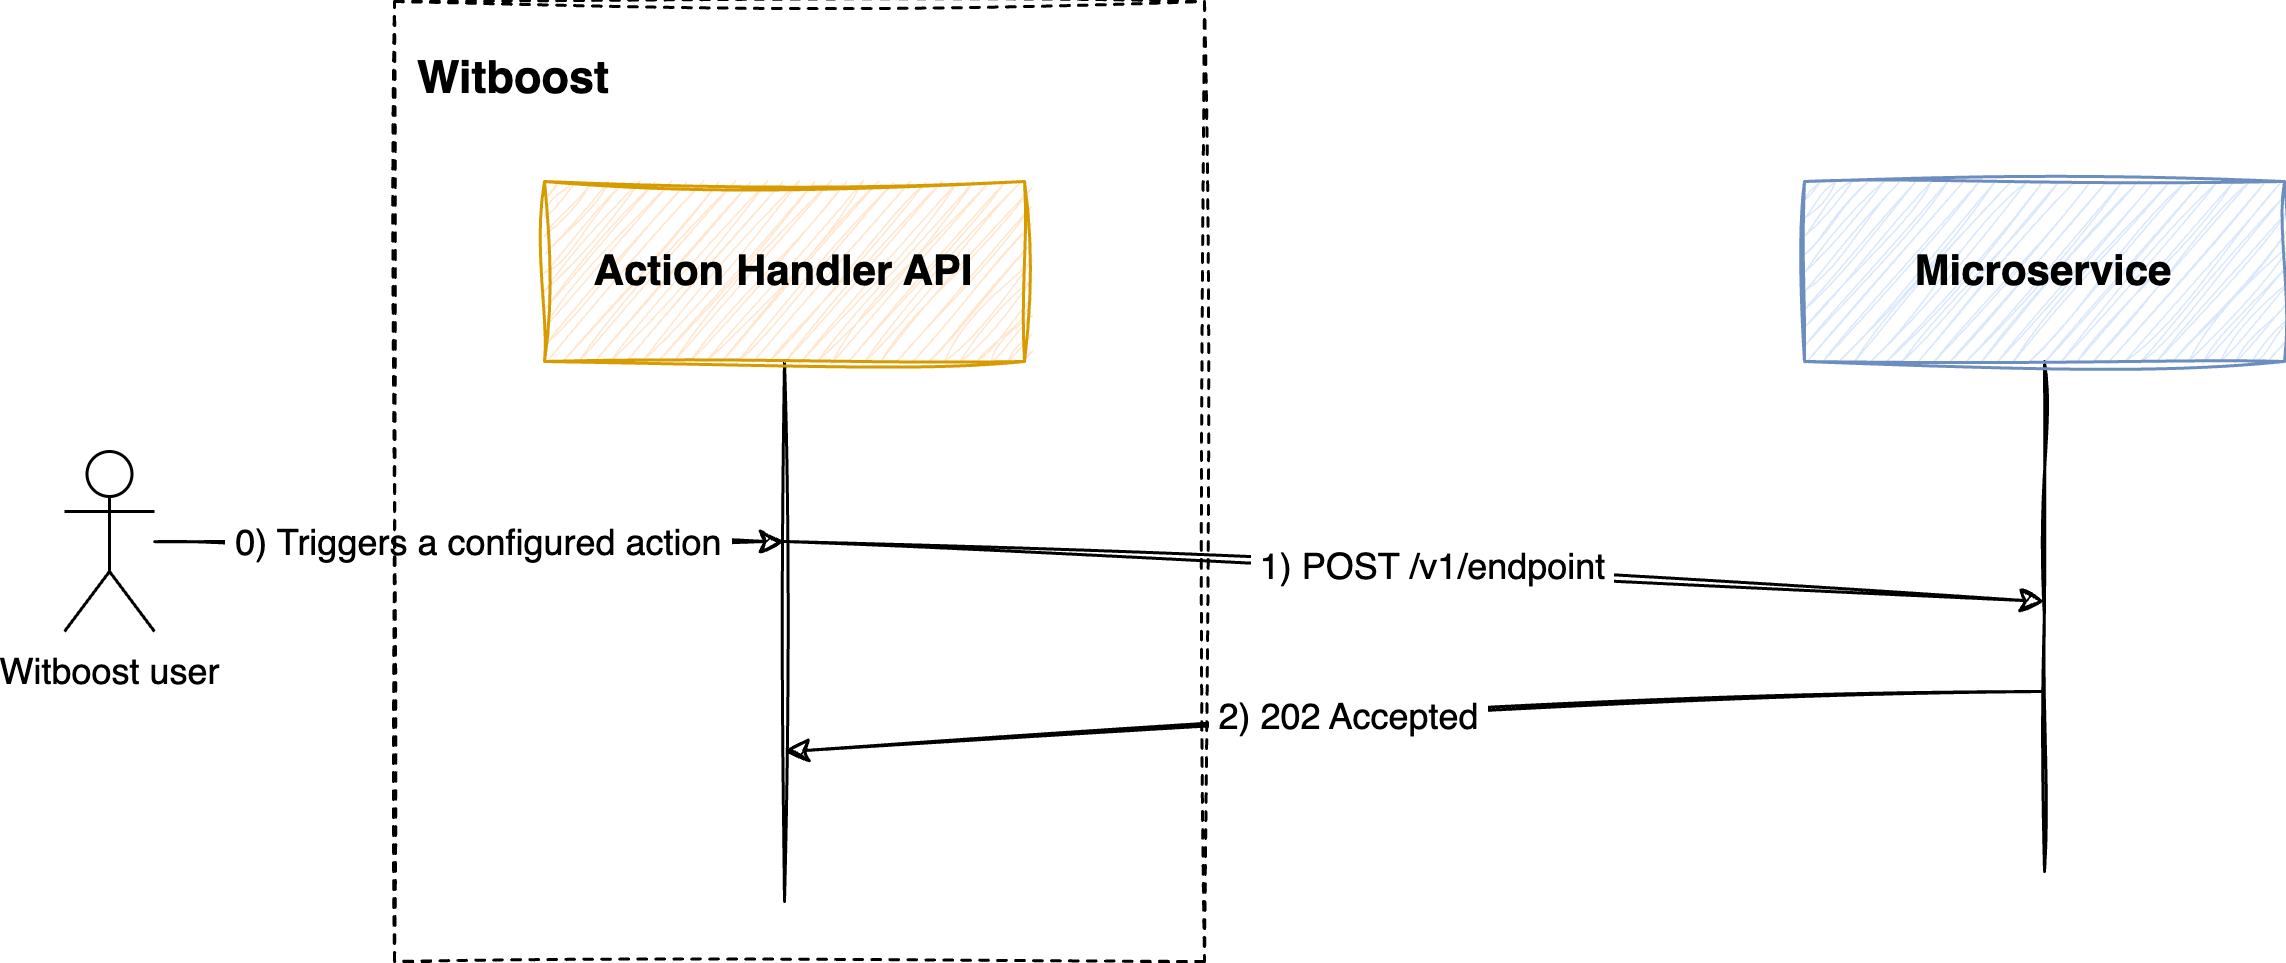
1. Receive a POST request at any endpoint of your choice
A request with all the action's data is sent to the target URL with a POST HTTP request. Eventually, this request includes some headers that you can use for authentication purposes. This is configured in the remote request hook's section of the values.yaml under the ui.appConfig.headers property.
Upon receiving the POST request, the endpoint should first respond with a 202 HTTP status code (ACCEPTED), postponing all the eventually heavy work in a second moment, asynchronously. This is to prevent that the UI keeps spinning any loading bar or that any request timeout triggers.

Once you accepted the request you can execute the business logic of your external service. e.g. your external service registers the request into a third-party ticketing system.
2. Update back the hook status on Witboost
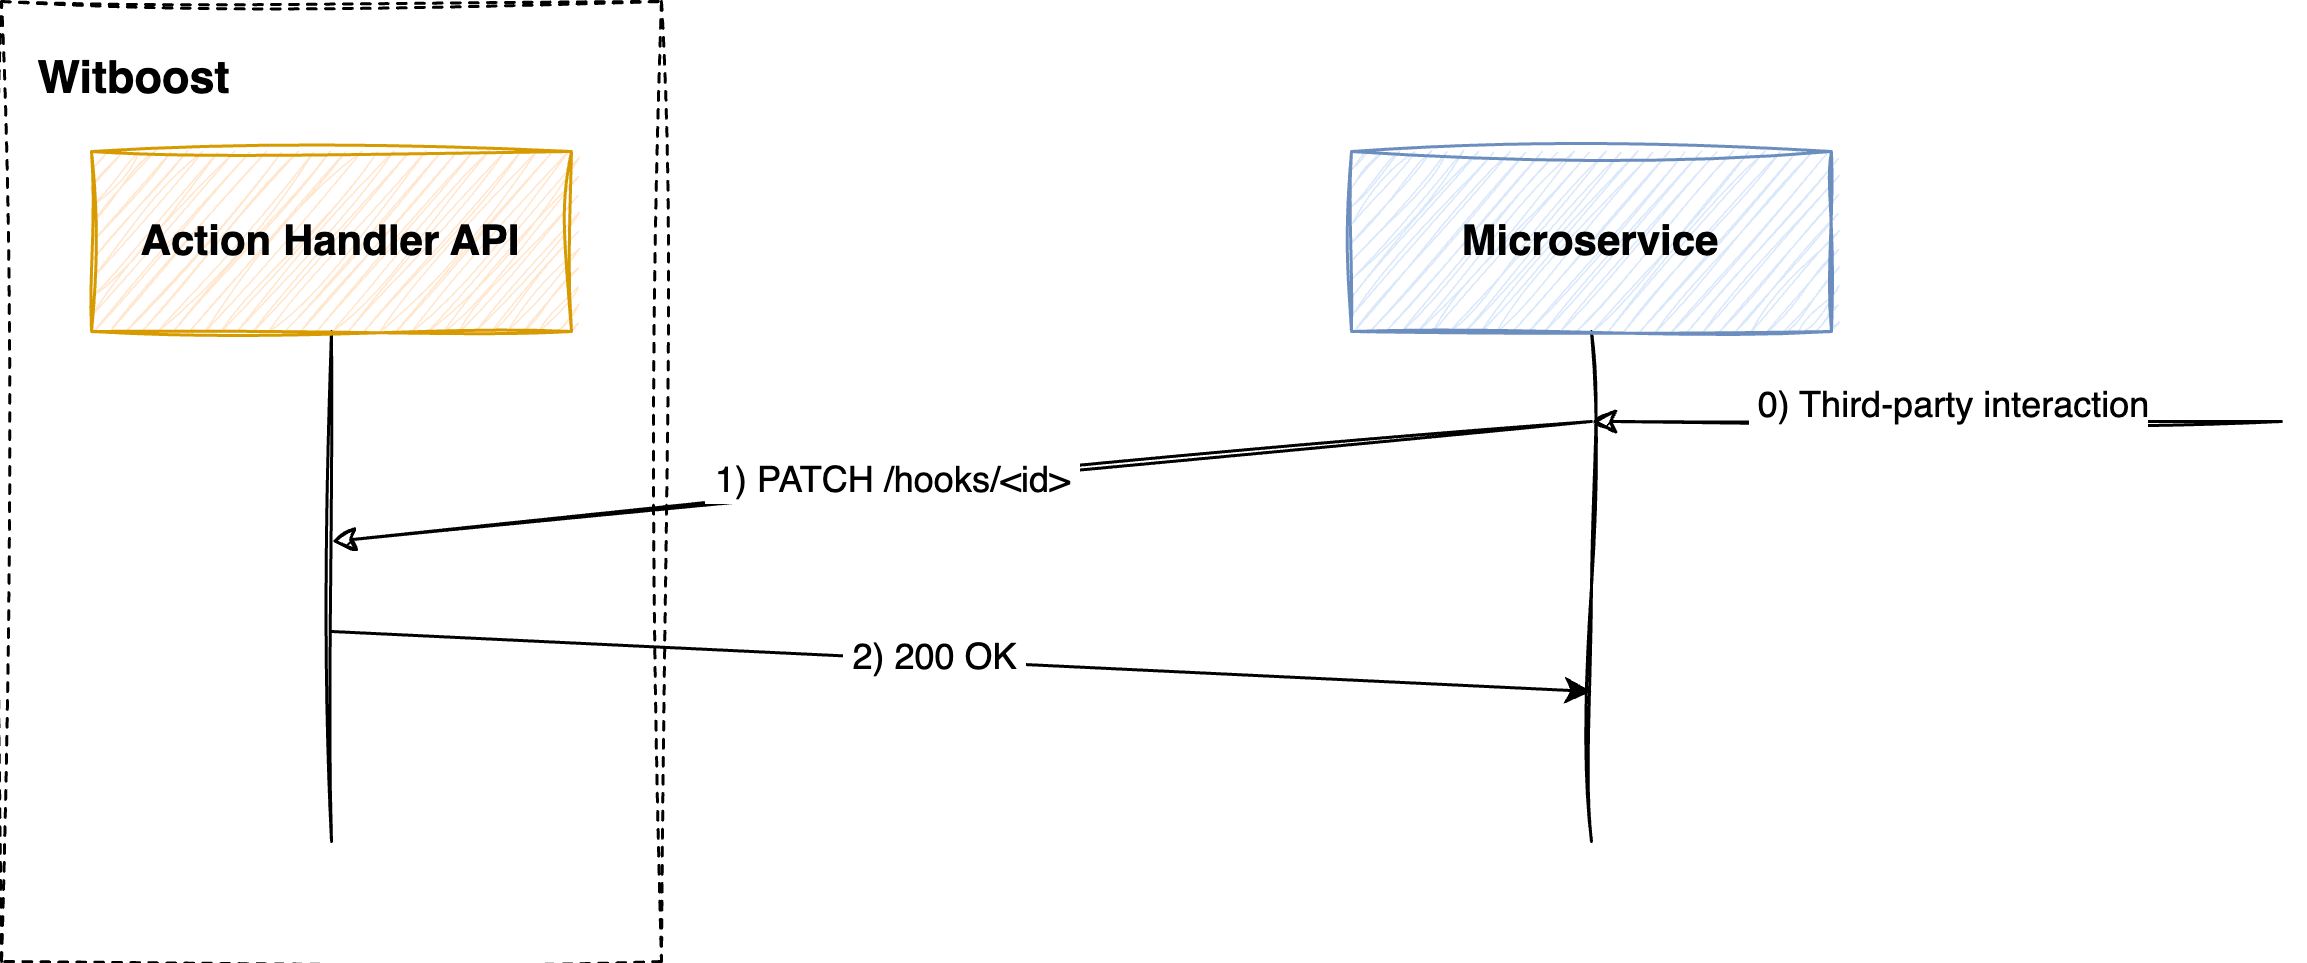
When a third-party interaction happened on your end, (e.g. the owner of the resource accepted the request on the ticketing system) the service must update the hook status to signal that the hook is completed and that is not anymore waiting for a status update.
To do so, you can use the respondToUrl request field provided in the original request.
Your service must send a PATCH request to the respondToUrl URL as described here.

Make sure Witboost is reachable by your external service. Check Configuring the remote request hook.
Moreover, this HTTP call must be authorized with a server-to-server JWT token that is generated using of the secrets under ui.appConfig.backend.auth.keys[i].secret. For more details see below in the dedicated section Authorizing the request from the external microservice towards witboost
Why should I update back the hook status on Witboost?
This is needed if, for instance, there is any notification to be delivered to users upon the completion of the hook, e.g. once the hook status is OK, a notification is dispatched to the original requester informing that an access request has been accepted or rejected on your authorization platform.
Authenticating requests from the external microservice towards witboost
For secure interaction between an external microservice and witboost, it's essential to authenticate the requests made by the microservice. This authentication ensures that only authorized services can update the status of hooks in witboost, maintaining the integrity and security of the system. Below are the steps and configurations required for this process:
Generating a Secure Token
To securely interact with witboost, external microservices need to generate a JWT (JSON Web Token) that adheres to specific standards. This token is used to authenticate requests made by the microservice to update the status of hooks in witboost.
-
Token Requirements:
- JWT with HS256 Signature: The token must be a JWT that uses an HS256 signature algorithm.
- Secret Key Usage: Use the raw base64 decoded value of the configured key from witboost as the secret for the JWT.
- Payload Configuration:
sub: This field should be set to"backstage-server"as this is the only value supported currently.exp: Set the expiration time to one hour from the time of token generation, in epoch seconds.
- Protected Header: Ensure that the JWT encodes the
algheader as a protected header. In many JWT libraries, this can be achieved with a method likesetProtectedHeader.
-
Token Generation Across Languages: Given that external callers may be written in languages other than Node.js, it's important to use a JWT library compatible with your programming language that supports these specifications.
-
Secure Token Handling:
- Store the JWT securely within your microservice.
- Avoid exposing the token or the secret key used for its generation.
Implementing Token Generation in Code
Here's an example of how you might generate a token in Node.js using the jose library:
async function getToken() {
  const secret = jose.base64url.decode(
    '<any witboost secret under backend.auth.keys>',
  );
  const alg = 'HS256';

  const jwt = await new jose.SignJWT({})
    .setProtectedHeader({ alg })
    .setSubject('backstage-server') // must be backstage-server
    .setExpirationTime('1h')
    .sign(secret);

  console.log(`using jwt: ${jwt}`);
  return jwt;
}
Adding Authentication to Requests
Attaching the Token: When your microservice sends a PATCH request to witboost to update the status of a hook, the JWT token must be included in the request header. This must be done as a Bearer token in the Authorization header.
Example:
Authorization: Bearer <Your-Generated-JWT-Token>