Form Layout
While building templates, it is usually beneficial to improve them not only technically, but also visually. To improve the user experience of a Witboost user that needs to create a component, we can arrange the fields in a template using different layouts. Witboost support grouping common fields, creating horizontal layouts, and tables.
All examples shown here are taken from the accompanying layouts.yaml template file, which you can see live by following the steps explained here.
Object layout
As already explained in the Basic Fields example, we can group fields by creating nested objects in the template steps. This allows us to set a title and a description.
numberFields:
  title: Number fields
  type: object
  description: Number fields are a way to enforce an input to accept only integer values
  required:
    - numberField
  properties:
    numberField:
      title: Integer field
      type: number
    constrainedNumberField:
      title: Number field with constraint 0 <= x <= 10
      type: number
      minimum: 0
      maximum: 10
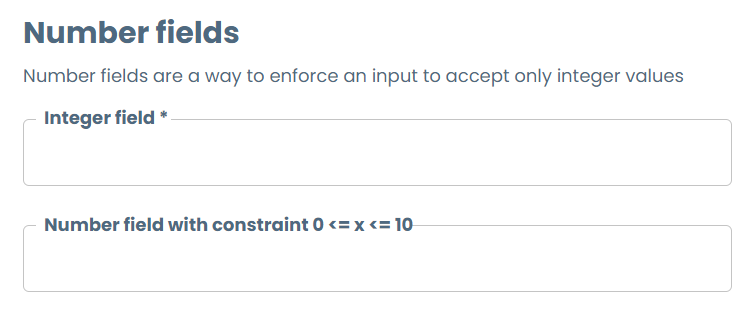
If you don't need the title nor description shown on the form you can hide it by setting ui:options.displayTitle to false, like so:
noTitleGroup:
  type: object
  ui:options:
    displayTitle: false
  properties:
    name:
      title: Field in non-title object
      type: string

Horizontal Layout
If you want to display different fields inside an object horizontally instead of vertically, you can change the orientation of the object by adding the field ui:ObjectFieldTemplate: HorizontalTemplate. By default, it will set two fields per row horizontally and overflowing to the next row:
horizontalLayout:
  title: Horizontal layout
  type: object
  ui:ObjectFieldTemplate: HorizontalTemplate
  properties:
    fieldOne:
      title: Field 1
      type: string
    fieldTwo:
      title: Field 2
      type: string
      enum:
        - Option 1
        - Option 2
    fieldThree:
      title: Field 3
      type: boolean

You can configure the maximum elements per row and the minimum width of each field if you need so.
horizontalLayoutOptionsMinElementWidth:
  title: Horizontal layout - 8 shorter width elements
  type: object
  ui:ObjectFieldTemplate: HorizontalTemplate
  ui:options:
    elementsPerRow: 8
    # minElementWidth: 150 -- See image comparison
  properties:
    fieldA:
      title: Field A
      type: string
    fieldB:
      title: Field B
      type: boolean
    fieldC:
      title: Field C
      type: string
    fieldD:
      title: Field D
      type: string
      format: date
    fieldE:
      title: Field E
      type: integer
    fieldF:
      title: Field in non-title object
      type: string
      default: Disabled
      ui:disabled: true
    fieldG:
      title: Field in non-title object
      type: string
      ui:style:
        marginTop: 20px
        background: "#111"
        color: "#0f0"
        font-family: Consolas
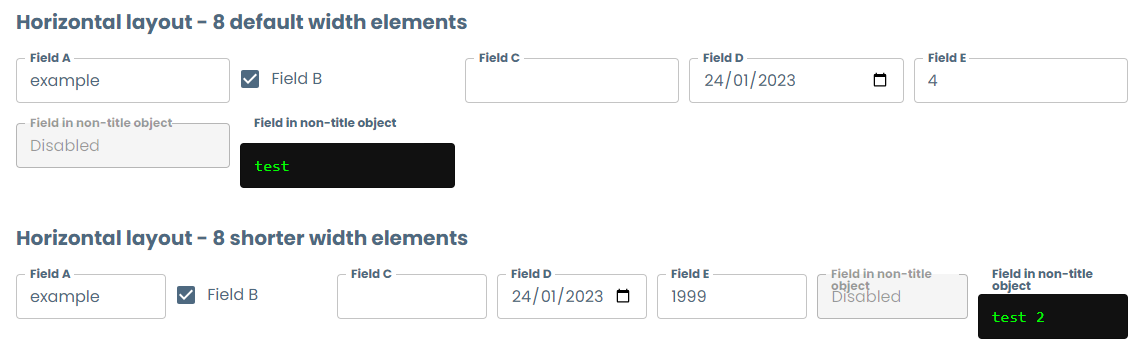
Table Layout
You can create tables on your templates by creating an array on objects and setting the ui:ArrayFieldTemplate: ArrayTableTemplate property on the array field, and setting ui:ObjectFieldTemplate: TableRowTemplate on the child field. Witboost will create a table where each field of the inner object will be rendered as a column, offering the possibility to add, remove and reorder rows.
tableExample:
  title: Table Example
  type: array
  ui:ArrayFieldTemplate: ArrayTableTemplate
  ui:options:
    maxDescriptionRows: 2
  default: []
  items:
    type: object
    ui:ObjectFieldTemplate: TableRowTemplate
    required:
      - name
      - dataType
    properties:
      name:
        title: Name
        type: string
      surname:
        title: Surname
        type: string
      salary:
        title: Salary
        type: number
      department:
        title: Department
        type: string
        enum:
          - Finance
          - Marketing
          - IT
          - Sales
      country:
        type: string
        title: Country
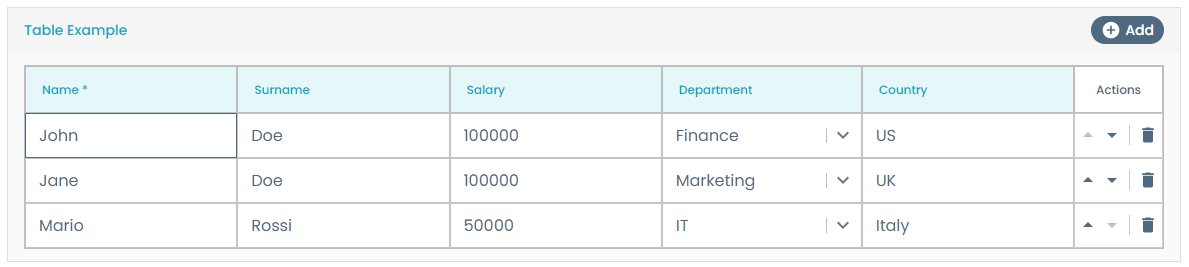
Check out how we use this layout to define Table Schema layouts for specifying the shape and metadata of a table storing data.
It is possible to enable pagination for the elements and configure the number of items displayed per page by setting the following property in the values.yaml file:
mesh:
  builder:
    scaffolder:
      arrayFields:
        rowsPerPage: <number_of_items>
The mesh.builder.scaffolder.arrayFields.rowsPerPage attribute defines how many elements are shown per page. Adjust this value according to your requirements.
Markdown descriptions
The description field of the form steps and object fields support Markdown syntax to enrich the form visuals. This includes titles and subtitles, tables, images, and more.
- title: Form Layouts
description: |-
# Layouts
While building templates, it is usually beneficial to improve them not only technically, but also visually. To improve the user experience of a Witboost user that needs to create a component, we can arrange the fields in a template using different layouts. Witboost support grouping common fields, creating horizontal layouts, and tables.

**Contents**
- Object layout - Number fields
- Horizontal layout
- Table layout
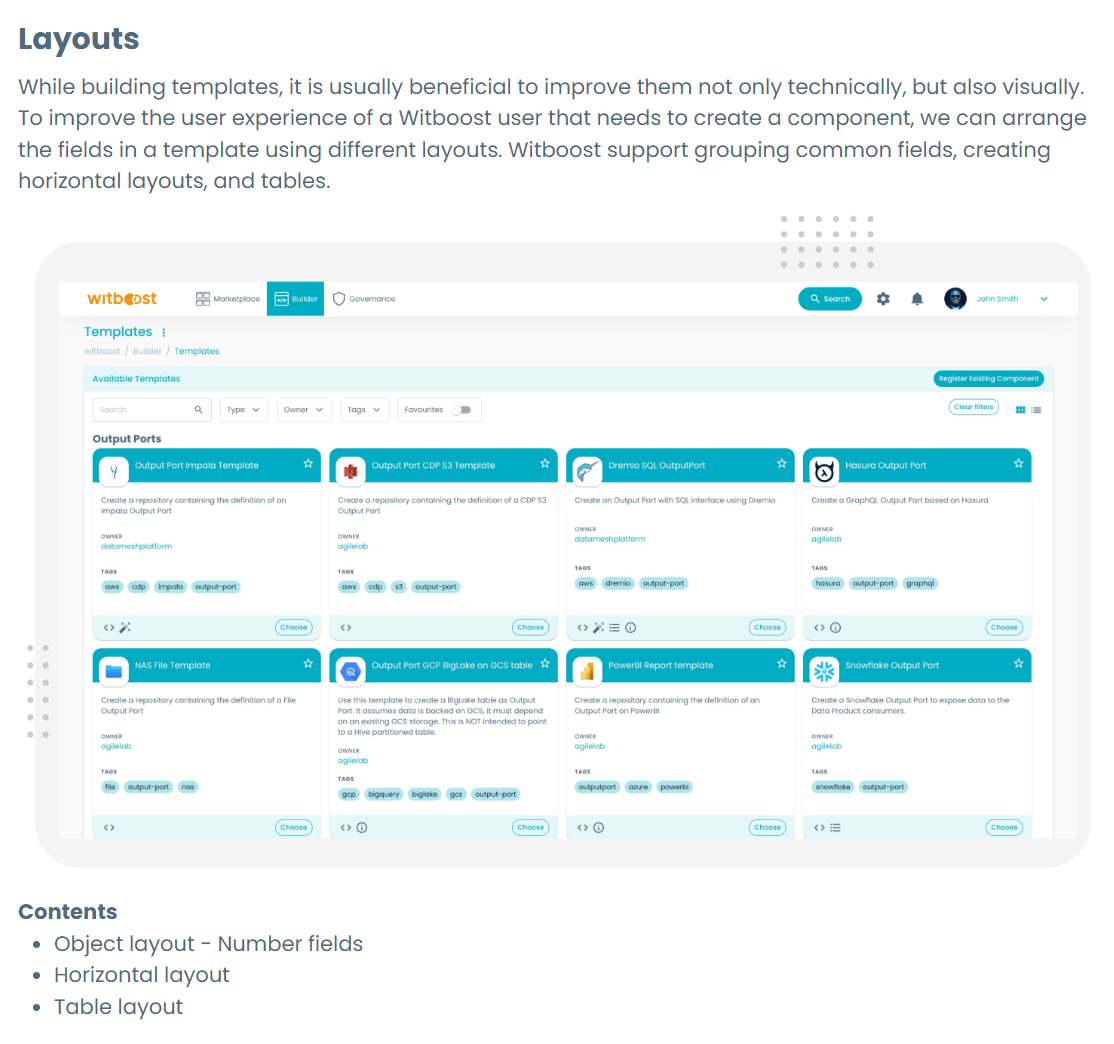
Image embedding
The easiest way to include images on the form is by adding the link to a public URL hosting the image. However, on some cases this is not possible, either because the image is not publicly hosted or is only available as part of the template. To overcome these, there are a couple of workarounds.
Techdocs hosting
Each template has the ability to host documentation by using the Techdocs plugin of Backstage (see more info here). We can leverage that Techdocs hosts the template documentation to store the image as part of it and then internally reference the directory used by the plugin to store these files. The requirements for this to work are:
-
The template is configured to use Techdocs. This is done by adding the following annotation in the
template.yamlmetadata object:apiVersion: scaffolder.backstage.io/v1beta3kind: Templatemetadata:name: template-name.1annotations:backstage.io/techdocs-ref: dir:.... -
The image is included in the
docs/folder of the template repository. It will be visible only after the documentation has been rendered at least once, so after registering the template it would be necessary to open the documentation by clicking on the Documentation icon on the template card.
By doing so you can refer to the image by using the following path:
spec:
parameters:
- title: Component metadata
description: |-
This is an image

Where <template metadata.name> is the value in the metadata.name field of the template.yaml file, and <image_path_in_docs> the path to the image relative to the docs/ folder.
Base64 embedding
Markdown natively supports embedding images using Base64. This is useful for cases when we don't want to host the image in a remote URL or depend on the Techdocs rendering to query the images stored in the documentation. The syntax for this is:
spec:
parameters:
- title: Component metadata
description: |-
This is an image

To facilitate the generation of these image tags, we provide a Bash script to automatically generate these Base64 Markdown tags during the creation of a template. It takes a list of files containing empty tags whose alt-text stores the path to the image file, and it generates the content automatically. Thus, it takes files like:
template.yaml:
...
spec:
  parameters:
    - title: Component metadata
      description: |-
        This is an image

        ![img/image.png]()
...
and by executing
image_embedder.sh template.yaml
it generates all Base64 tags present on the document. For example, the above template converts the img/image.png file into Base64 and replaces in-place the tag, creating the following output:
template.yaml:
...
spec:
parameters:
- title: Component metadata
description: |-
This is an image

...
Since Base64 encoded images can still be large, we recommend leveraging the YAML Substitution feature to separate the template into different files, so that the main template.yaml remains clean and readable.
template.yaml:
spec:
  parameters:
    - $yaml: ./header.yaml
header.yaml:
title: Component metadata
description: |-
This is an image
