Skeleton Entities
Overview
In Witboost, a Skeleton Entity is an entity whose definition is provided by a Nunjucks-templated file. This file is stored within the entity's repository alongside a set of parameters required to render the final YAML definition, which is then supplied to the Witboost Entities registry.
Entities such as Systems and Components can (and should) be defined using these skeleton (templated) definitions for better flexibility and maintainability.
Introduced in Witboost 2.3, Skeleton Entities provide a more dynamic and user-friendly approach to define systems and components. They seamlessly integrate with tools like the Editor Wizard and the Reverse Provisioning Wizard, allowing for easier entity management.
Why Skeleton Entities?
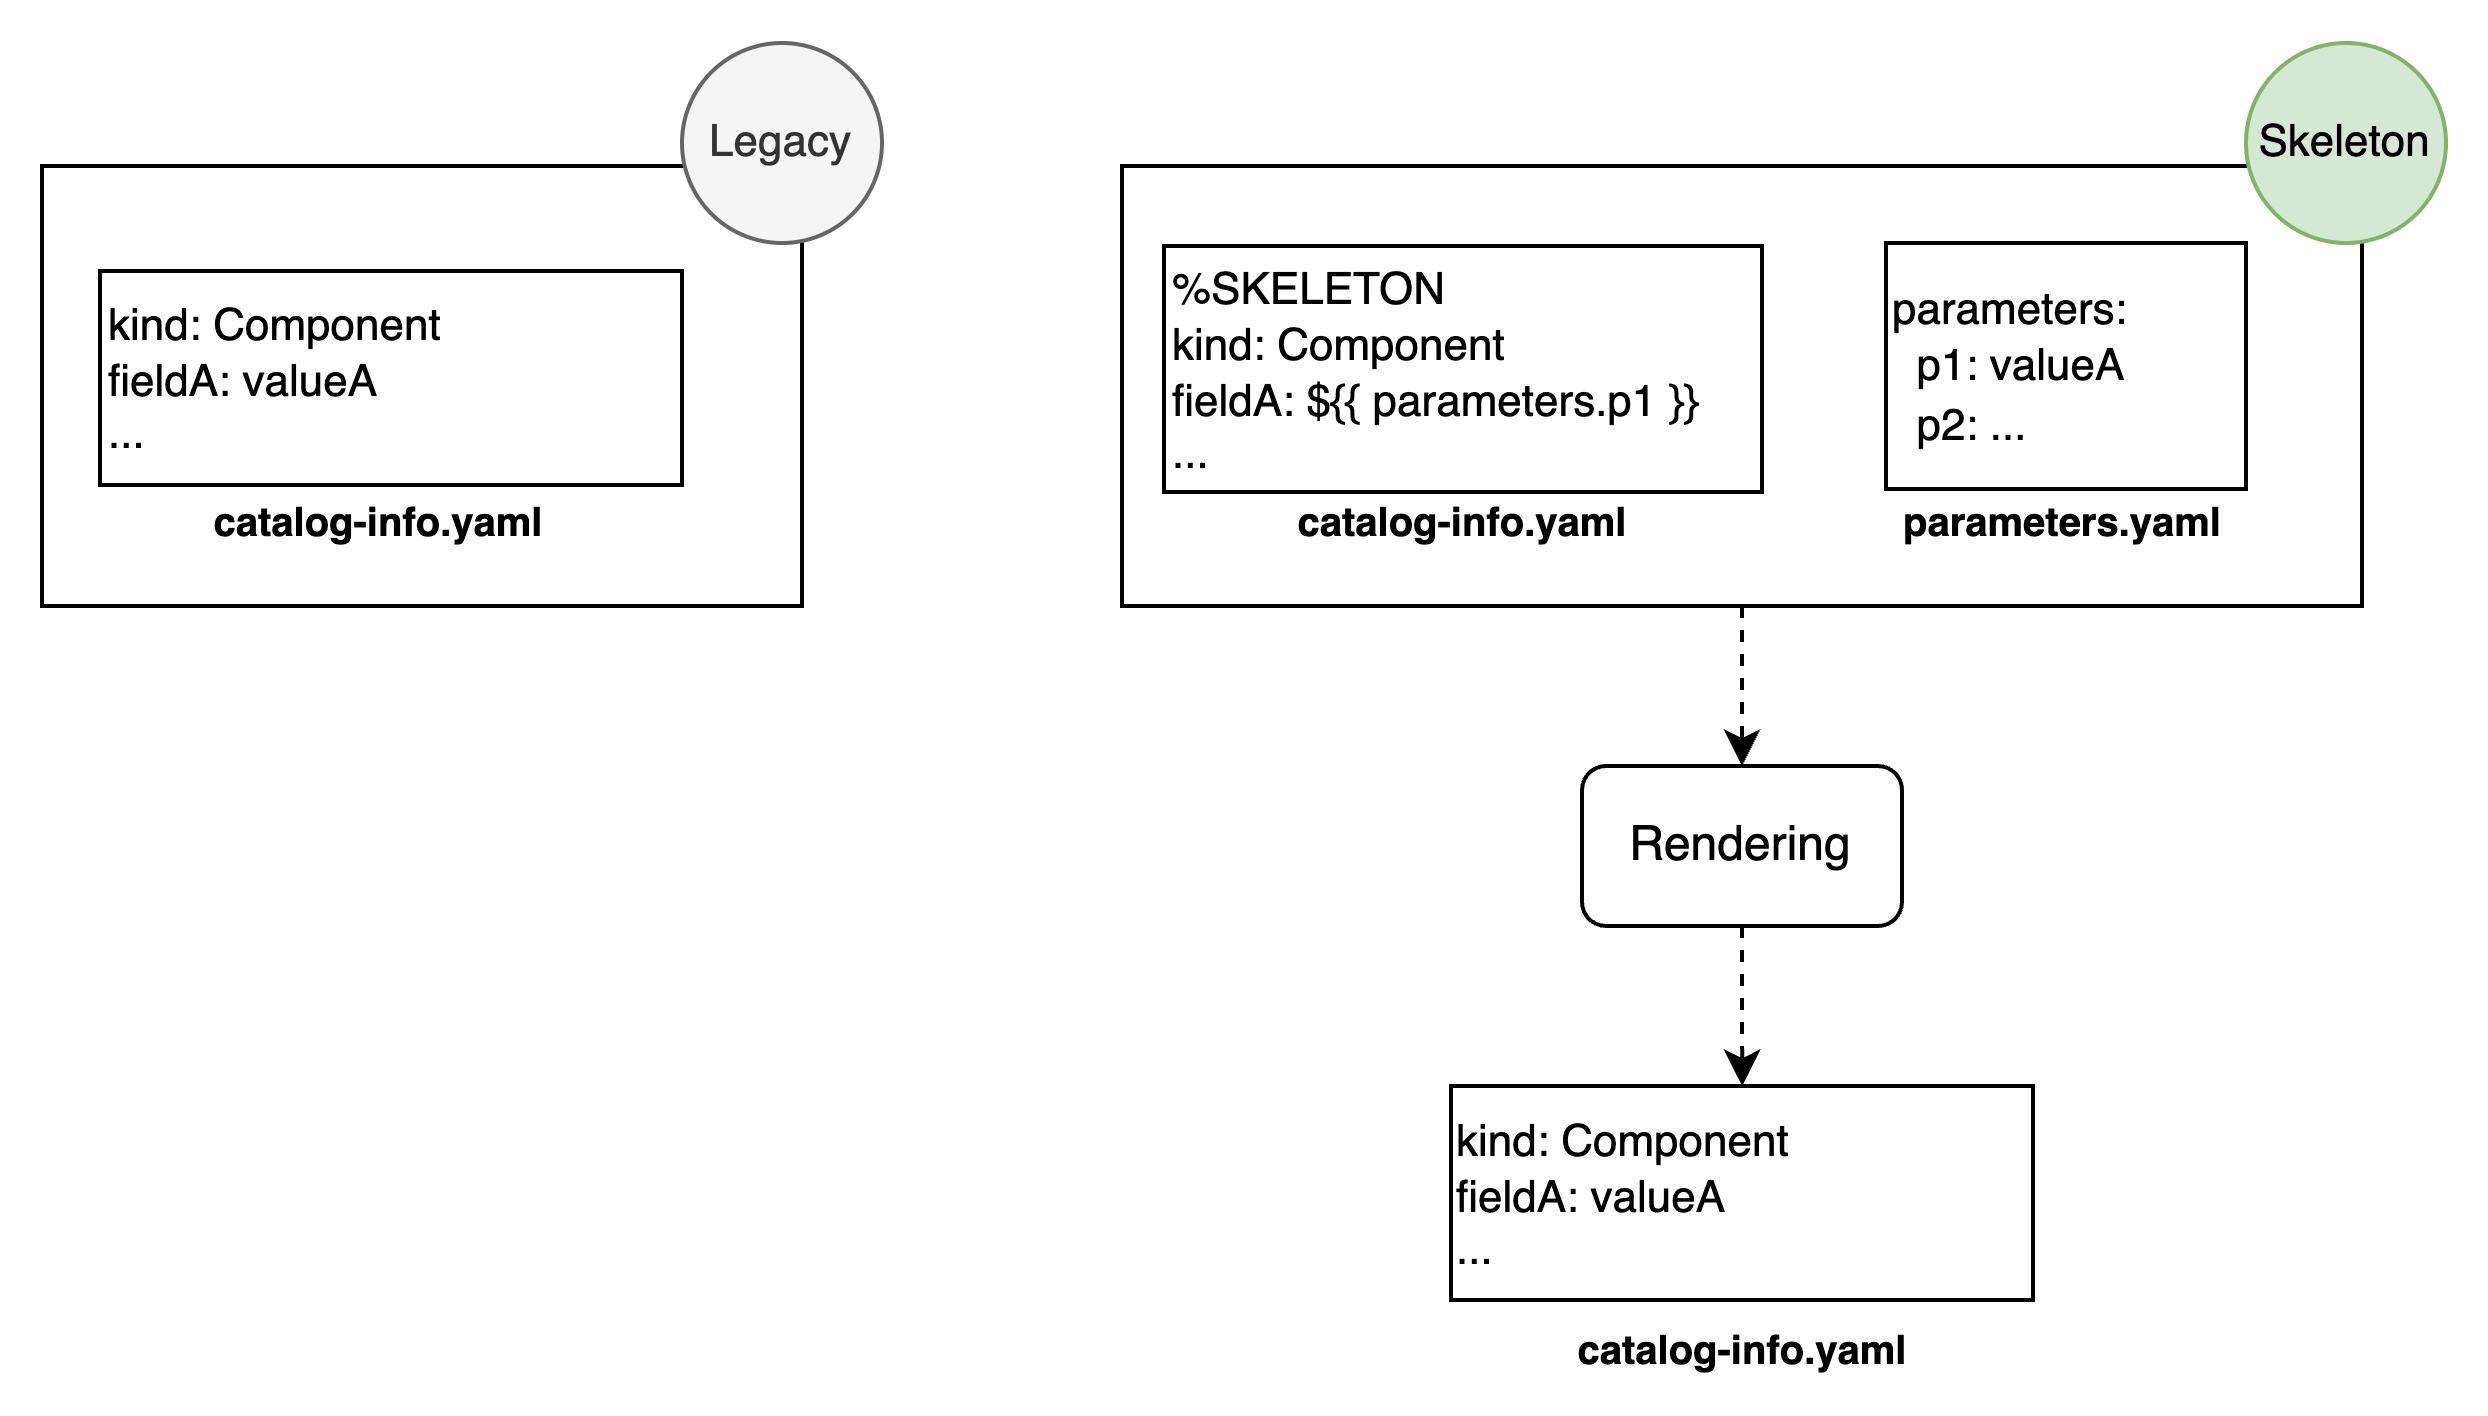
Before Skeleton Entities, systems and components were typically defined using static YAML files stored in a Git repository. For example, a system could be represented by a catalog-info.yaml file like this:
kind: System
metadata:
  name: finance.cashflow.2
  description: This represents all the operating cashflows generating incoming or outgoing liquidity
spec:
  type: dataproduct
  lifecycle: experimental
  owner: group:witboost
  domain: domain:finance
  mesh:
    name: Cash Flow
    version: 2.0.0
    fullyQualifiedName: Liquidity Cash Flows
    maturity: Strategic
As mentioned in the overview, an entity provider would read this file and generate or update the corresponding entity in Witboost.
This approach was the standard way to define systems and components before Witboost 2.3. It remains useful for defining other types of entities such as domains, templates, types, and resources — which are often managed by the Platform Team.
However, systems and components are frequently created and modified by non-technical users who may lack the expertise to edit YAML files directly. To address this, tools like Creation Templates, Editor Wizard, and Reverse Provisioning Wizard offer a more intuitive, graphical way to create and modify entity definitions — without requiring direct interaction with YAML files or repositories. Skeleton Entities allow for improved separation of concerns between structure and data, safer editing through parameter files, and better integration with visual tools.
The benefits of Skeleton Entities
Skeleton Entities were introduced to:
- Provide better integration with Witboost's graphical tools.
- Simplify the workflow for non-technical users.
- Offer greater flexibility and power for technical users who prefer working directly in repositories.
With Skeleton Entities, the repository structure for the entity in our example would now look like this:
catalog-info.yaml (Template / Skeleton)
%SKELETON
kind: System
metadata:
  name: finance.cashflow.2
  description: ${{ parameters.description }}
spec:
  type: dataproduct
  lifecycle: ${{ parameters.lifecycle }}
  owner: group:witboost
  domain: domain:finance
  mesh:
    name: ${{ parameters.displayName }}$
    version: ${{ parameters.version.major }}.${{ parameters.version.minor }}.${{ parameters.version.patch }}$
    fullyQualifiedName: Liquidity ${{ parameters.displayName }}s
    maturity: Strategic
parameters.yaml
parameters:
  description: This represents all the operating cashflows generating incoming or outgoing liquidity
  lifecycle: experimental
  displayName: Cash Flow
  maturity: Strategic
  version:
    major: 2
    minor: 0
    patch: 0
How to define a Skeleton Entity
Defining a skeleton entity is straightforward. Just follow these steps:
- Add the
%SKELETONdirective at the top of thecatalog-info.yamlfile: it's important to keep this directive on the very first line of the file. - Define a
parameters.yamlfile that includes all the parameters required by the skeleton. - Parameterize any values that should be dynamic by using
Nunjuckssyntax (${{ parameters.xxx }}). - Leave static values as they are — not everything needs to be parameterized.
With these steps, the entity's parameters become editable through the Editor Wizard and the Reverse Provisioning Wizard. These tools will never directly modify the skeleton catalog-info.yaml file itself, as they used to with static definitions. Instead, they operate on the parameters.yaml file, ensuring a cleaner and more maintainable workflow.
Learn more about setting up a Creation Template to instantiate a Skeleton Entity in Creating Use Case Templates.
Skeleton vs Legacy Entities
Since Skeleton Entities became the standard for defining systems and components starting with Witboost 2.3, this documentation uses the term Legacy Entities to refer to entities created without the %SKELETON directive — typically before Witboost 2.3 — where all metadata is stored directly in a fully rendered catalog-info.yaml file.
Best Practices and Tips
Escaping
When writing a catalog-info.yaml file for a Skeleton Entity, you're not writing a static YAML file — you're writing a Nunjucks template that gets dynamically rendered into a YAML structure using values from parameters.yaml.
To make this work correctly, especially across different data types, you often need to use Nunjucks filters and control structures. For example:
-
| dumpensures values are correctly serialized into YAML, adding quotes around strings and properly escaping characters like:or#. This is critical to avoid syntax errors when rendering.name: ${{ parameters.name | dump }} -
Loops (
{% for %}) and conditionals ({% if %}) are useful when injecting arrays or optional values:tags: {% if parameters.tags | length > 0 %}{% for tag in parameters.tags %}- tagFQN: ${{ tag }}source: Tag{% endfor %}{% else %}[]{% endif %} -
Filters like
| length,| lower,| default, etc., help with formatting and fallback behavior in the template logic.
Without these expressions, the rendered catalog-info.yaml may:
- Break due to invalid YAML syntax
- Include incorrect values
- Miss optional fields or inject empty structures improperly
Using Nunjucks expressions correctly is what makes Skeleton Entities safe, reusable, and dynamic — especially when paired with form-driven tools like the Editor Wizard or Reverse Provisioning Wizard.
Skeleton Rendering Preview
If you are developing or editing a Skeleton Entity, the Skeleton Rendering Preview tool can help you visualize how your catalog-info.yaml will be rendered using the values from parameters.yaml.
You can use it to:
- Validate your Nunjucks templating
- Quickly test changes without committing to Git
- Spot missing or misnamed parameters
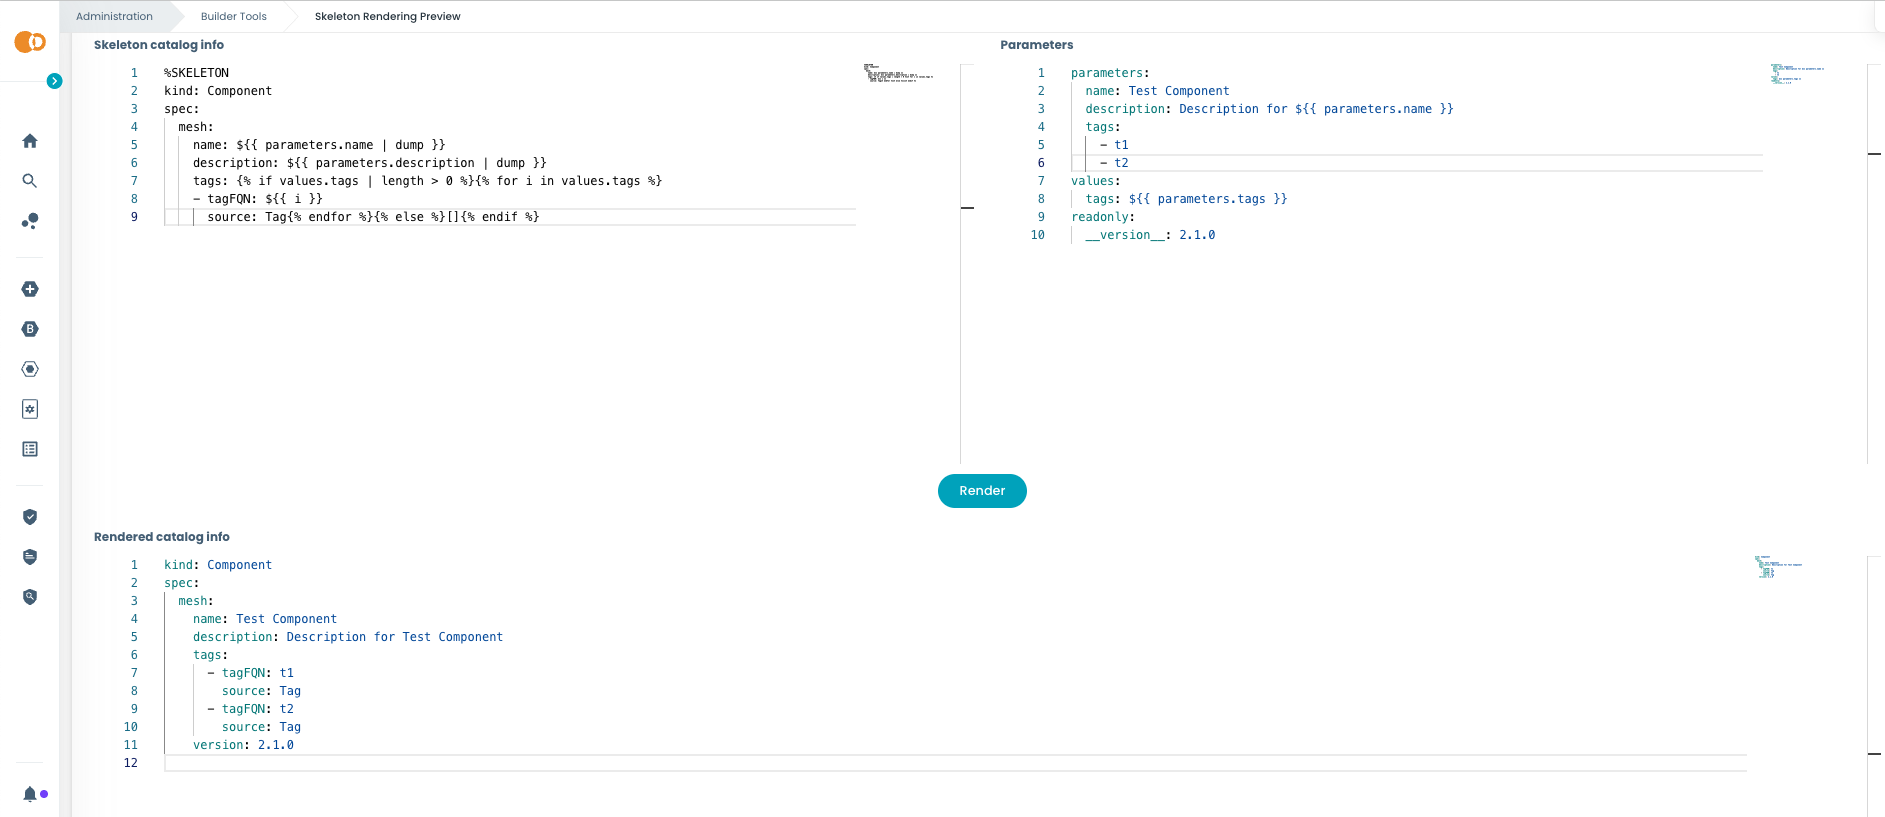
This tool is still in preview and will be better integrated in future releases.
In the meantime, you can try it directly at:
<witboost-url>/platform-settings/builder-tools/skeleton-rendering-preview
Migration
This section provides guidelines for migrating Legacy Entities (systems and components) and related tools to the Skeleton Entity model, which became the standard starting from Witboost 2.3.
From Legacy to Skeleton Entities
Migrating a Legacy Entity to a Skeleton Entity involves:
-
Enabling Skeleton mode:
Add the%SKELETONdirective at the top of the entity'scatalog-info.yamlfile. This activates dynamic rendering and marks the file as Nunjucks template. -
Removing hardcoded values and creating a
parameters.yamlfile:
Replace hardcoded values incatalog-info.yamlwith Nunjucks placeholders that reference parameters — e.g.,${{ parameters.email }}— and move their actual values to a newparameters.yamlfile under theparameters:block.
Learn more in the Skeleton Parameters section.
If your catalog-info.yaml contains a witboost.parameters section, that's a great starting point.
kind: Component
# ...
spec:
  description: A component description (experimental)
  tags:
    - tagFQN: t1
      source: Tag
    - tagFQN: t2
      source: Tag
# ...
witboost:
  parameters:
    lifecycle: experimental
    description: A component description
    tags:
      - t1
      - t2
- Copy its content under
parameters:in the newparameters.yamlfile. - Remove the
witboost.parametersblock fromcatalog-info.yaml.
parameters.yaml
parameters:
  lifecycle: experimental
  description: A component description
  tags:
    - t1
    - t2
The witboost.parameters section was originally generated by the creation template during instantiation.
To make migration easier, inspect the creation template's repository and open skeleton/catalog-info.yaml.
This is the original template (with Nunjucks syntax) from which your entity's catalog-info was rendered.
skeleton/catalog-info.yaml
kind: Component
# ...
spec:
  description: ${{ values.description | dump }}
  tags: {% if values.tags | length > 0 %}{% for i in values.tags %}
    - tagFQN: ${{ i }}
      source: Tag{% endfor %}{% else %}[]{% endif %}
# ...
You'll likely see references to values.<key> — these come from template.yaml > spec.steps[template].values.
template.yaml
kind: Template
# ...
spec:
  parameters:
    - title: Metadata
      properties:
        lifecycle: # parameters.lifecycle
          title: Lifecycle
          type: string
        description: # parameters.description
          title: Description
          type: string
        tags: # parameters.tags
          title: Tags
          type: array
          default: []
          items:
            type: string
        # ...
  steps:
    - id: template
      name: Fetch Skeleton + Template
      action: fetch:template
      input:
        url: ./skeleton
        targetPath: .
        values:
          description: '${{ parameters.description }} (${{ parameters.lifecycle }})' # values.description
          tags: ${{ parameters.tags }} # values.tags
          # ...
You now have two options:
-
Replace each value with its expression when copying the content of
skeleton/catalog-info.yamlin your entity'scatalog-info.yaml, so that only parameters are left:%SKELETONkind: Component# ...spec:description: "${{ parameters.description | dump }} (${{ parameters.lifecycle | dump }})"tags: {% if parameters.tags | length > 0 %}{% for i in parameters.tags %}- tagFQN: ${{ i }}source: Tag{% endfor %}{% else %}[]{% endif %}# ... -
Or, copy the value definitions into the
values:section of yourparameters.yaml:catalog-info.yaml%SKELETONkind: Component# ...spec:description: ${{ values.description | dump }}tags: {% if values.tags | length > 0 %}{% for i in values.tags %}- tagFQN: ${{ i }}source: Tag{% endfor %}{% else %}[]{% endif %}# ...parameters.yamlparameters:lifecycle: experimentaldescription: A component descriptiontags:- t1- t2values:description: '${{ parameters.description }} (${{ parameters.lifecycle }})'tags: ${{ parameters.tags }}
Creation Templates
To make a Creation template generate a Skeleton Entity, simply add the %SKELETON directive at the very top of the catalog-info.yaml file located in the template's skeleton folder.
This instructs Witboost to create the entity by:
- Copying the
catalog-info.yamlfile as-is, preserving its Nunjucks expressions. - Generate a
parameters.yamlfile containing:- User-provided inputs defined under
spec.parametersintemplate.yaml. - Values from
spec.steps[template].values.
- User-provided inputs defined under
Together, these files make the entity fully compatible with the Skeleton Entity model.
Learn more in Creating Use Case Templates.
Edit Templates
During the migration from Legacy Entities to Skeleton Entities, it's important to also understand how Edit Templates are affected — especially since v2 edit templates have been introduced and may behave differently from the v1 templates.
As your witboost entities evolve, it's likely that you'll end up with a mix of Legacy and Skeleton Entities in the same installation. This is expected and supported — but it's important to use the right type of Edit Template for each case.
For complete details about v1 and v2 Edit Templates, how they work and their compatibility settings refer to the Edit Templates section.
Key Differences: v1 vs v2 Edit Templates
| Feature | v1 Edit Template | v2 Edit Template |
|---|---|---|
| Default entity support | Legacy Entities | Skeleton Entities |
| Skeleton Entities support | ✅ Supported by default (with a UI warning) | ✅ Supported by default |
| Legacy Entities support | ✅ Supported by default | ❌ Not supported unless explicitly enabled |
Steps (spec.steps) in edit-template.yaml | Required (ignored for Skeleton Entities) | Optional (but required for Legacy compatibility) |
Needs edit-skeleton/ folder | ✅ Always required (ignored for Skeletons) | ❌ Not required (unless Legacy support is enabled) |
| Where it writes | catalog-info.yaml (Legacy)parameters.yaml (Skeleton) | catalog-info.yaml (Legacy)parameters.yaml (Skeleton) |
| Best used for | Legacy entities | Skeleton entities |
How v1 Templates Work
- Designed for Legacy Entities, where metadata is edited directly in
catalog-info.yamlvia anedit-skeletonfolder. - When used on a Skeleton Entity, they:
- By default support it — no config needed.
- Ignore the
edit-skeletonfolder. - Edit the
parameters.yamlfile instead. - Show a "compatibility warning" in the Editor Wizard (informing the user they're using a
v1template on a Skeleton Entity).
If you want to avoid that warning, consider switching to a v2 template or disable it through the compatibility options.
How v2 Templates Work
- Designed for Skeleton Entities — editing happens only in the
parameters.yamlfile. spec.stepsinedit-template.yamlis not needed, and there's no need for anedit-skeletonfolder.
If you want to also support Legacy Entities with a v2 template:
spec:
  compatibility:
    legacyEntities:
      executionPolicy: ALLOWED
(edit-template.yaml)
But in that case:
- You must provide both
spec.stepsand anedit-skeleton/folder (used only for Legacy Entities). - When editing a Skeleton Entity, those sections are still ignored — only
parameters.yamlis used.
Reverse Provisioning Templates and Tech Adapters
When migrating from Legacy to Skeleton Entities, Reverse Provisioning Templates and Tech Adapters may need adjustments.
What changes with Skeleton Entities?
- Skeleton Entities store editable data in
parameters.yamlinstead of directly incatalog-info.yaml. - Reverse Provisioning still works, but the way updates are applied is different.
If you're using a v1 (legacy) Reverse Provisioning Template
- ✅ Legacy Entities: work as usual — updates go directly to
catalog-info.yaml. - ✅ Skeleton Entities: supported by default, but:
- The user will see a warning in the Reverse Provisioning Wizard (it can be disabled).
- You may need to configure a field mapping (
pathToParameterMap) to translate updates to catalog-info paths into parameters updates — see here. - Updates to catalog-info paths
witboost.parameters.<key>are auto-mapped — no config needed.
If you're using a v2 Reverse Provisioning Template (newer, recommended)
- ✅ Skeleton Entities: supported natively. No mapping needed. Updates go directly into
parameters.yaml. - ❌ Legacy Entities: not supported unless you enable it in
reverse-provisioning-template.yaml:
spec:
  compatibility:
    legacyEntities:
      executionPolicy: ALLOWED
If backward compatibility is enabled, the tech adapter must be able to differentiate between Legacy and Skeleton Entities when a Reverse Provisioning request is received. This can be done thanks to new information included in the request. On Legacy Entities, it must return updates in dot-path notation (like spec.mesh.email) to be applied to catalog-info.yaml, while Skeleton Entities expect updates to parameters.yaml.
More info:
Template Selection Logic (Edit & Reverse Provisioning)
When more than one template is associated with an entity's useCaseTemplateId, Witboost automatically selects the highest supported version.
v2templates always take priority overv1templates when both are applicable.- If a
v2template is not compatible with the entity (e.g., a legacy entity andv2does not allow it), Witboost falls back to av1template — if available and compatible.
This logic applies the same way to:
- Edit Templates
- Reverse Provisioning Templates
| Entity Type | Templates Available | Selected Template | Notes |
|---|---|---|---|
| Legacy | ✅ v1 ✅ v2 (with legacy support) | ✅ v2 | v2 wins because it's compatible and higher version |
| Legacy | ✅ v1 ❌ v2 (not compatible) | ✅ v1 | Falls back to v1 since v2 has legacyEntities: NOT_ALLOWED |
| Skeleton | ✅ v1 ✅ v2 | ✅ v2 | v2 wins by version; no compatibility config needed |
| Skeleton | ✅ v1 (with skeleton support) | ✅ v1 | Only v1 is available |
| Skeleton | ❌ v1 (NOT_ALLOWED) | 🚫 None | No compatible templates; operation is disabled |
✅ Template available and compatible ❌ Template available but not compatible
Q&A
💬 What happens if I don't migrate my legacy entities?
Nothing breaks — they'll continue to work as-is using v1 templates.
However, you'll miss out on:
- Cleaner editing via
parameters.yaml - Better future-proofing with
v2support - Easier reuse of Creation, Edit, and Reverse Provisioning templates
- Improved user experience — for example, the comparison page in the Editor Wizard and Reverse Provisioning Wizard, when editing Skeleton Entities, displays a comparison between the current and updated descriptors of the entity, instead of comparing the catalog-info content as on Legacy entities. This is a big help for users who are familiar with the descriptor structure — and only care about how it evolves after the operation — but not with the catalog-info:

You can migrate gradually — Legacy and Skeleton entities can safely coexist, even in the same data project (e.g., components of the same Data Product, some defined as Skeleton entities and others as Legacy).
💬 Do I need to update my tech adapters for Reverse Provisioning?
Not immediately. As outlined above, you can work on Reverse Provisioning Templates to configure forward-compatibility options with Skeleton Entities, without having to change a single line of code in the Tech Adapter.
💬 What happens if multiple Edit or Reverse Provisioning templates match an entity?
Witboost chooses the most recent and compatible template:
- ✅
v2wins if it's compatible with the entity - 🔁 If not, falls back to
v1— if allowed - 🚫 If no compatible template is found, the wizard will be disabled
See the full selection table above.
💬 Can I keep using v1 Edit and Reverse Provisioning templates for everything?
Yes, but:
- By default, you'll get warnings when using them on Skeleton Entities
- They require extra config to support both entity types
- Long term,
v2will offer more flexibility and better integration