Provisioning
This section will try to dig deeper into the deployment functionalities, by covering corner cases and by displaying all the advanced features.
Deployment Status
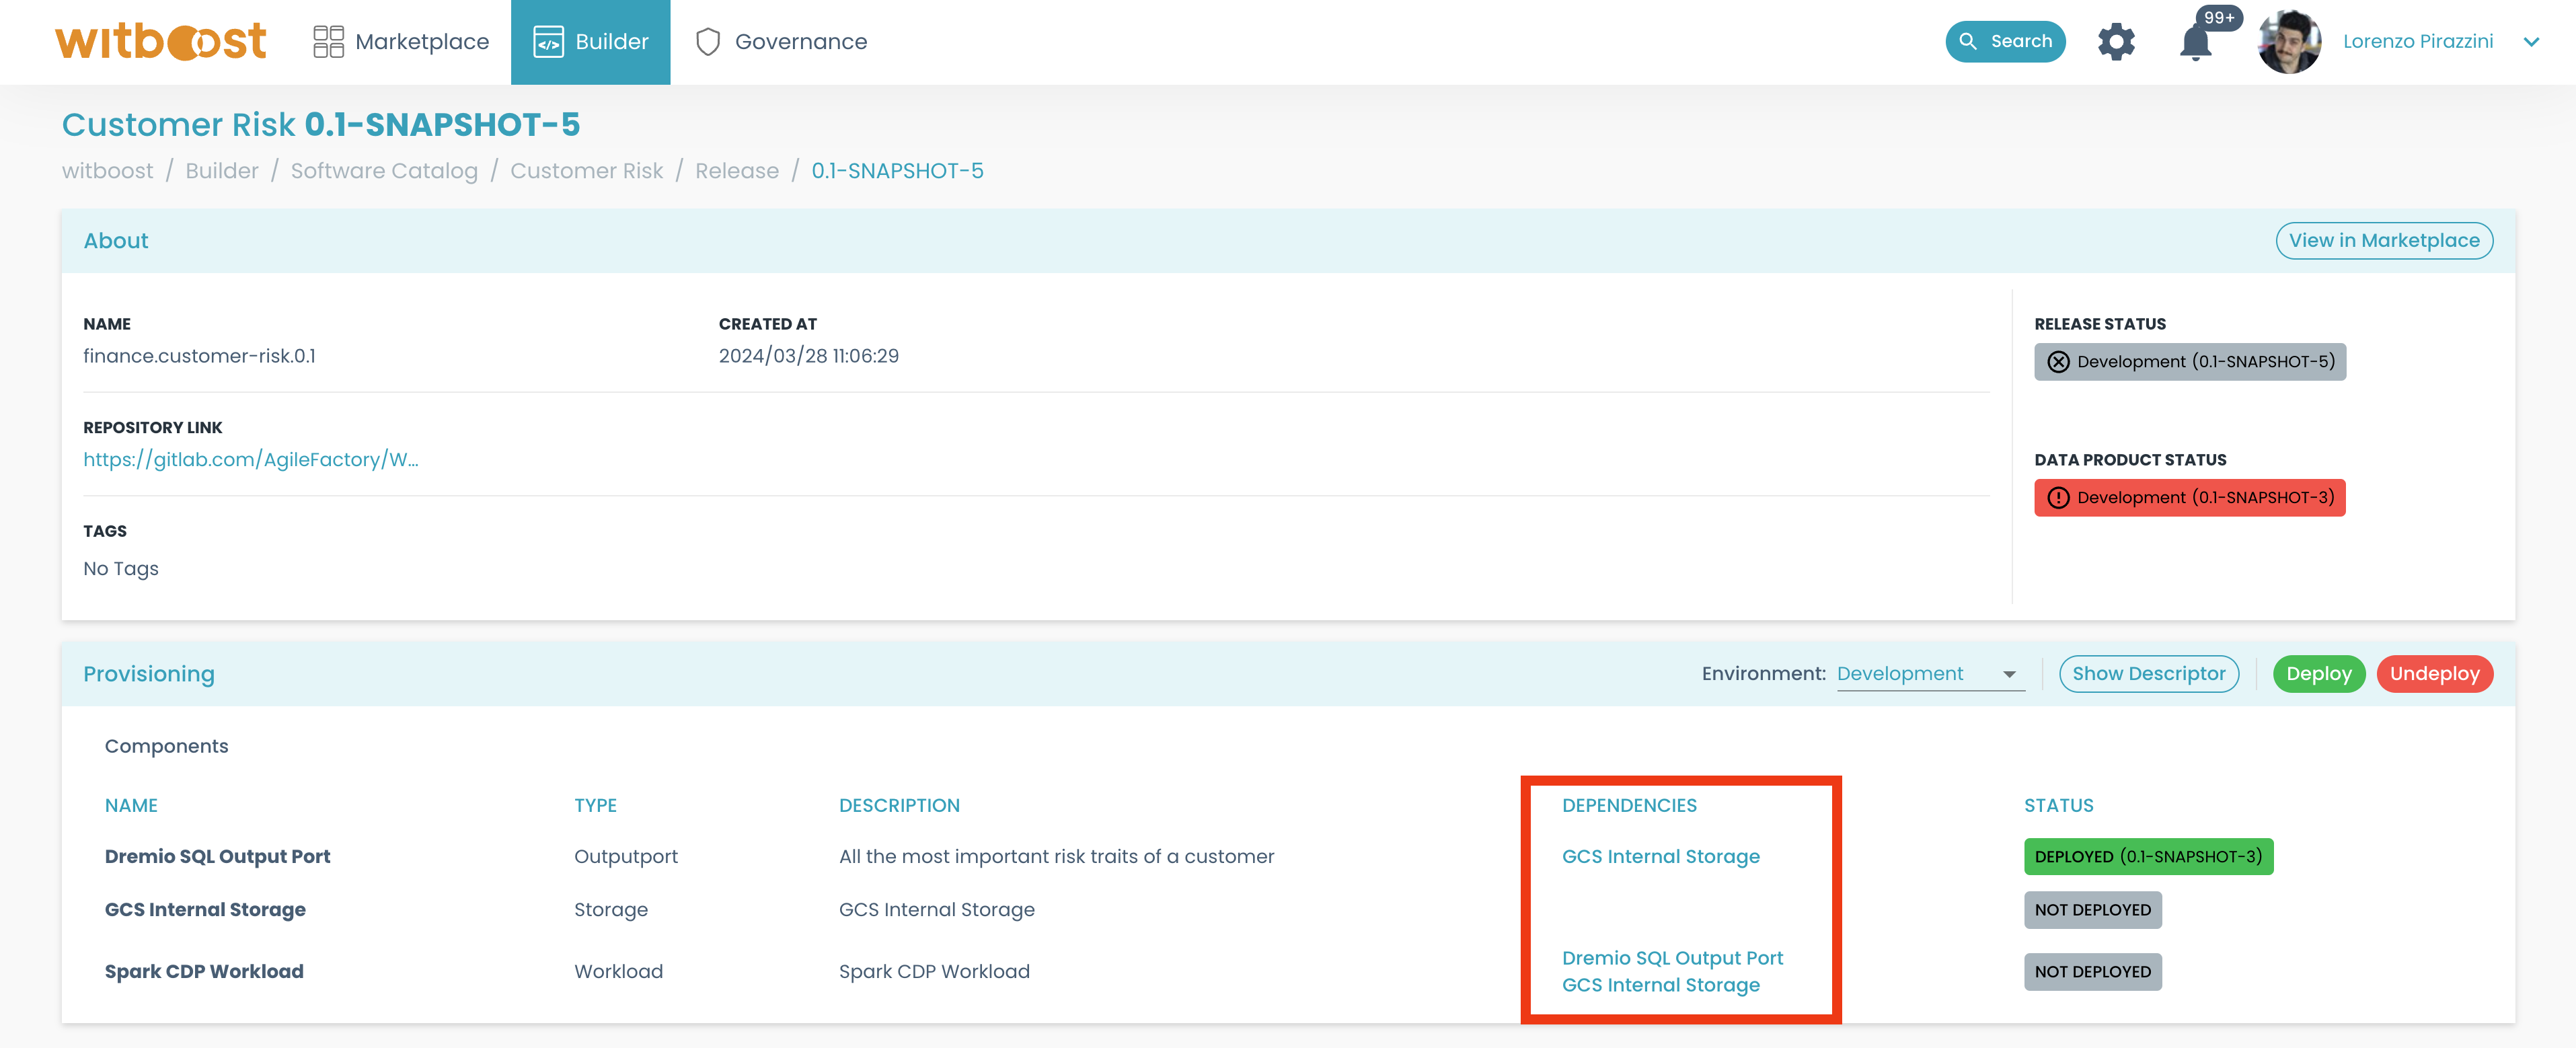
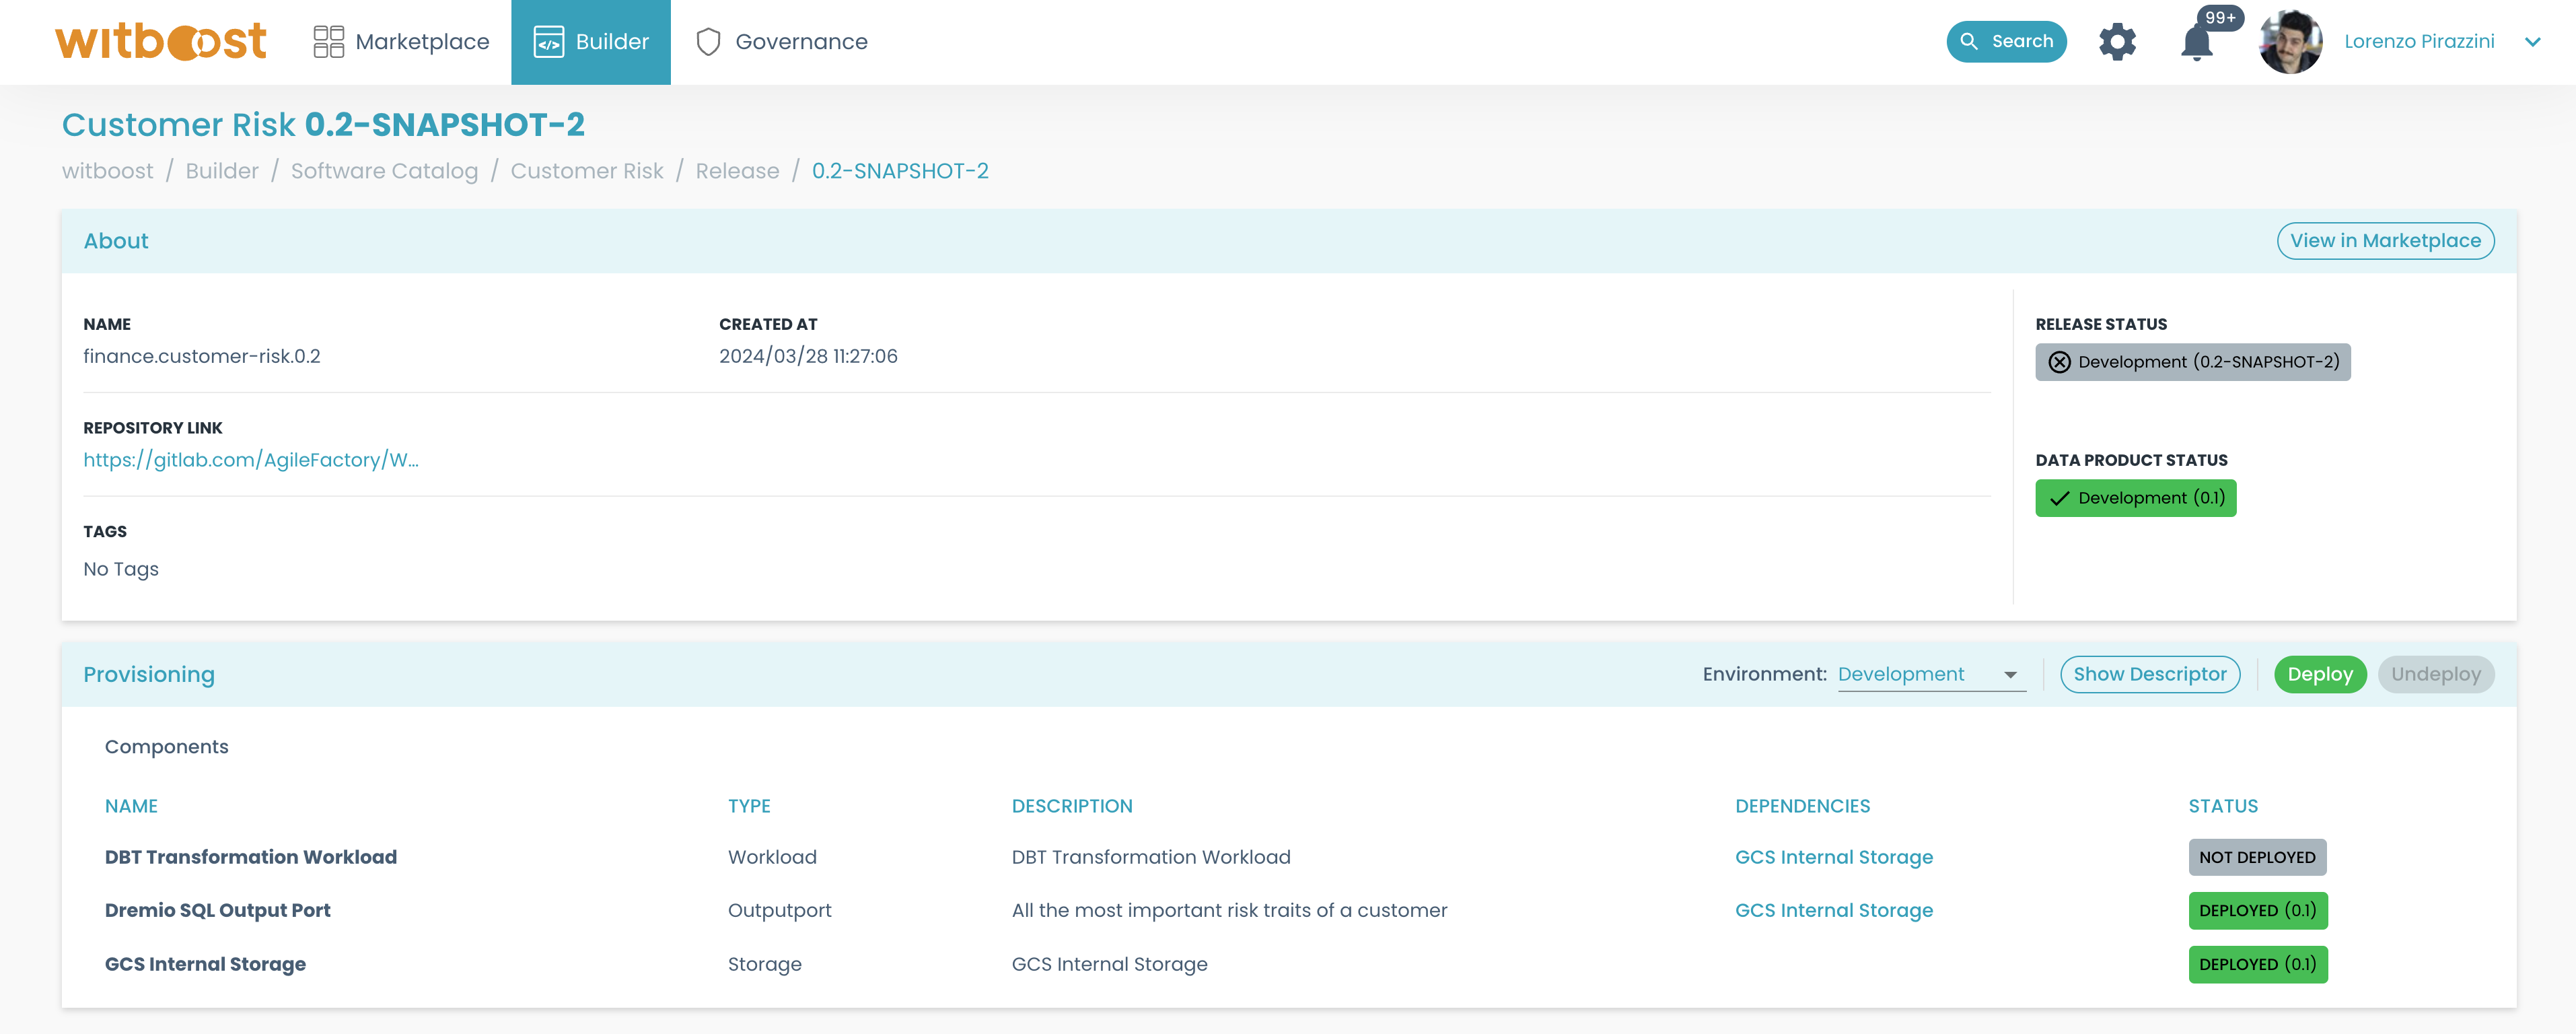
When you open the release detail page, in the upper section, on the right, you can see a summary of the statuses:
- the
RELEASE STATUSrepresents the status of the release for the selected environment; - the
DATA PRODUCT STATUSrepresents the current status of the Data Product for the selected environment.
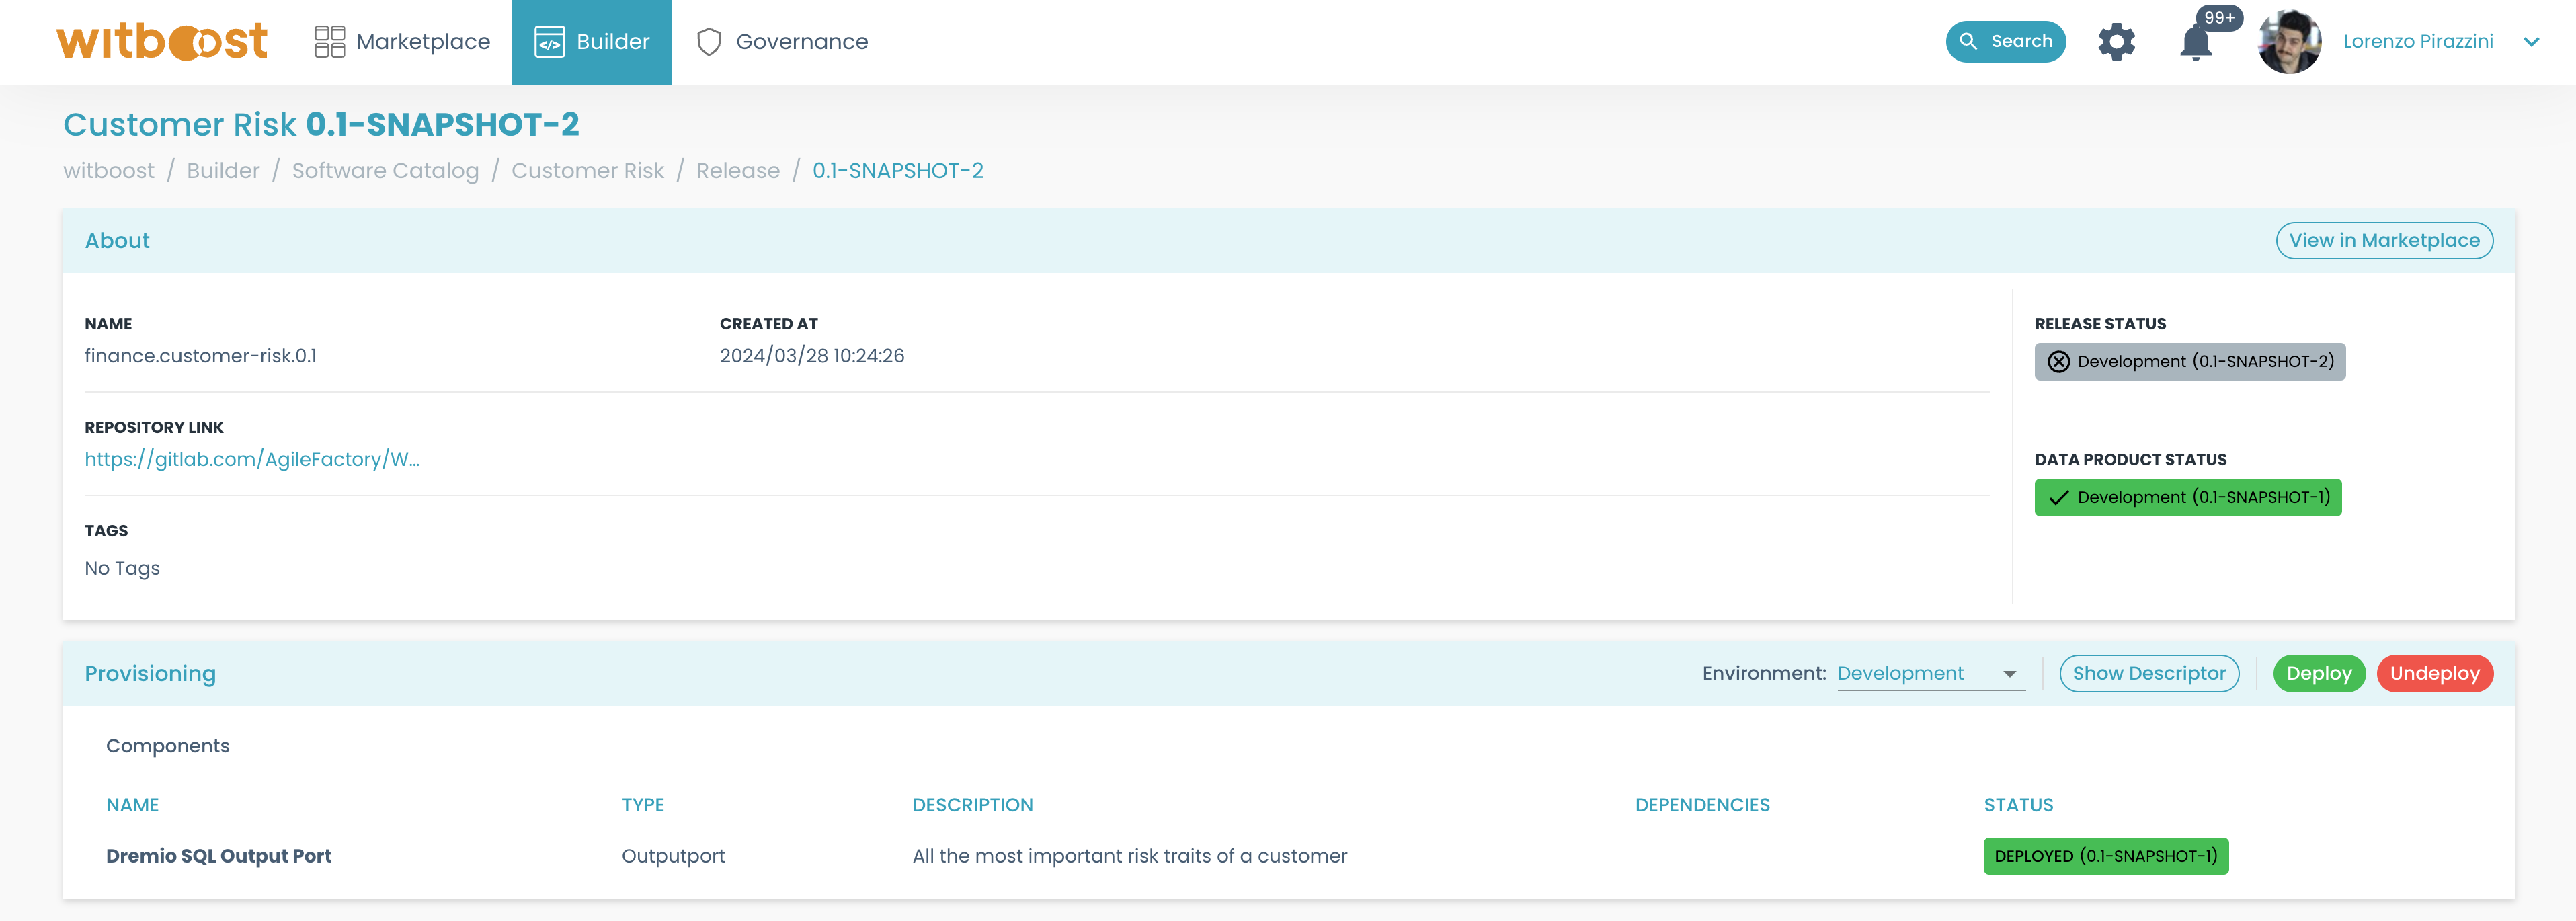
So, a release may be not deployed for an environment, but the Data Product is currently deployed with another release on the same environment. In this section, the status contains the indication of the release for which the status is displayed.
In the example above, the draft release 0.1-SNAPSHOT-2 is not deployed in the development environment, so its status is NOT DEPLOYED. At the same time, the currently deployed release in the development environment is the draft release 0.1-SNAPSHOT-1, hence the data product's status is DEPLOYED.
In case the release is the one currently deployed for the selected environment, the Data Product status is not shown.
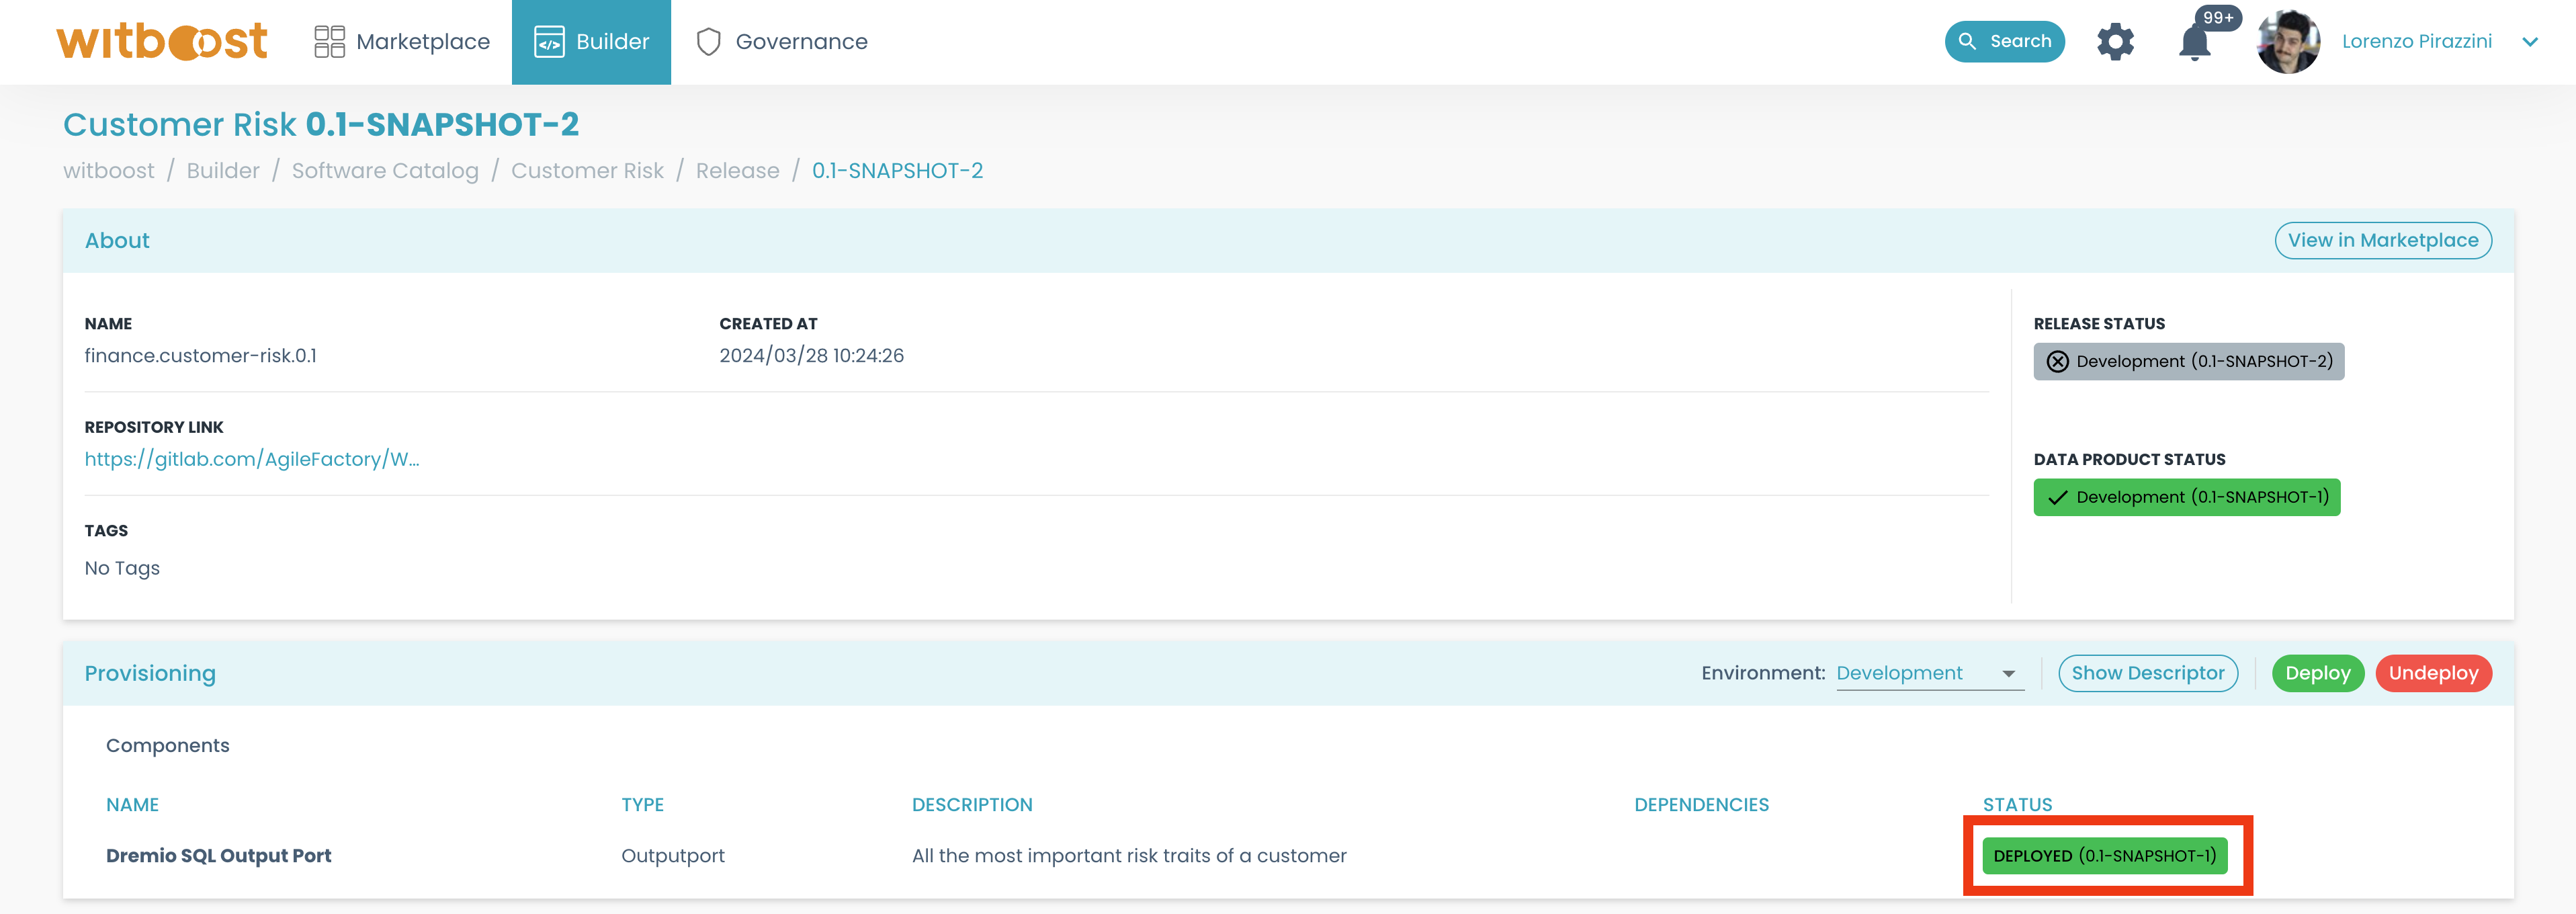
In the Provisioning card, all the components belonging to the Data Product's release are listed, and for each one of them, its current status for the selected environment is shown. Since the currently deployed components may belong to different releases, for each status the deployed release is reported.
Changing the selected environment changes all the current statuses displayed on the page.
Deployment Failures
In case at least one step of the deployment operation fails, the deployment is marked as failed and the Data Product status for that environment is corrupted
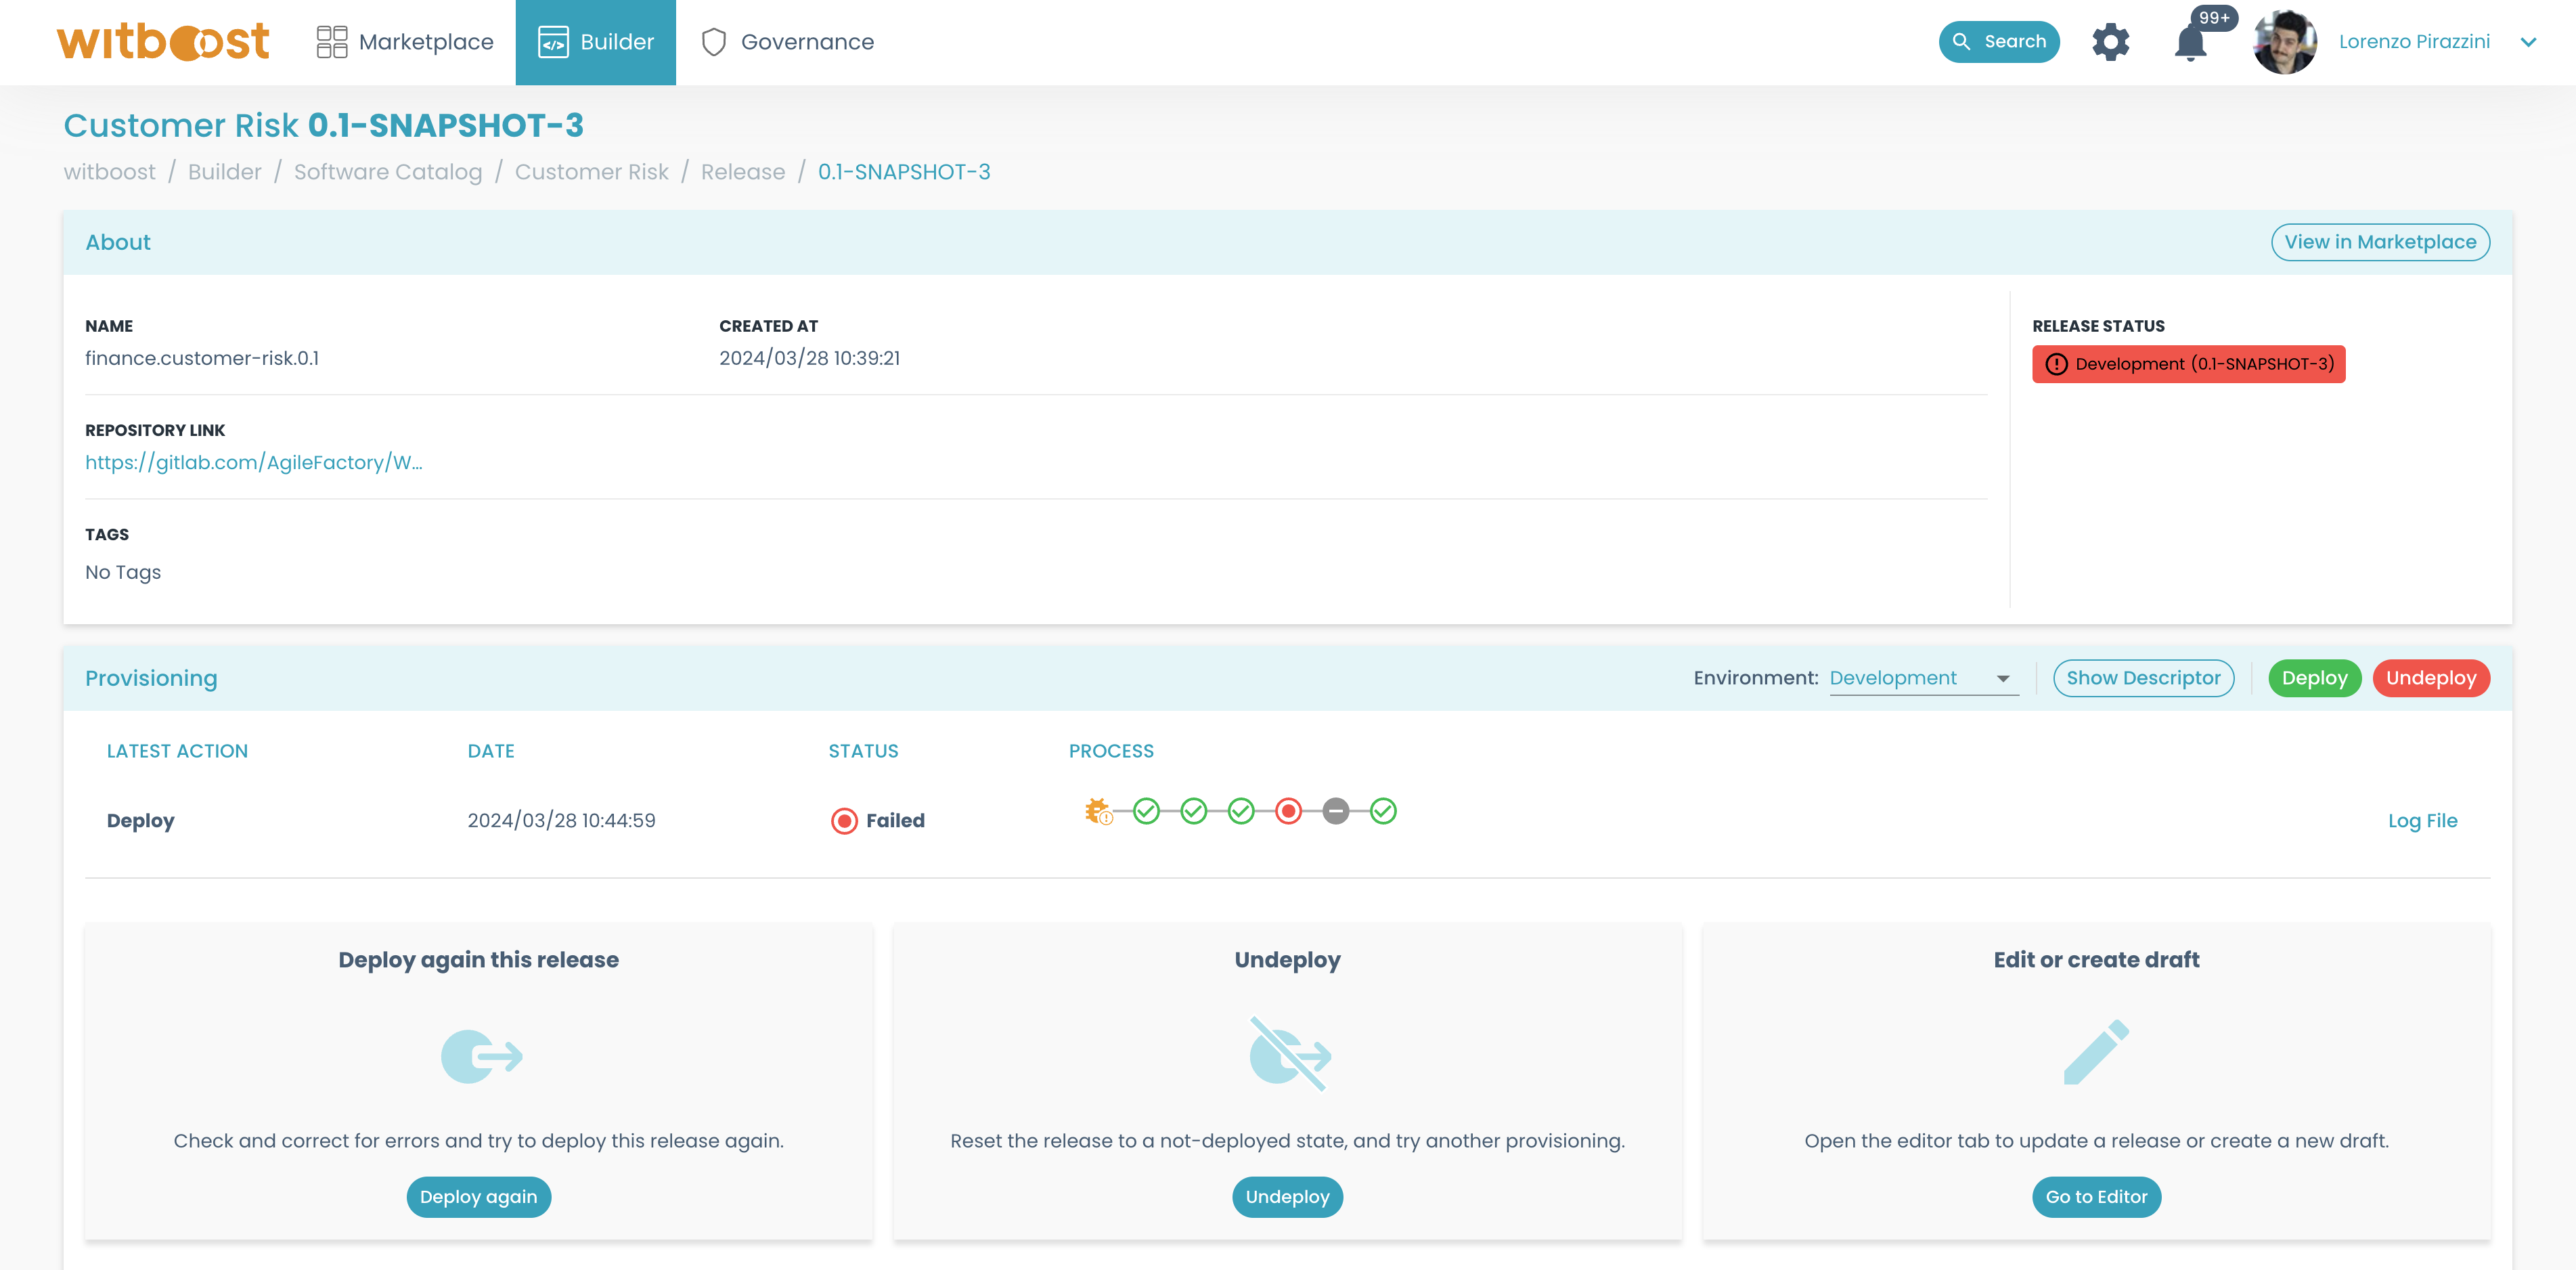
In the Provisioning card, you can see the latest action performed, with the red circles representing the steps that failed

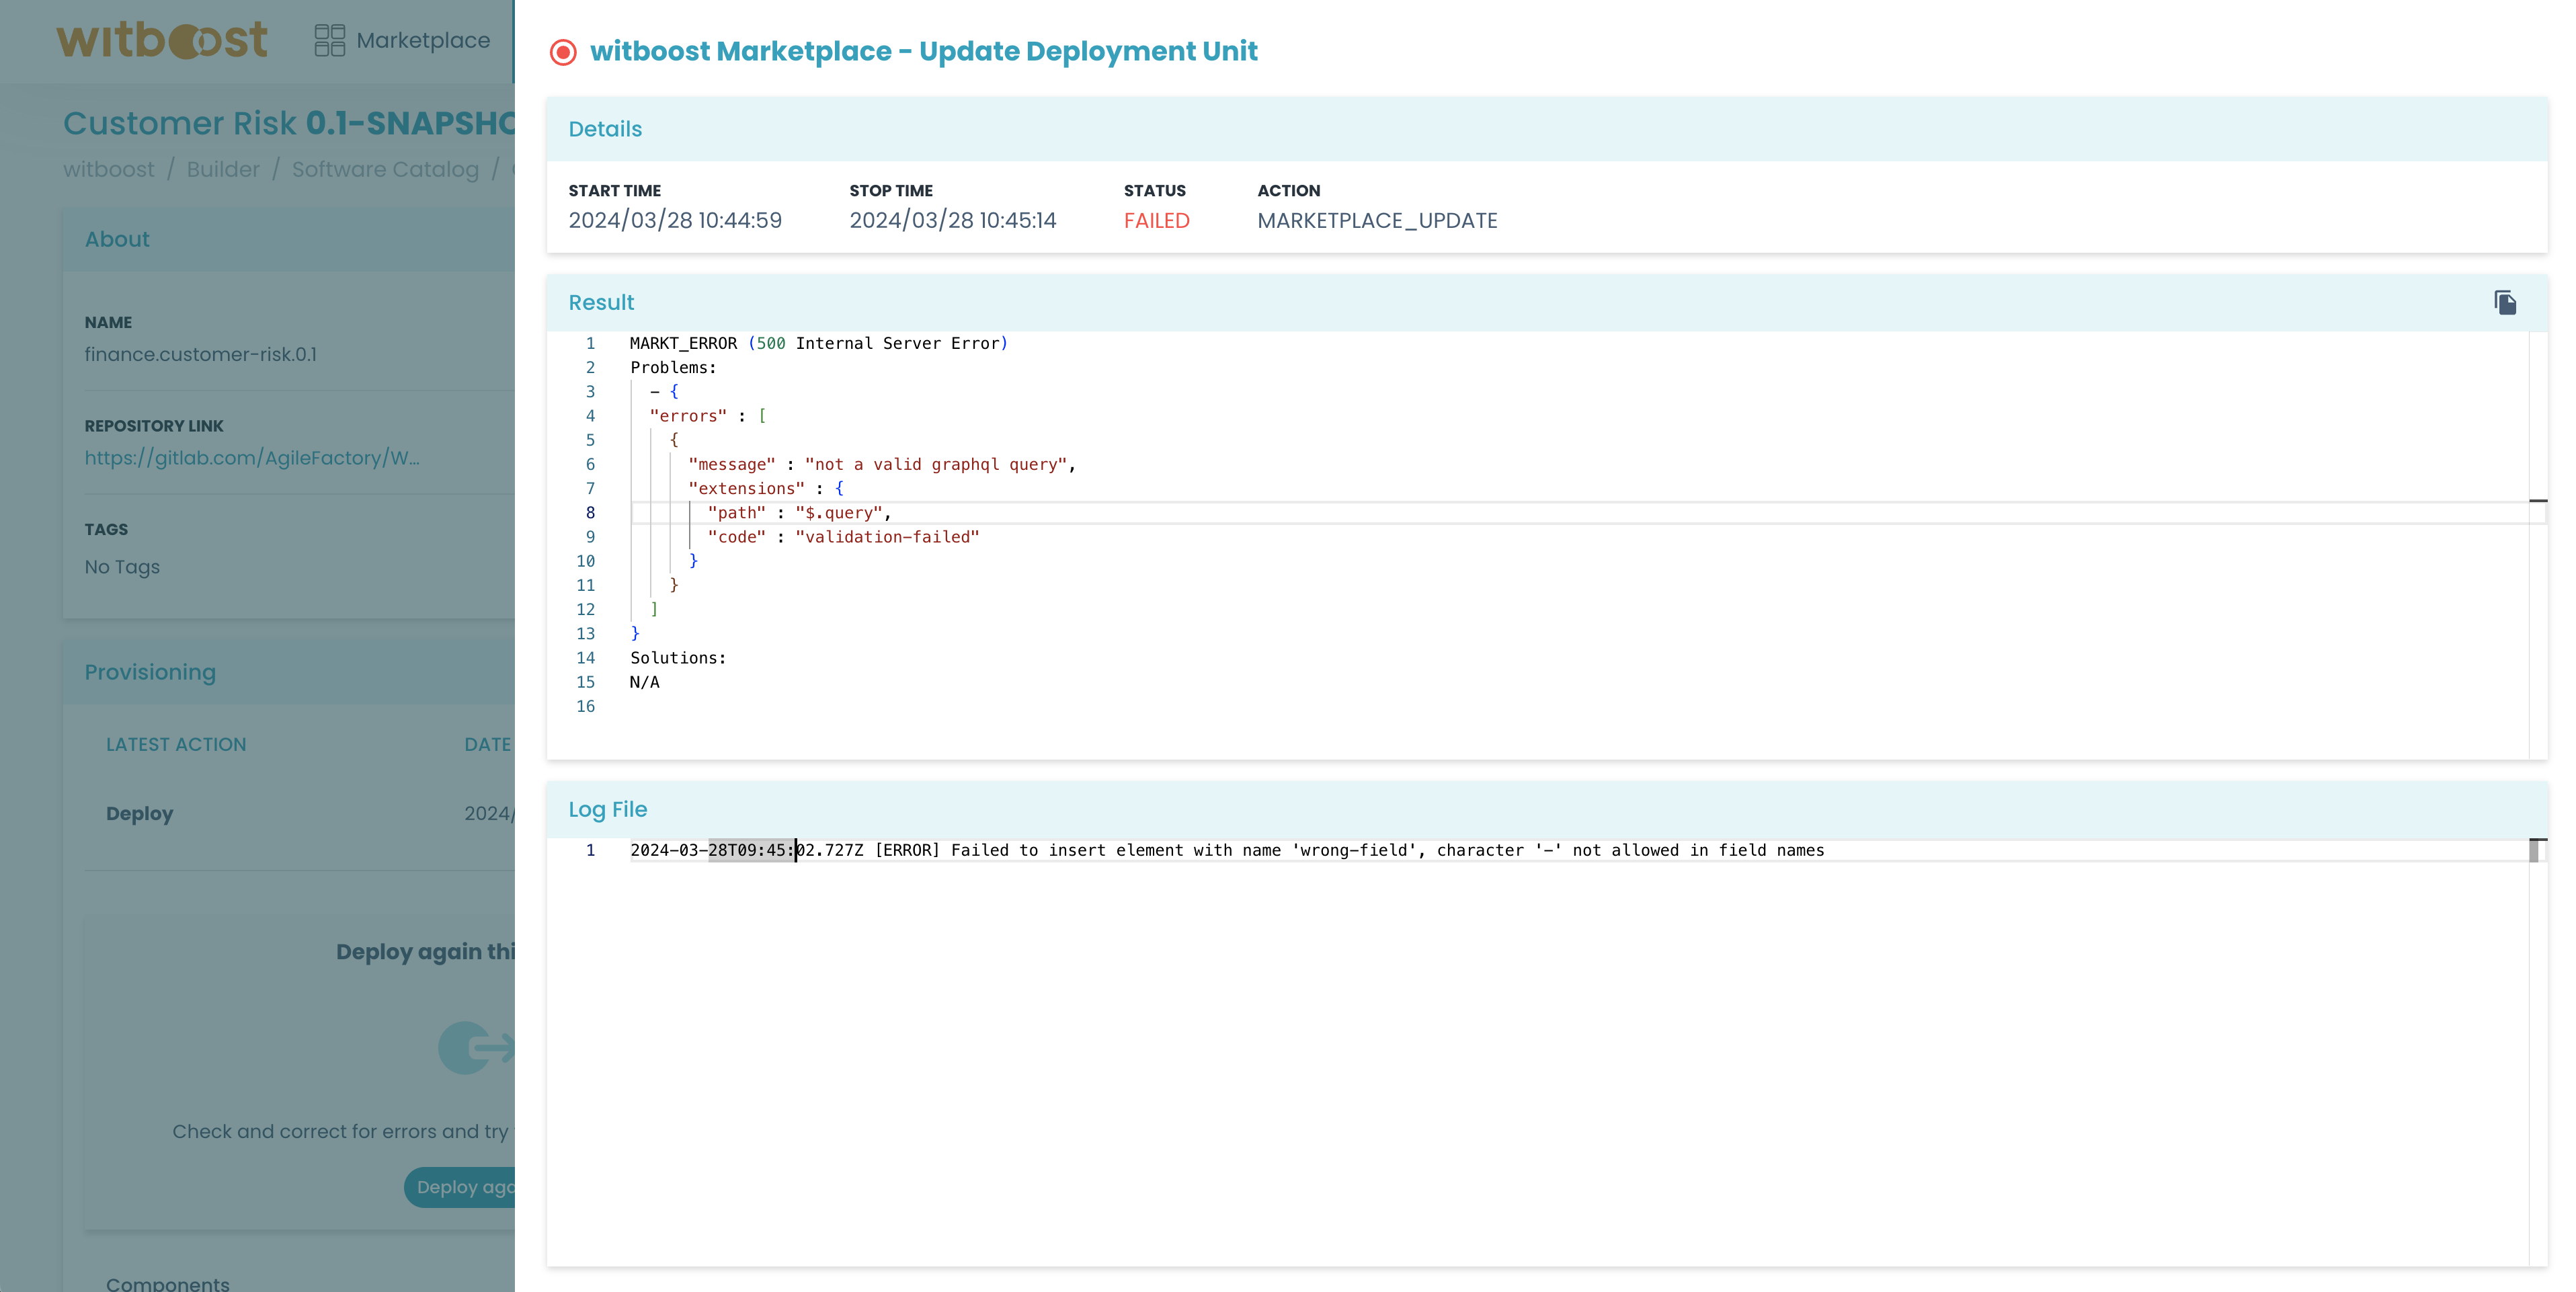
Clicking on a failed step will open a drawer with the error that made it fail, and the logs if any
Once you understand what problem caused the failure, you can check the current status of the components: for example, you could have some components already successfully deployed, some in a failed state, and some components not yet deployed
To simplify the resolution of this corrupted status, there are three labels with suggestions over how you could approach the failure:
- You can try the deployment of the release again. This could be beneficial in case there was an external error (like a connection interruption) that was addressed outside Witboost. After resolving it, you can try again the deployment and see if it succeeds.
- You can go back to the editor and make some changes. This is the most common situation: you forgot to define some fields in the descriptor and the deployment failed. Now you can just go back to the editor and add the missing details.
- You can undeploy the release. This will remove everything that is currently deployed for this environment. This is a solution in case you want to delete the already deployed components and start over from a clean situation.

There is no limit to the number of deploy/undeploy operations you can perform. So, don't worry if a deployment fails, just fix the problems and deploy it again.
Deployment Preview
If you need more control over the deployment operation, you can click on the Deploy button on the release details page.
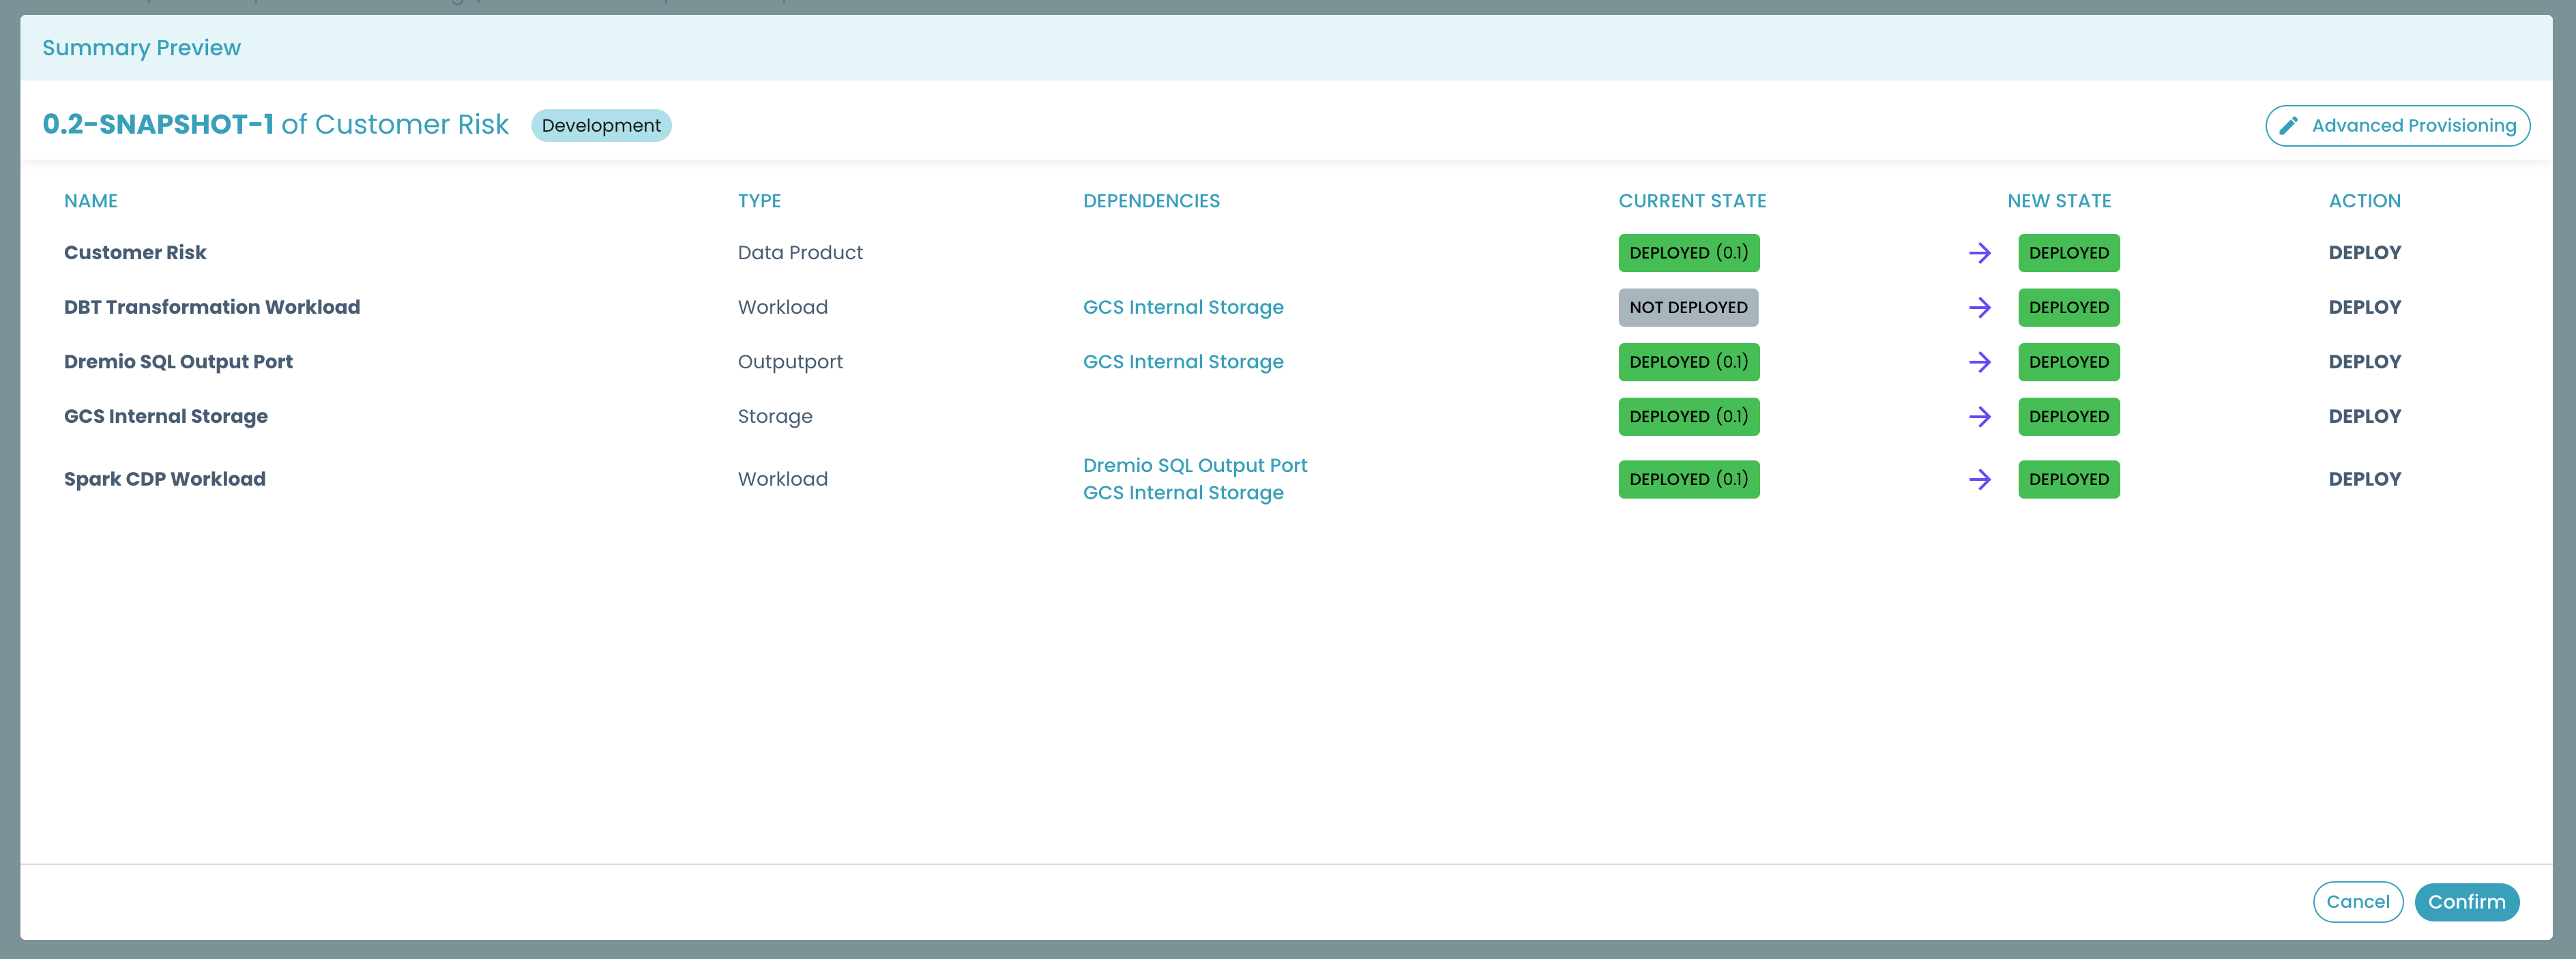
When clicking on the Deploy button, a modal will show you all the operations that will be performed on the target environment
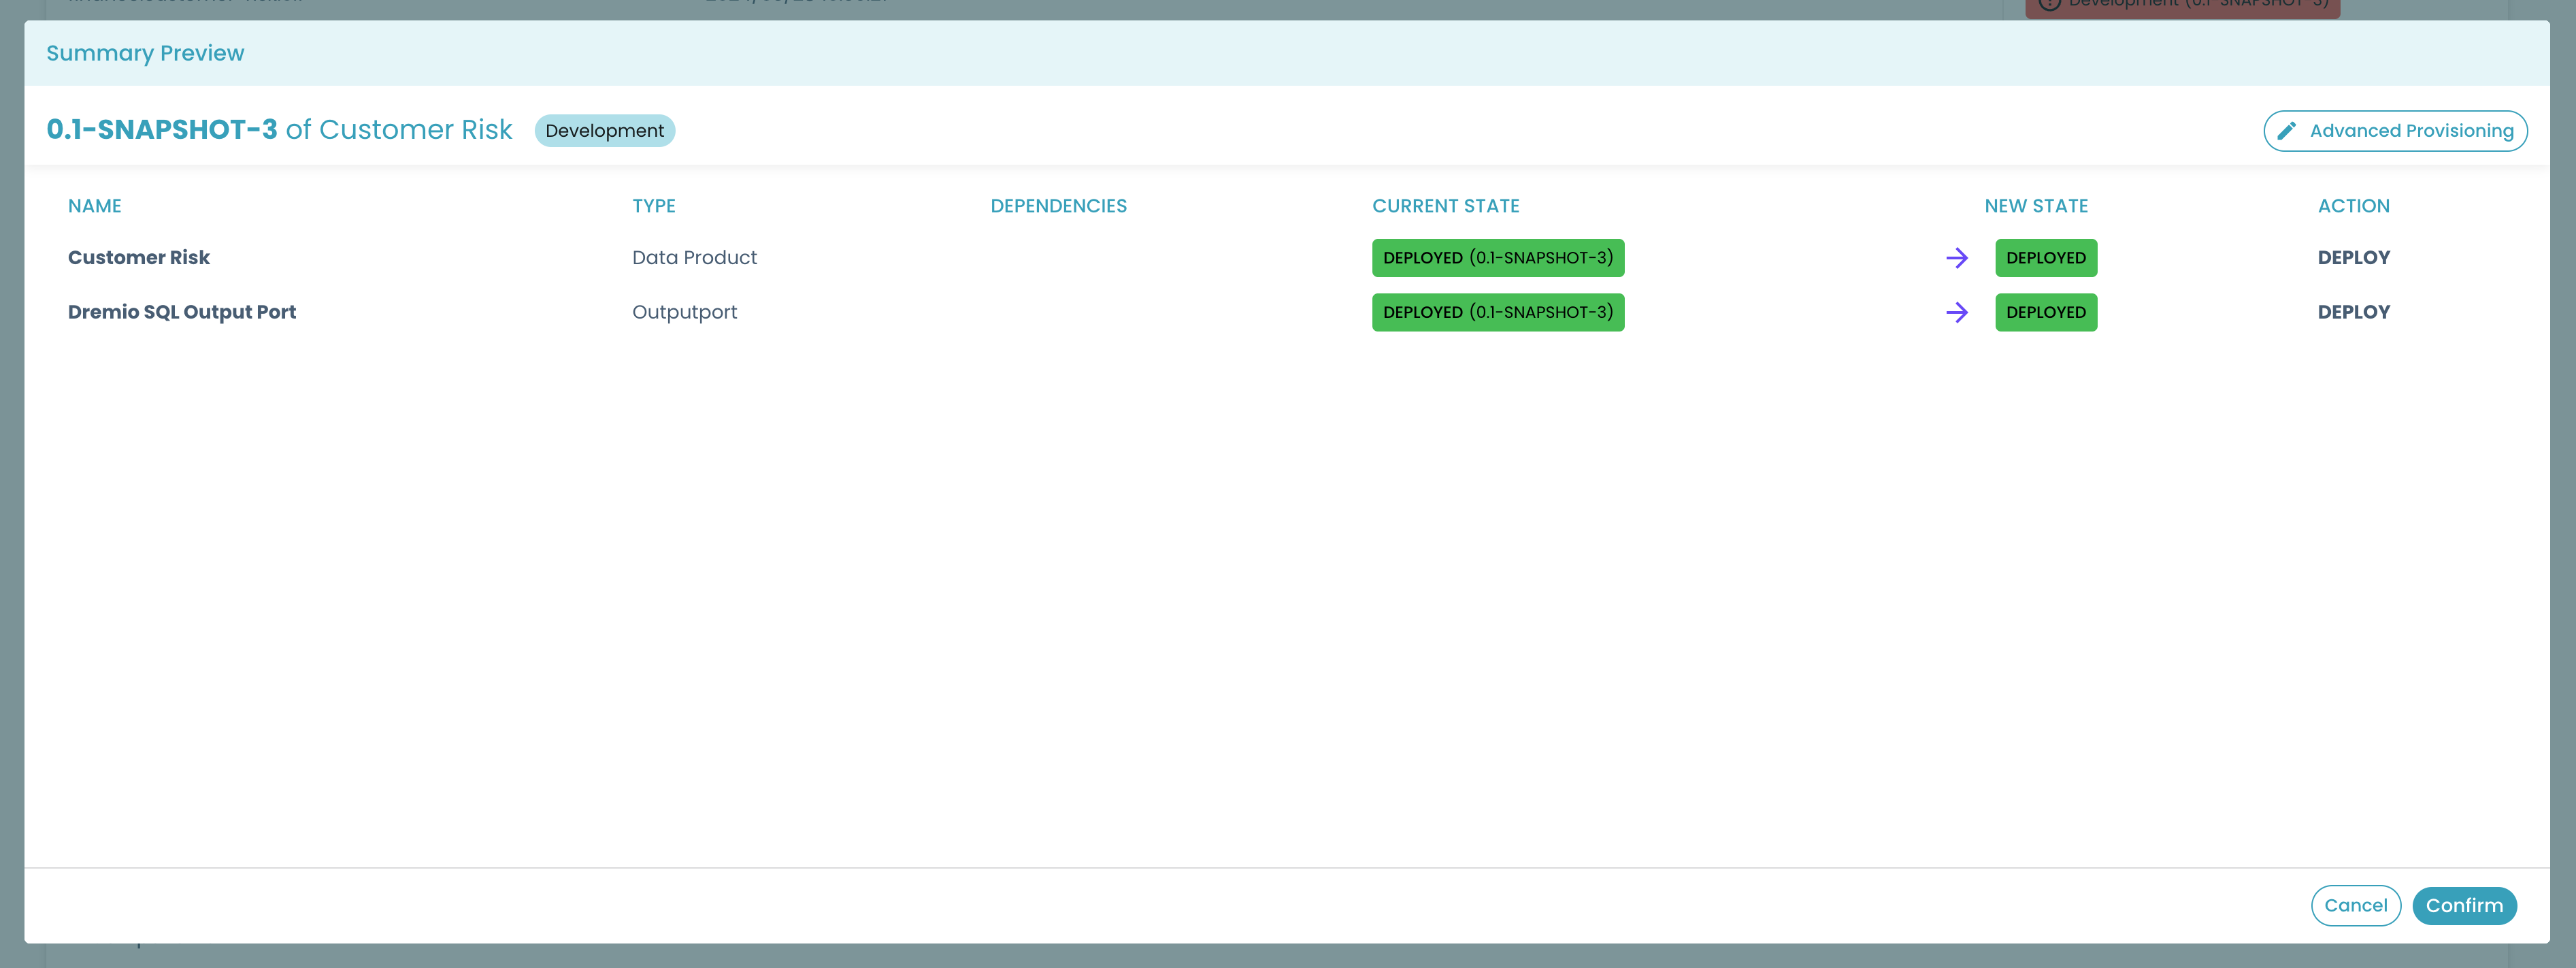
Let's analyze what this modal can tell us:
- first of all in the title you can see a summary of the coordinates of this operation: release, data product, and target environment
- then a table lists all the components, and the data product itself, one per each row
- every row contains the overall details of the component: name, type, and a list of other components that it depends on
- on the right side, for each component you can see: its current status, the new status it will have after the deployment, and the action that will change its status
In the example above, both the data product Customer Risk and its output port Dremio SQL Output Port are already deployed, both for release 0.1-SNAPSHOT-3, and with this deployment they will be deployed again, overwriting the existing ones.
Component Dependencies
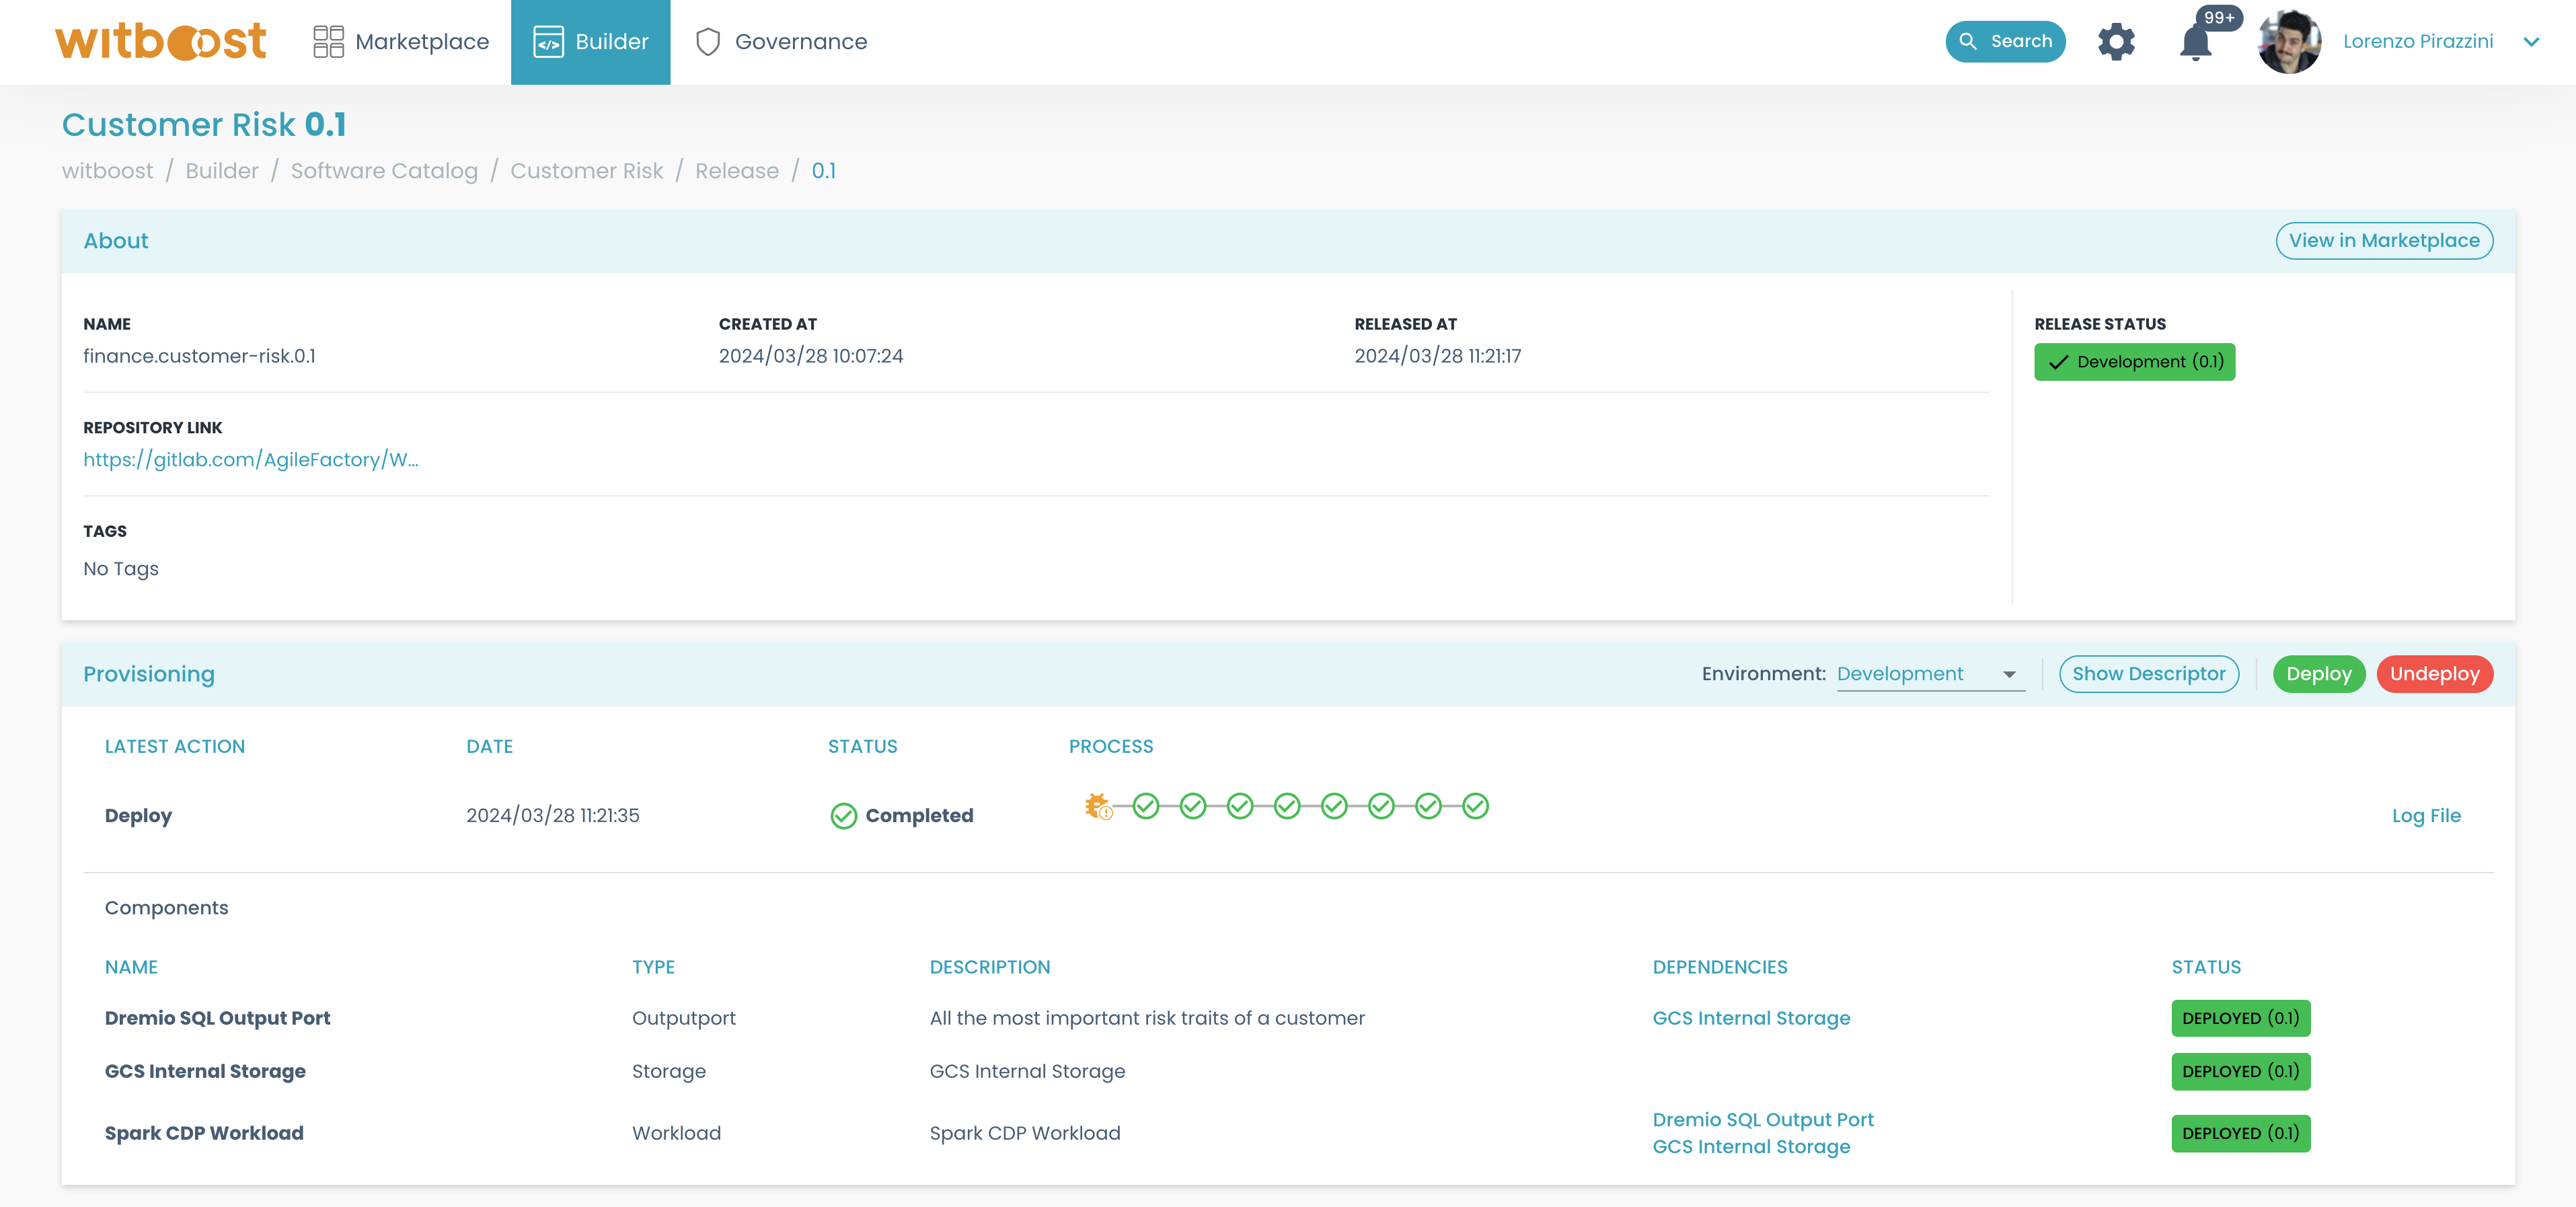
The bottom section of the release detail page contains the Provisioning panel, with a list of all the components of the current release.
Every component could have a list of other components belonging to the same release that need to be deployed before they can be deployed. This list of needed components is called dependencies.
In this case the Dremio SQL Output Port depends on GCS Internal Storage, while Spark CDP Workload depends on both of them. Therefore any deployment operation will deploy GCS Internal Storage first, then the Dremio SQL Output Port, and finally the Spark CDP Workload.
The dependencies of a component are other components that will be always deployed before the component itself. A couple of examples of dependencies between components are:
- an external table component might depend on the storage component where the underlying files are stored;
- a workload that reads from a remote service and writes to a topic might depend on the topic component since it would fail at runtime in case the topic does not exist;
- a data quality component might depend on the consumable component it will perform the data quality checks on.
The dependencies between components are responsible for the following behaviors:
- if component A depends on component B, when undeploying component B, component A will be undeployed too
- if component A depends on component B, when deploying component A, component B will be deployed too
- if component A depends on components B and C, the deployment of A will not start until B and C are completed successfully
- if two components have the same set of dependencies, they can be deployed at the same time
Since some components are deployed in parallel at the same time, it could happen that the circles representing the provisioning steps are not changing status in the order they are displayed.
Adding and removing components
When adding a new component to a Data Product, and creating a new release, the new release status will show a situation where not all the components are deployed, even if the last provisioning operation was successful.
Let's start from a situation where we have a successfully deployed release
Let's add a new component to the Data Product (in this example DBT Transformation Workload), then let's create a new draft release and open its details
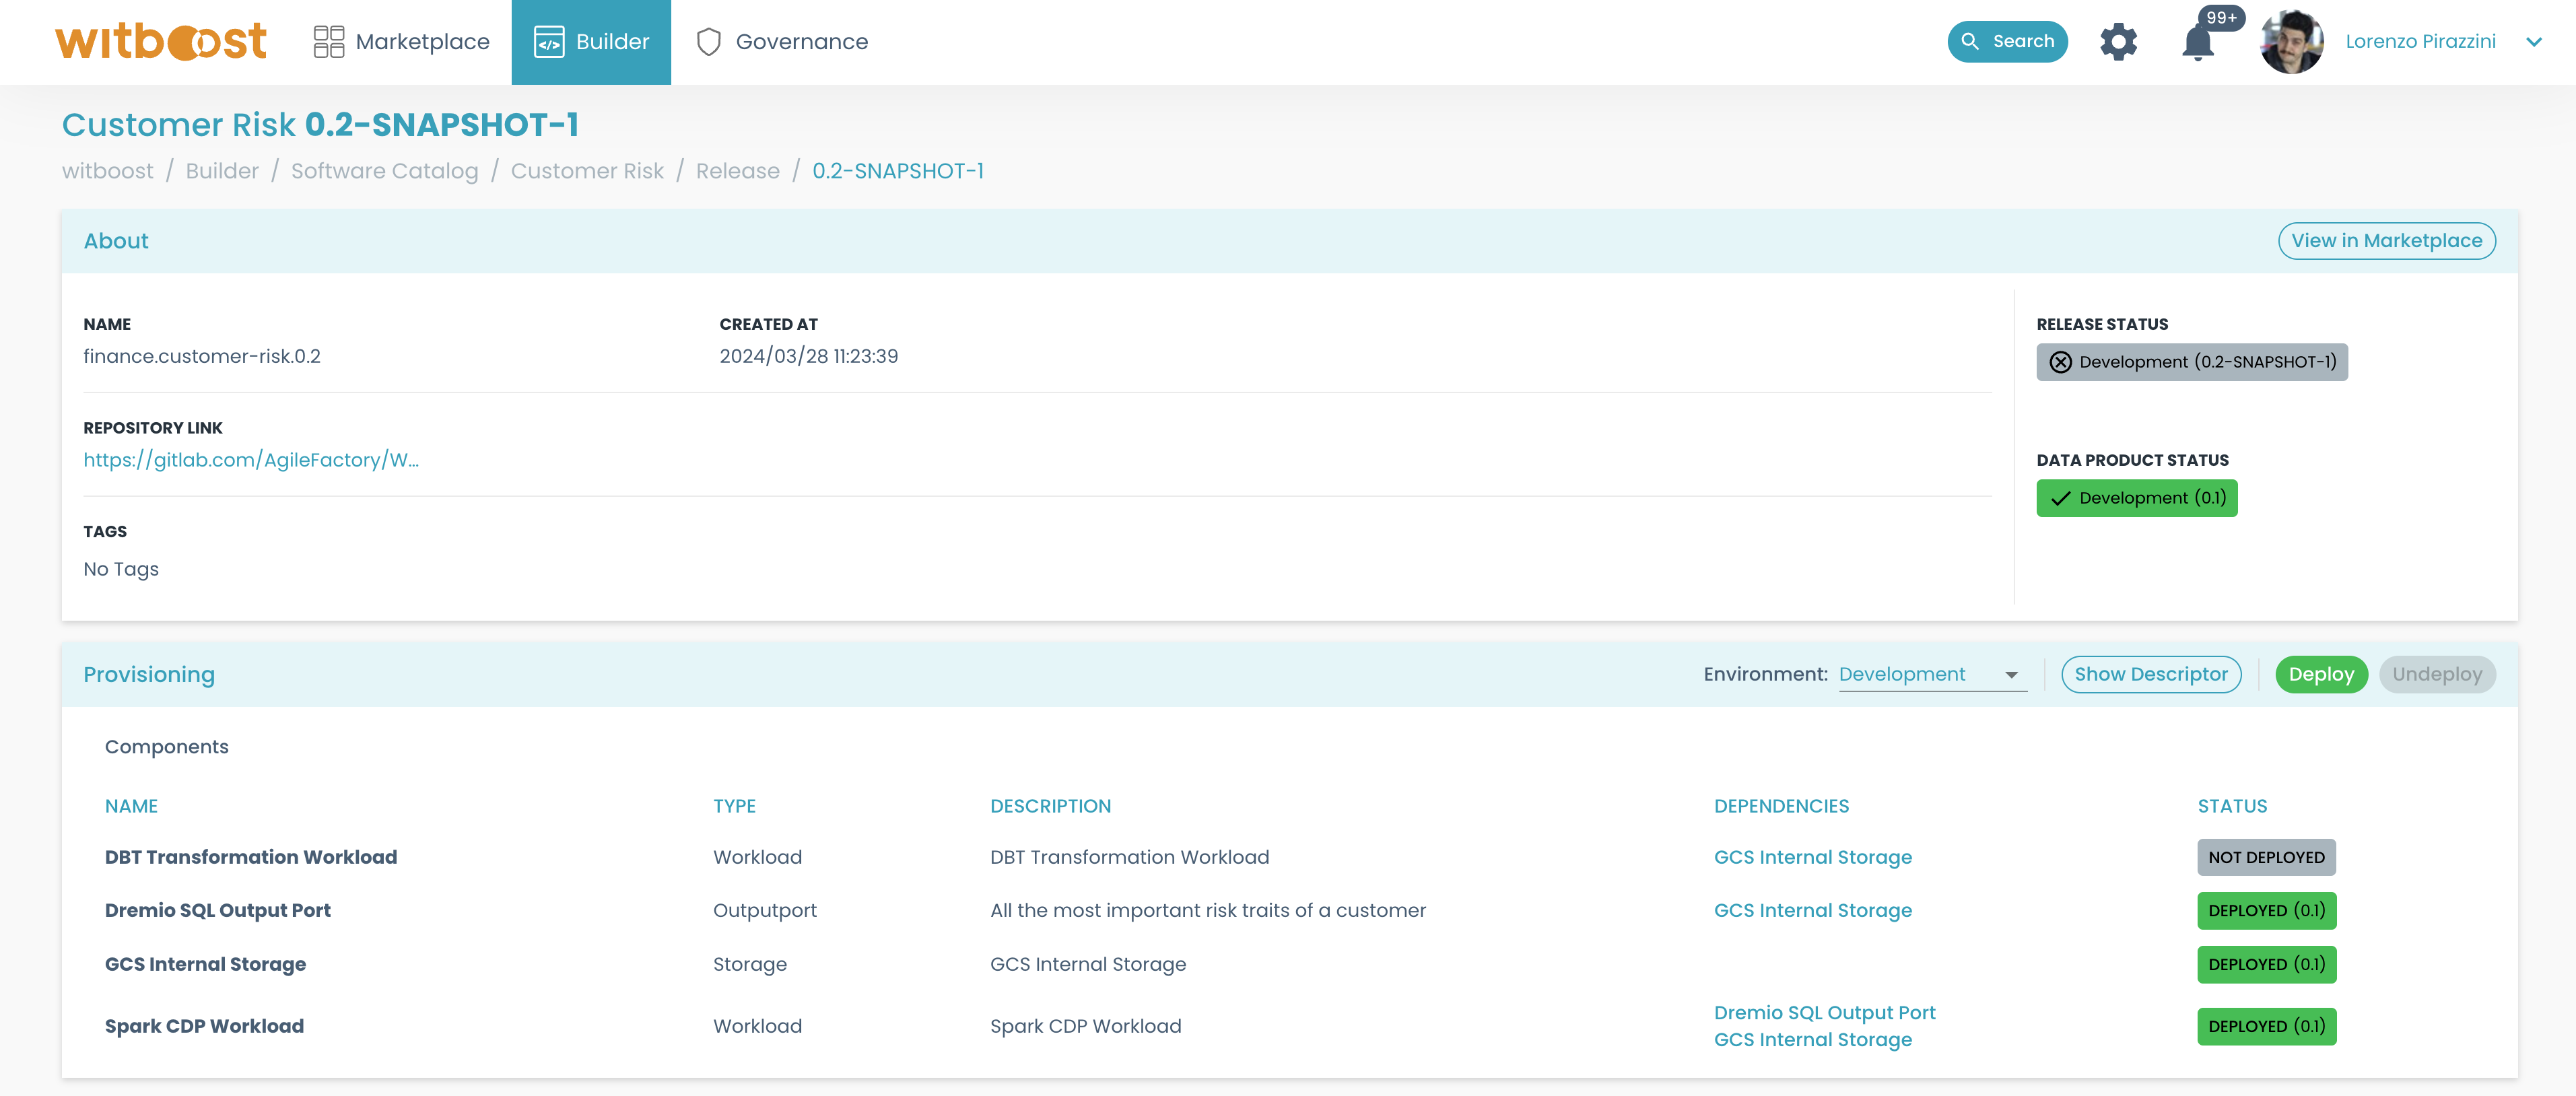
As you can see, the status of the new release is NOT DEPLOYED, while the status of the Data Product is DEPLOYED with the previous release. Looking at the components we can see that the new component DBT Transformation Workload is NOT DEPLOYED while all the others are deployed with a previous release.
Clicking on the Deploy button, we can see in the preview that all the components will be deployed, but only the new component will be a new deployment
Let's now remove a component from this release, for example, we can remove Spark CDP Workload which is currently deployed. Now we can see that the component is not present anymore among the components of this release
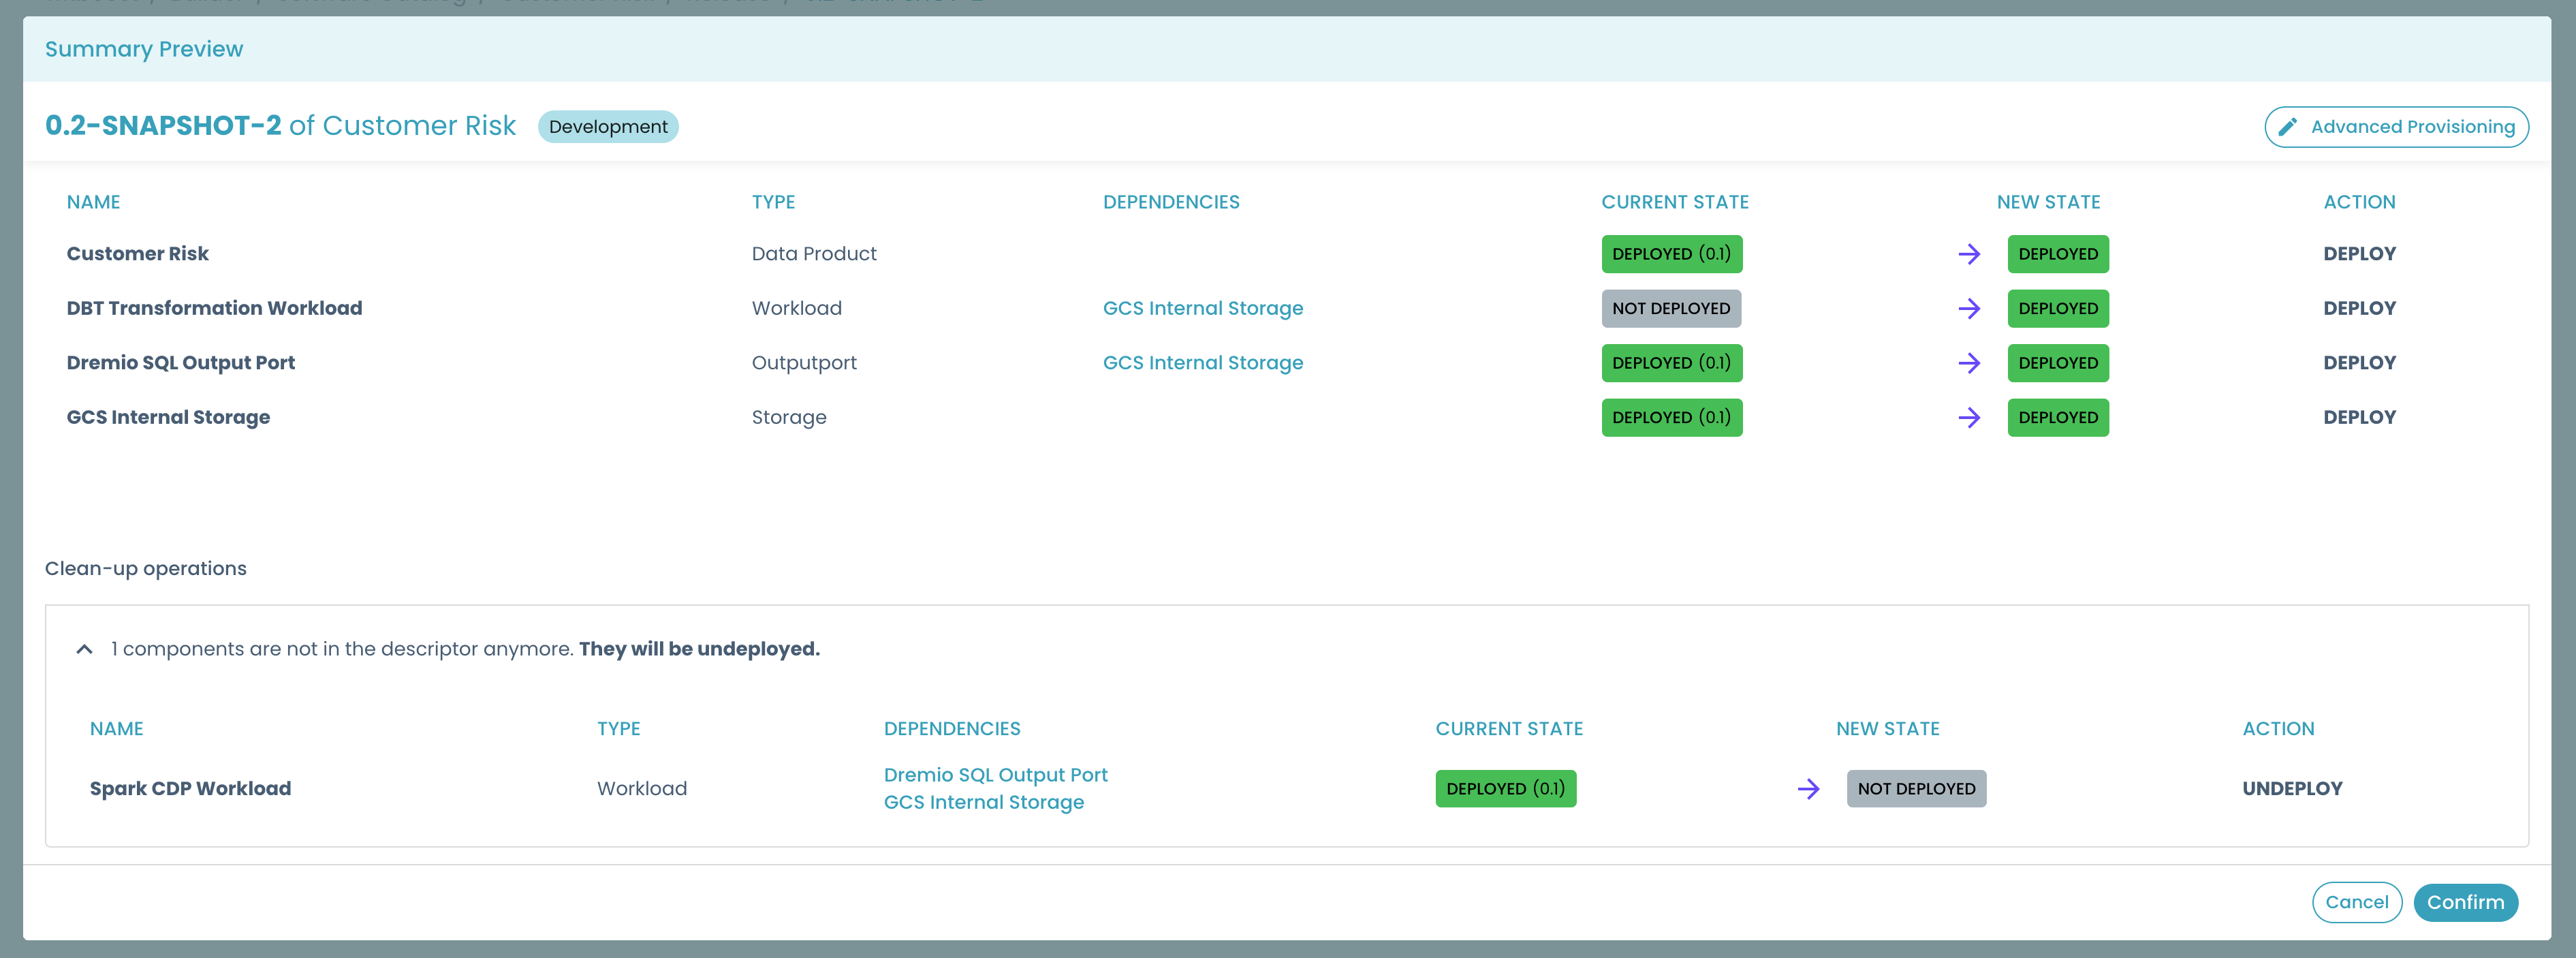
And by clicking on the Deploy button, the preview will show us that if we want to deploy this release some components that were previously deployed will be removed
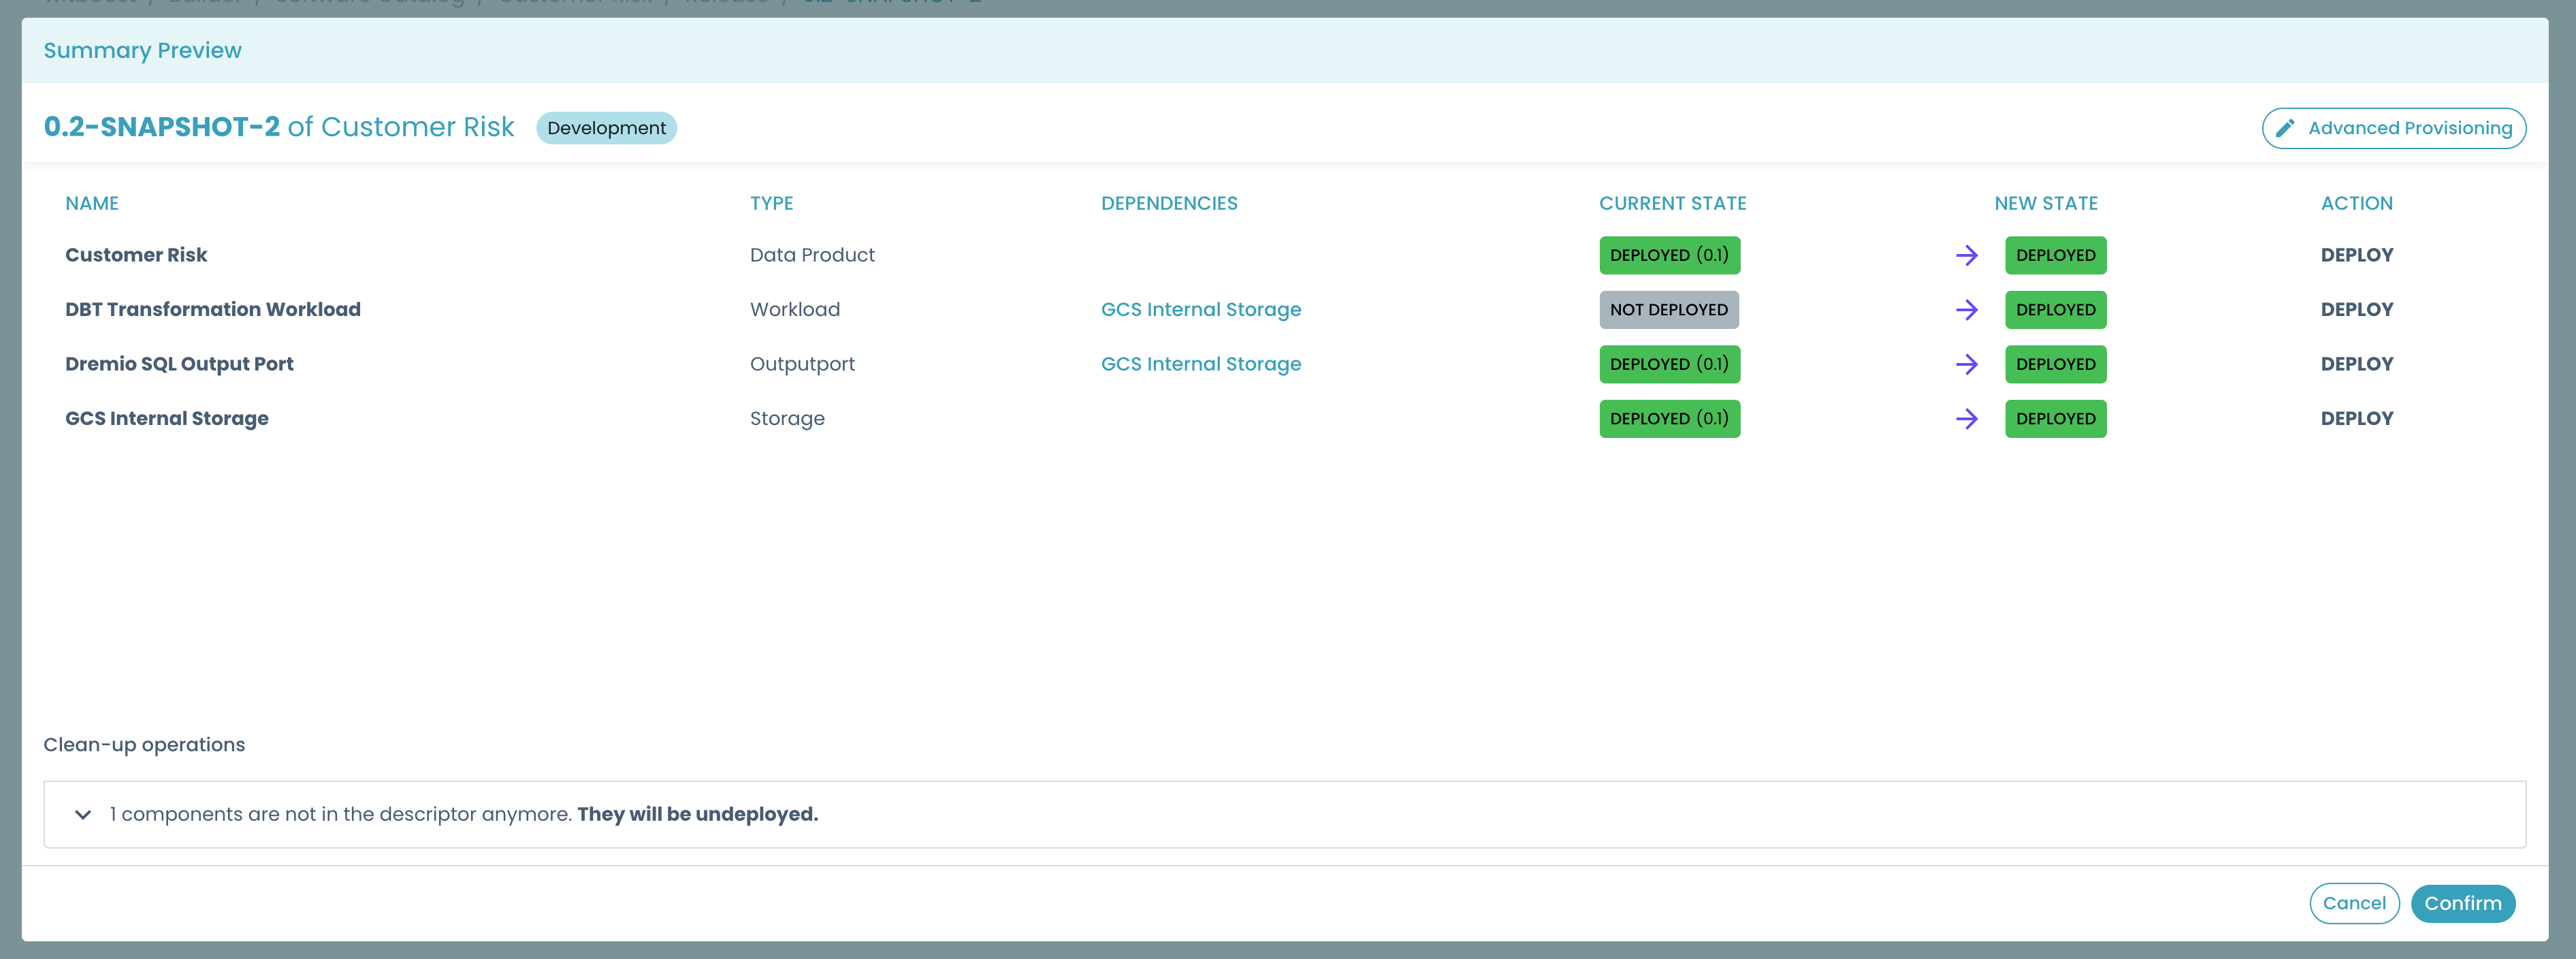
By clicking on the panel, we can expand that section and see that the component that will be removed is indeed the one that is currently deployed (Spark CDP Workload), but that we removed from this release
Deployment termination
It could happen that during a deployment (or undeployment) operation, a step gets stuck: it continues to show the RUNNING status, and the logs are not updated.
In this case, the user can decide to terminate the provisioning operation by clicking on the Terminate button
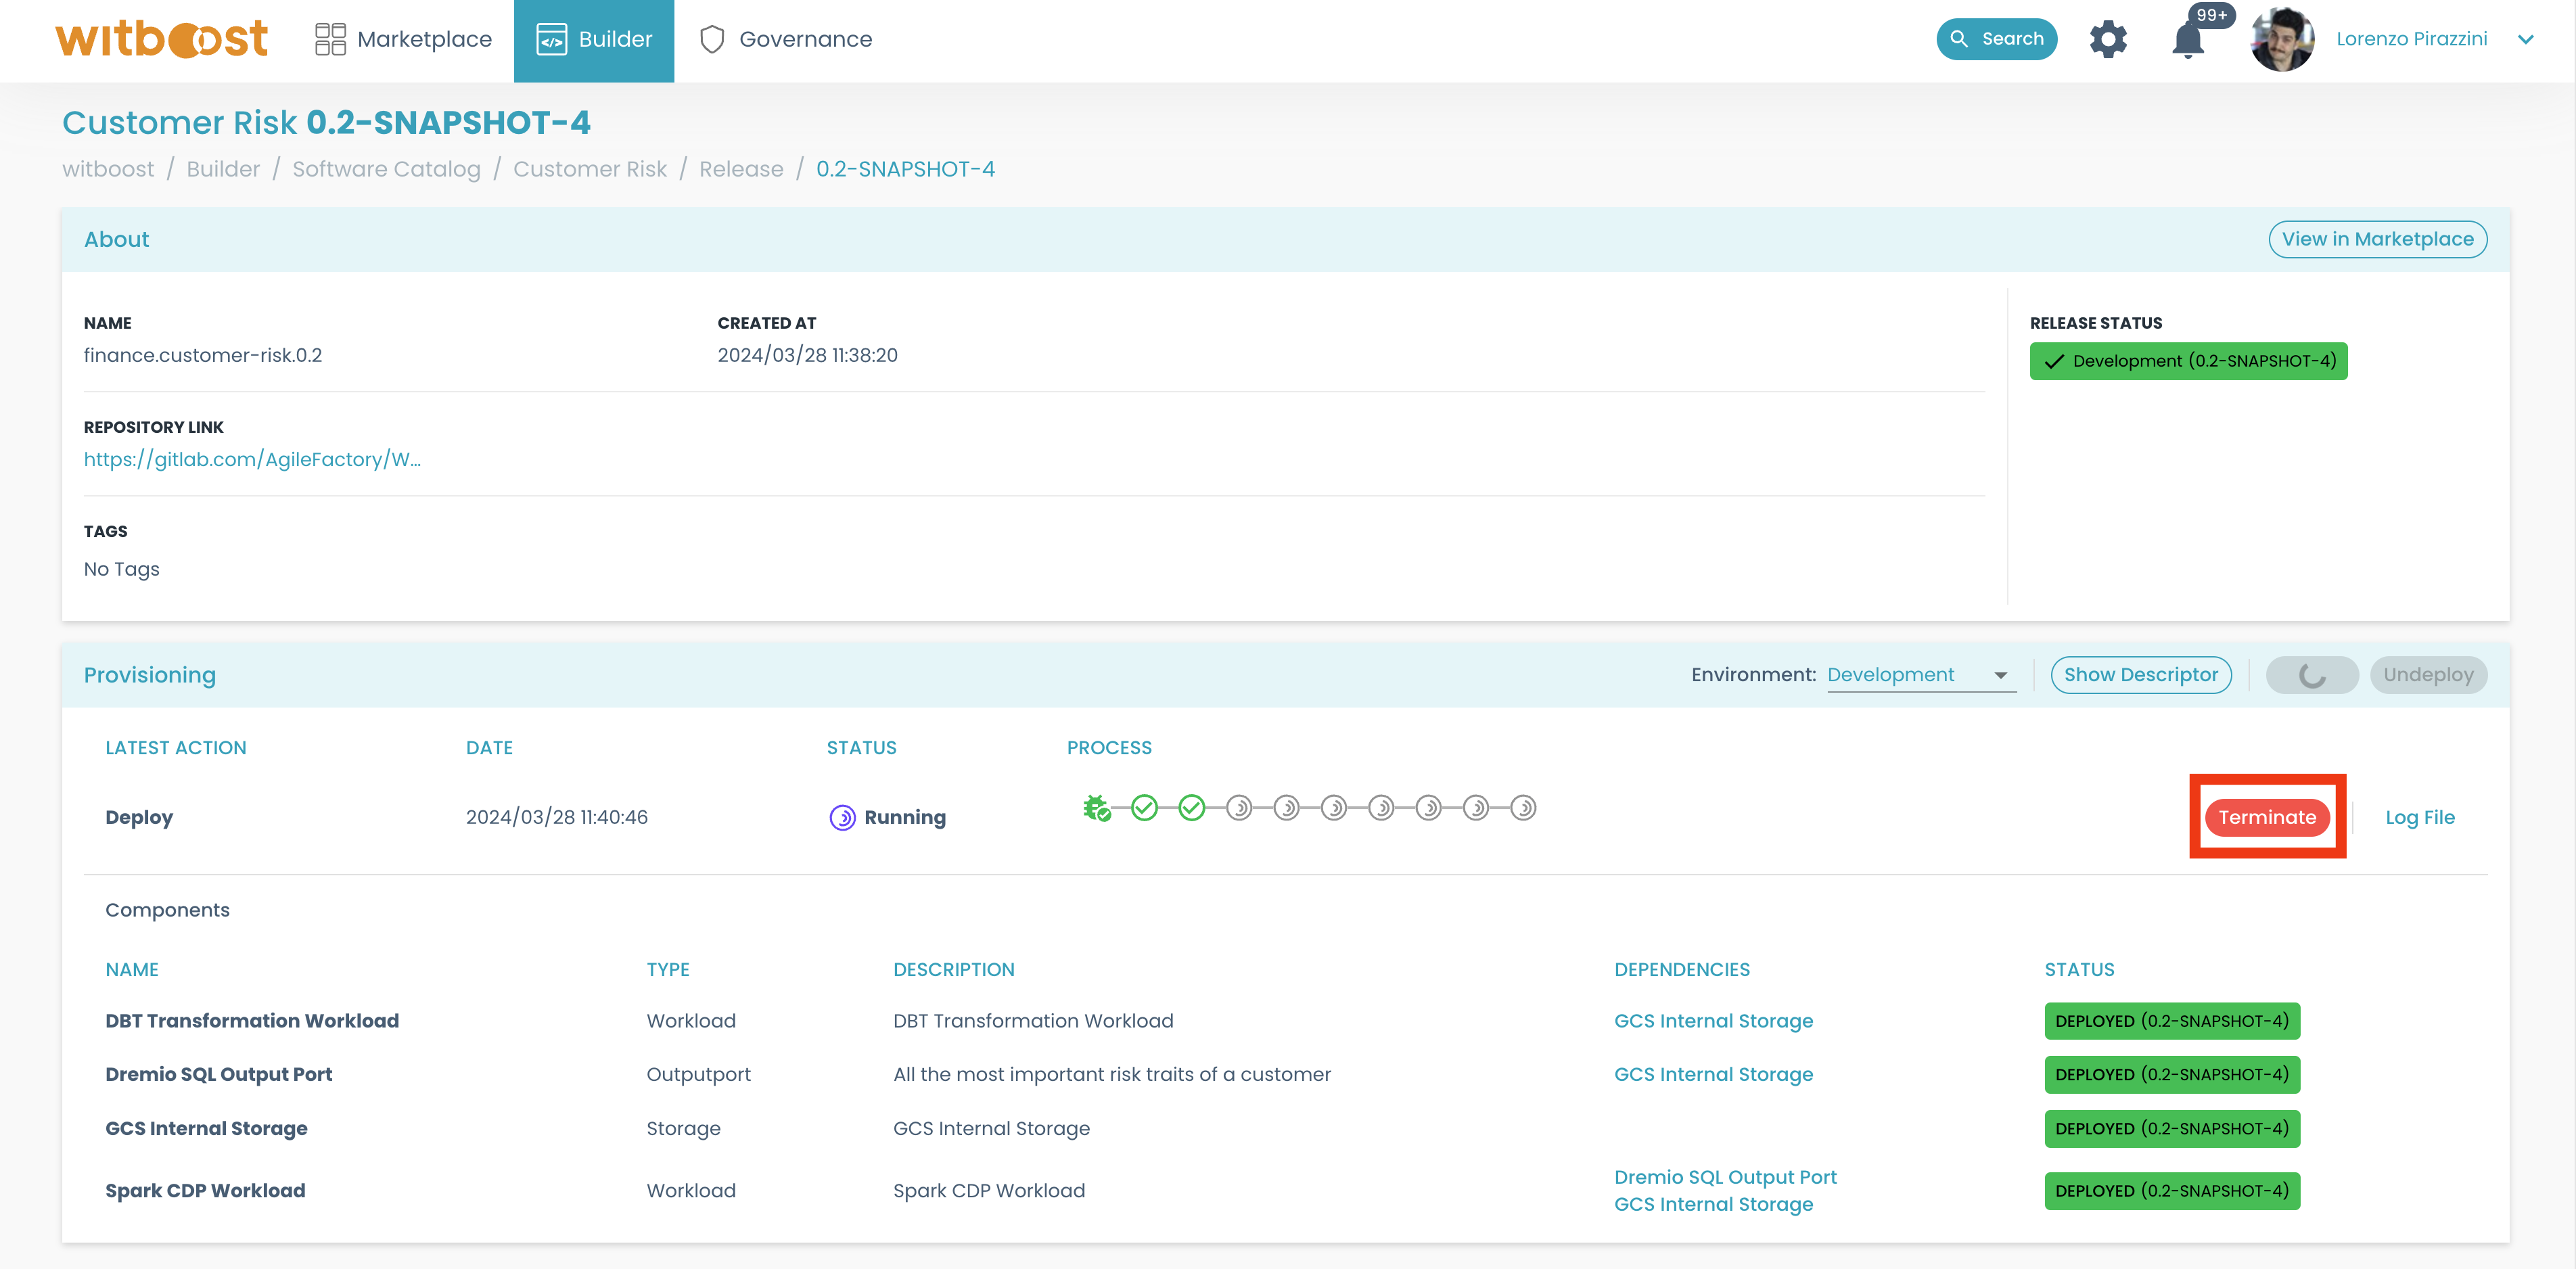
This will open a modal that lets the user choose how the current operations should be terminated
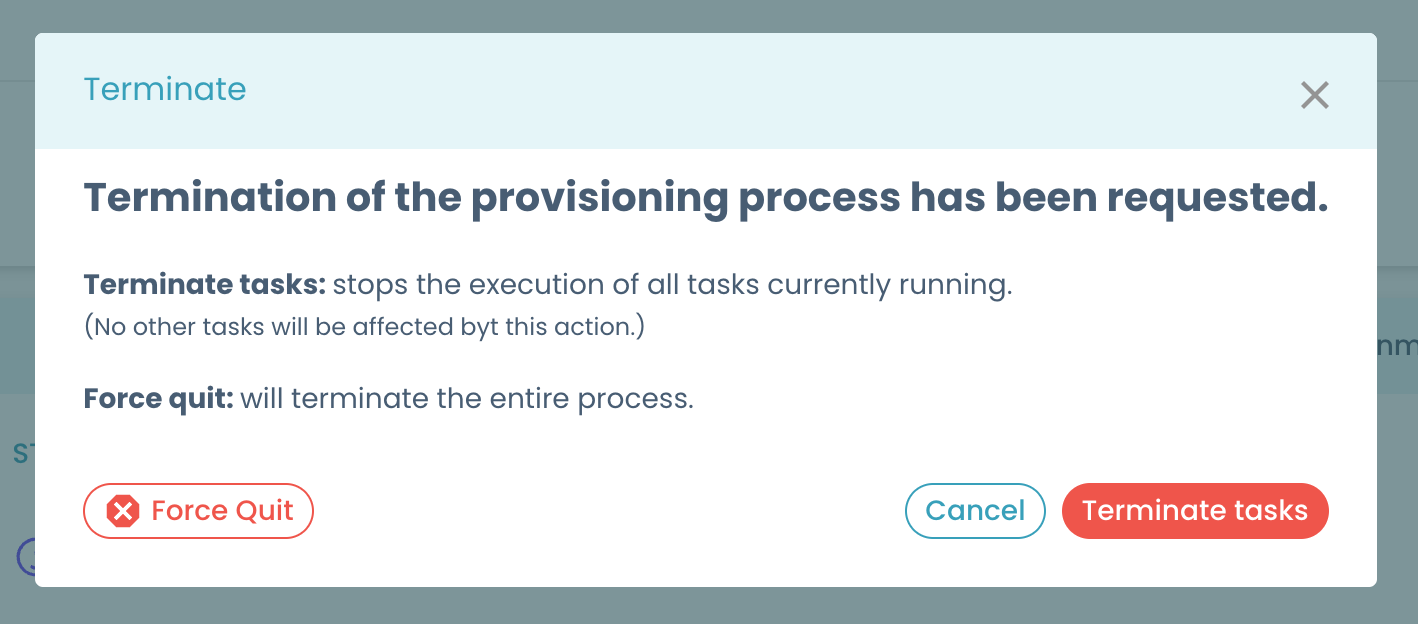
The two possibilities are:
- terminating the current running tasks. This will terminate only the tasks that are currently in RUNNING status, continuing with the other steps if possible;
- force quitting the whole operation. This will terminate the whole operation, marking all the current steps (and the ones not started yet) as TERMINATED.
After termination, the terminated steps will appear with a specific terminated circle

Terminating a deployment operation means that every Technology Adapter will receive a termination signal, by invoking its termination API. Since some Technology Adapters could not have this API implemented yet, in case termination is requested, they will be simply ignored.
Draft release deployments
It can happen that while working on a draft release, you make a lot of changes to it, and every time you update it, you want to try it out by deploying it.
To better explain this concept, let's think of a scenario like this:
- you are developing a data product and update its draft release to
v0.2-SNAPSHOT-4. Then you deploy it on thedevelopmentenvironment, and it is deployed successfully; - then you add a lot of new features to the data product: you add new components, you remove old ones, you change the descriptor with a lot of edited fields, etc
- then you update the draft release to
v0.2-SNAPSHOT-5, and you want to deploy it - but now, you want to check what is already deployed on the
developmentenvironment before deploying your changes, but you go to theDeploymenttab and you do not see the releasev0.2-SNAPSHOT-4anymore, since it was replaced byv0.2-SNAPSHOT-5!
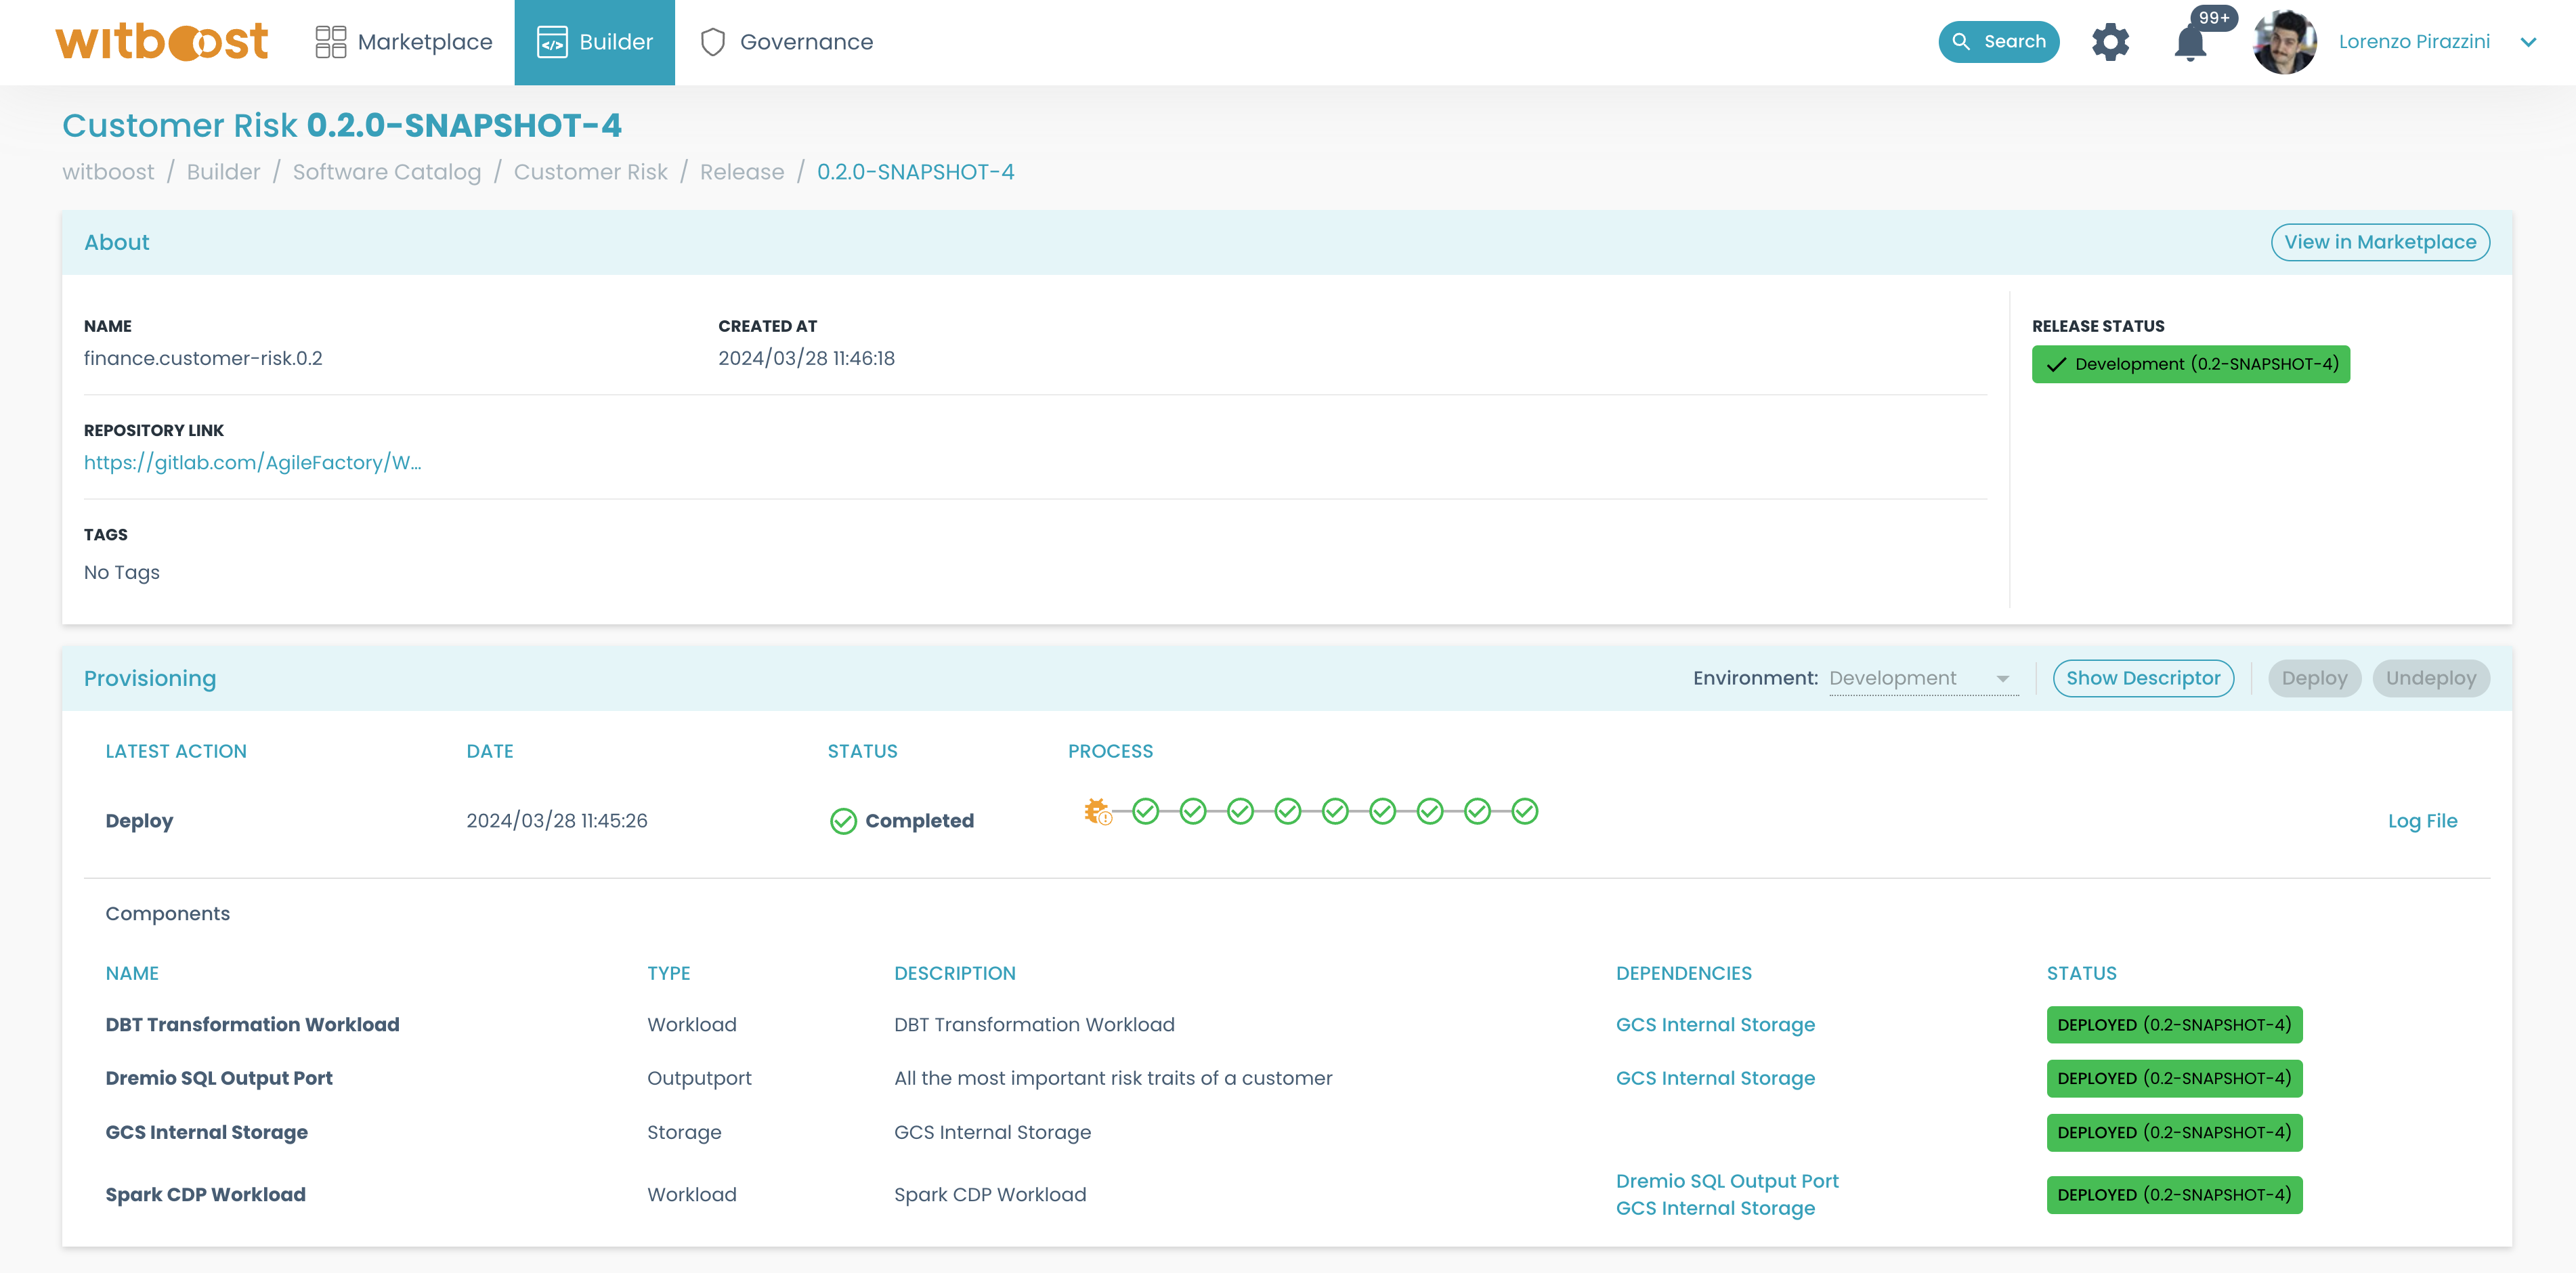
To prevent you from losing information about old versions of your draft release, we added for every release a badge that tells you which release is deployed on the target environment
![]()
In this case, you can see how the current release is v0.2-SNAPSHOT-5, but on that row, we have a badge that tells us that the one currently deployed is v0.2-SNAPSHOT-4. By clicking on the row you will open release v0.2-SNAPSHOT-5, but if you click on the badge itself, release v0.2-SNAPSHOT-4 is displayed
This release detail page is similar to the regular one, but is read-only: since this release does not exist anymore (it was updated) you can only see it to check what were the operation and the descriptor associated with the currently deployed data product.
Advanced Provisioning
If you need more control over the deployment operation performed, you can leverage the "advanced provisioning" feature, available for all releases.
To use it, simply open the deployment preview of a release, and click on the Advanced Provisioning button
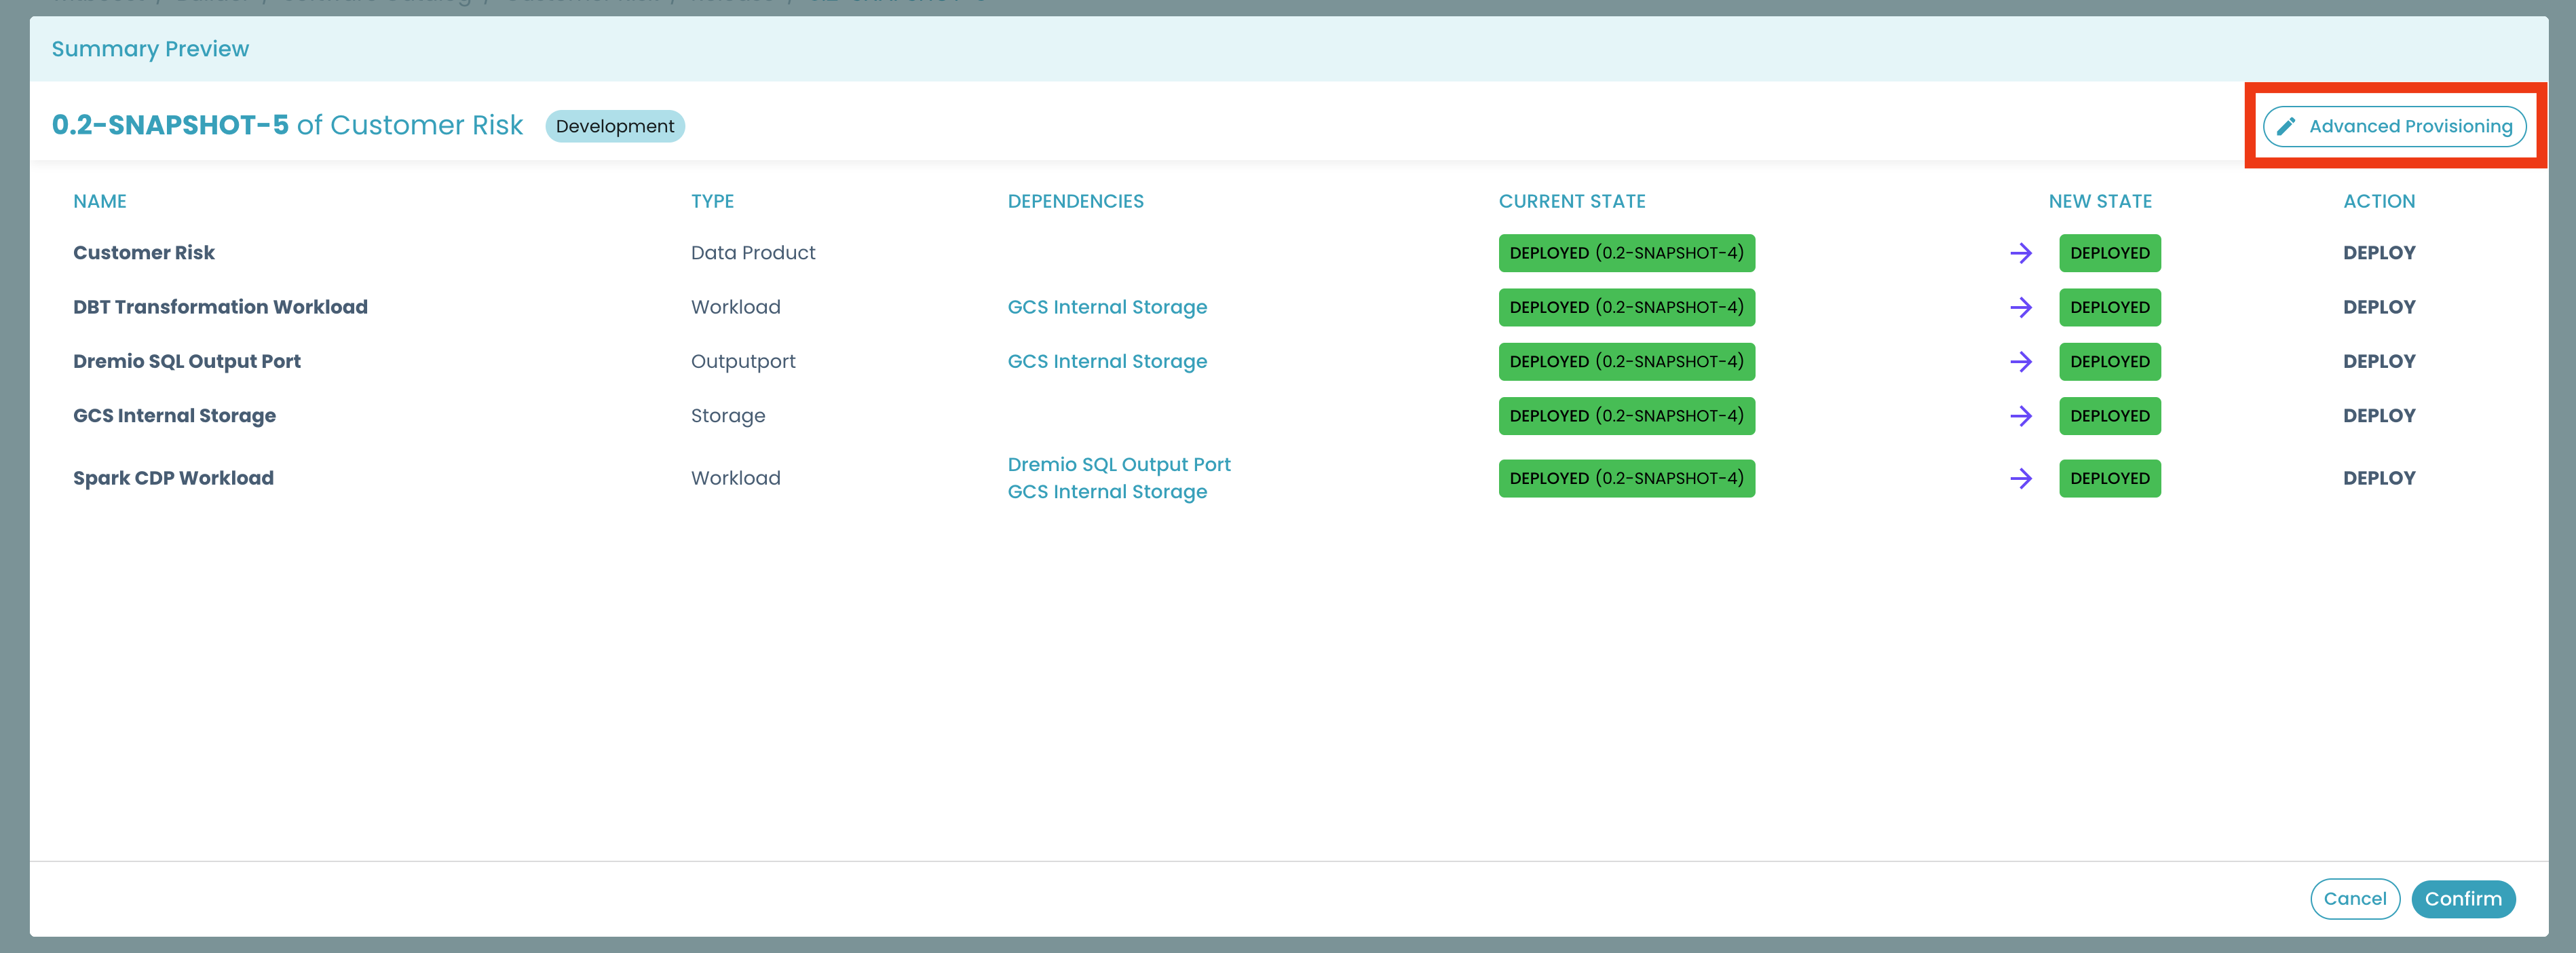
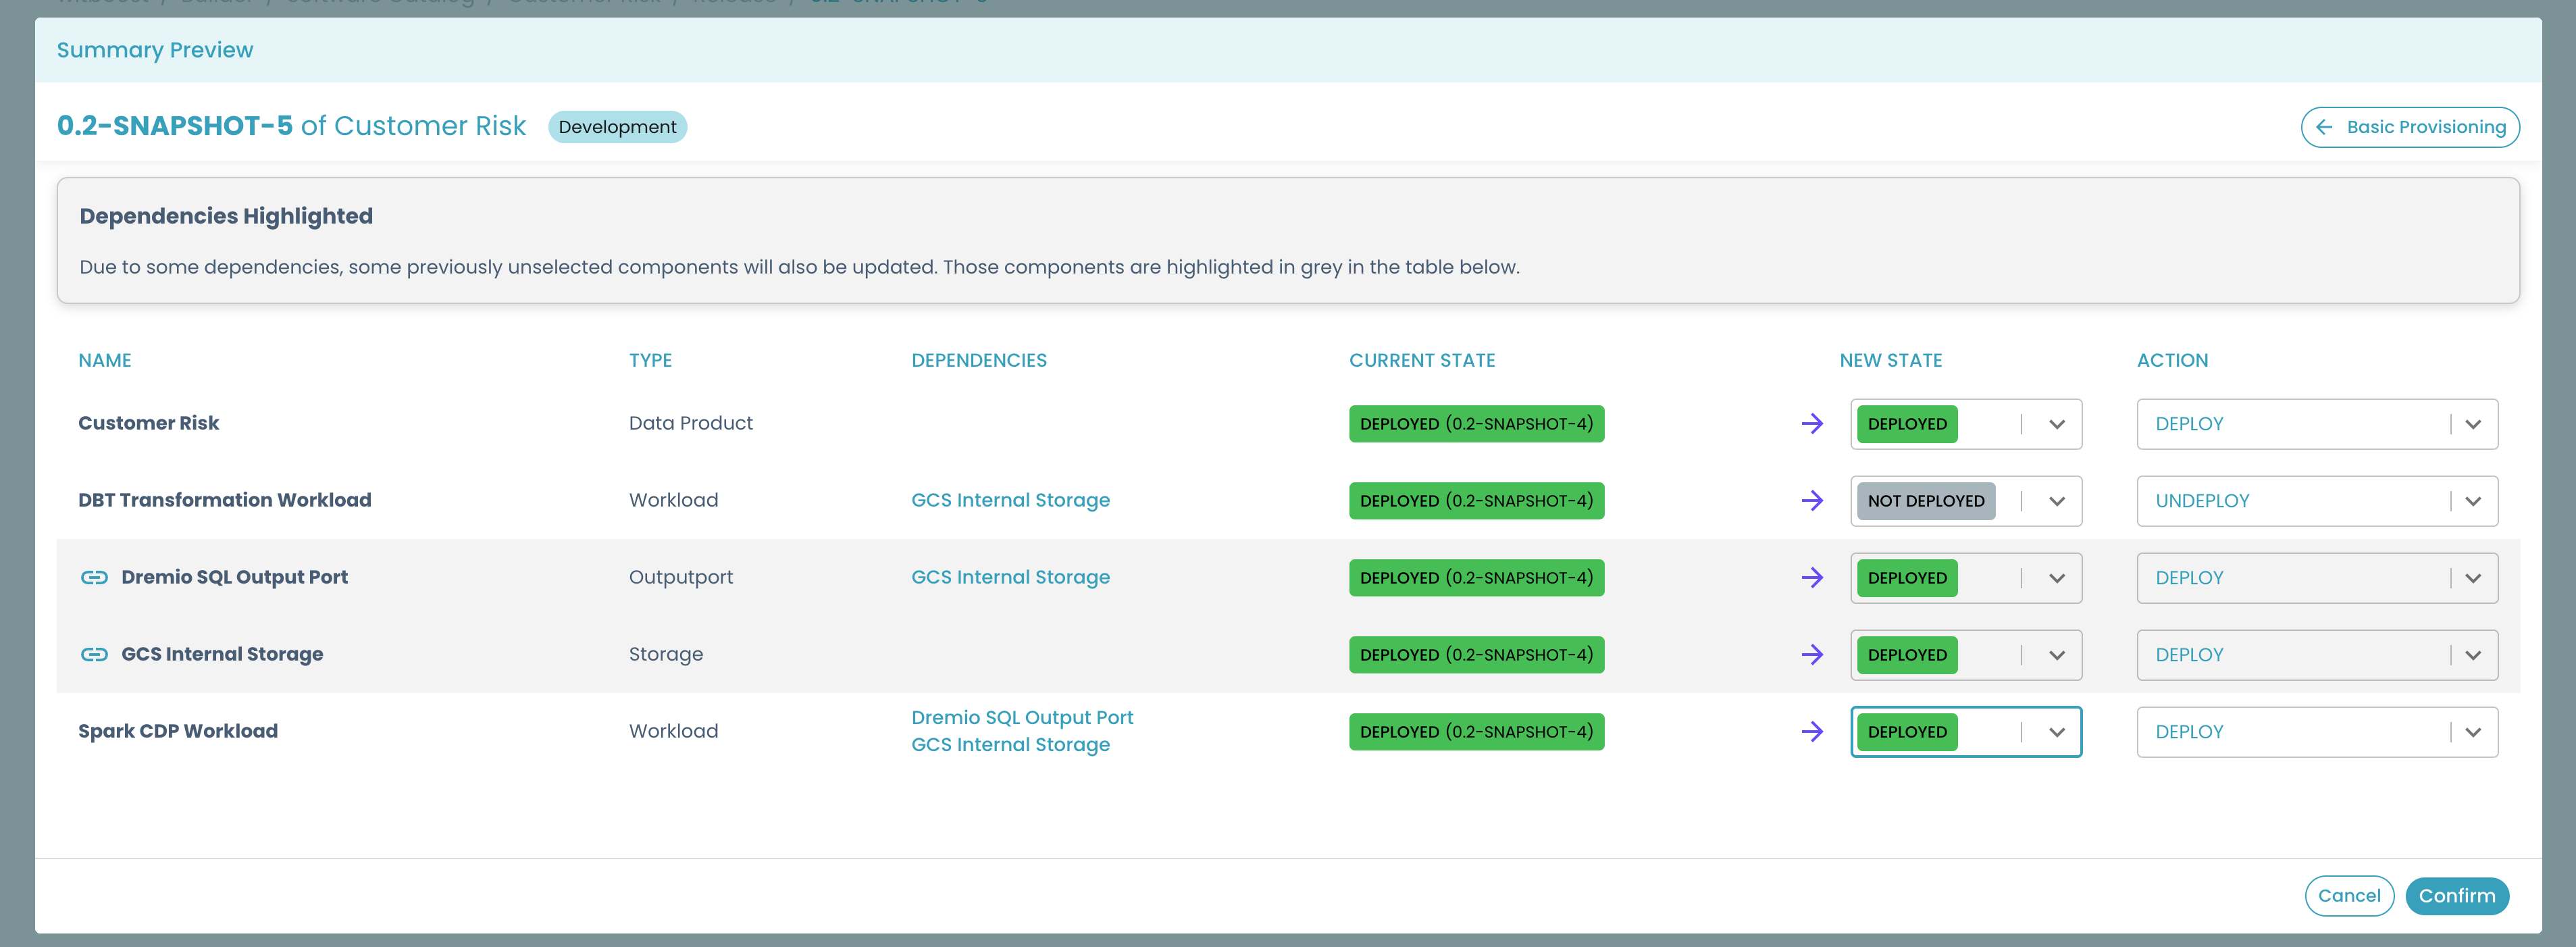
This will open a new modal that will let you change the action performed for each element
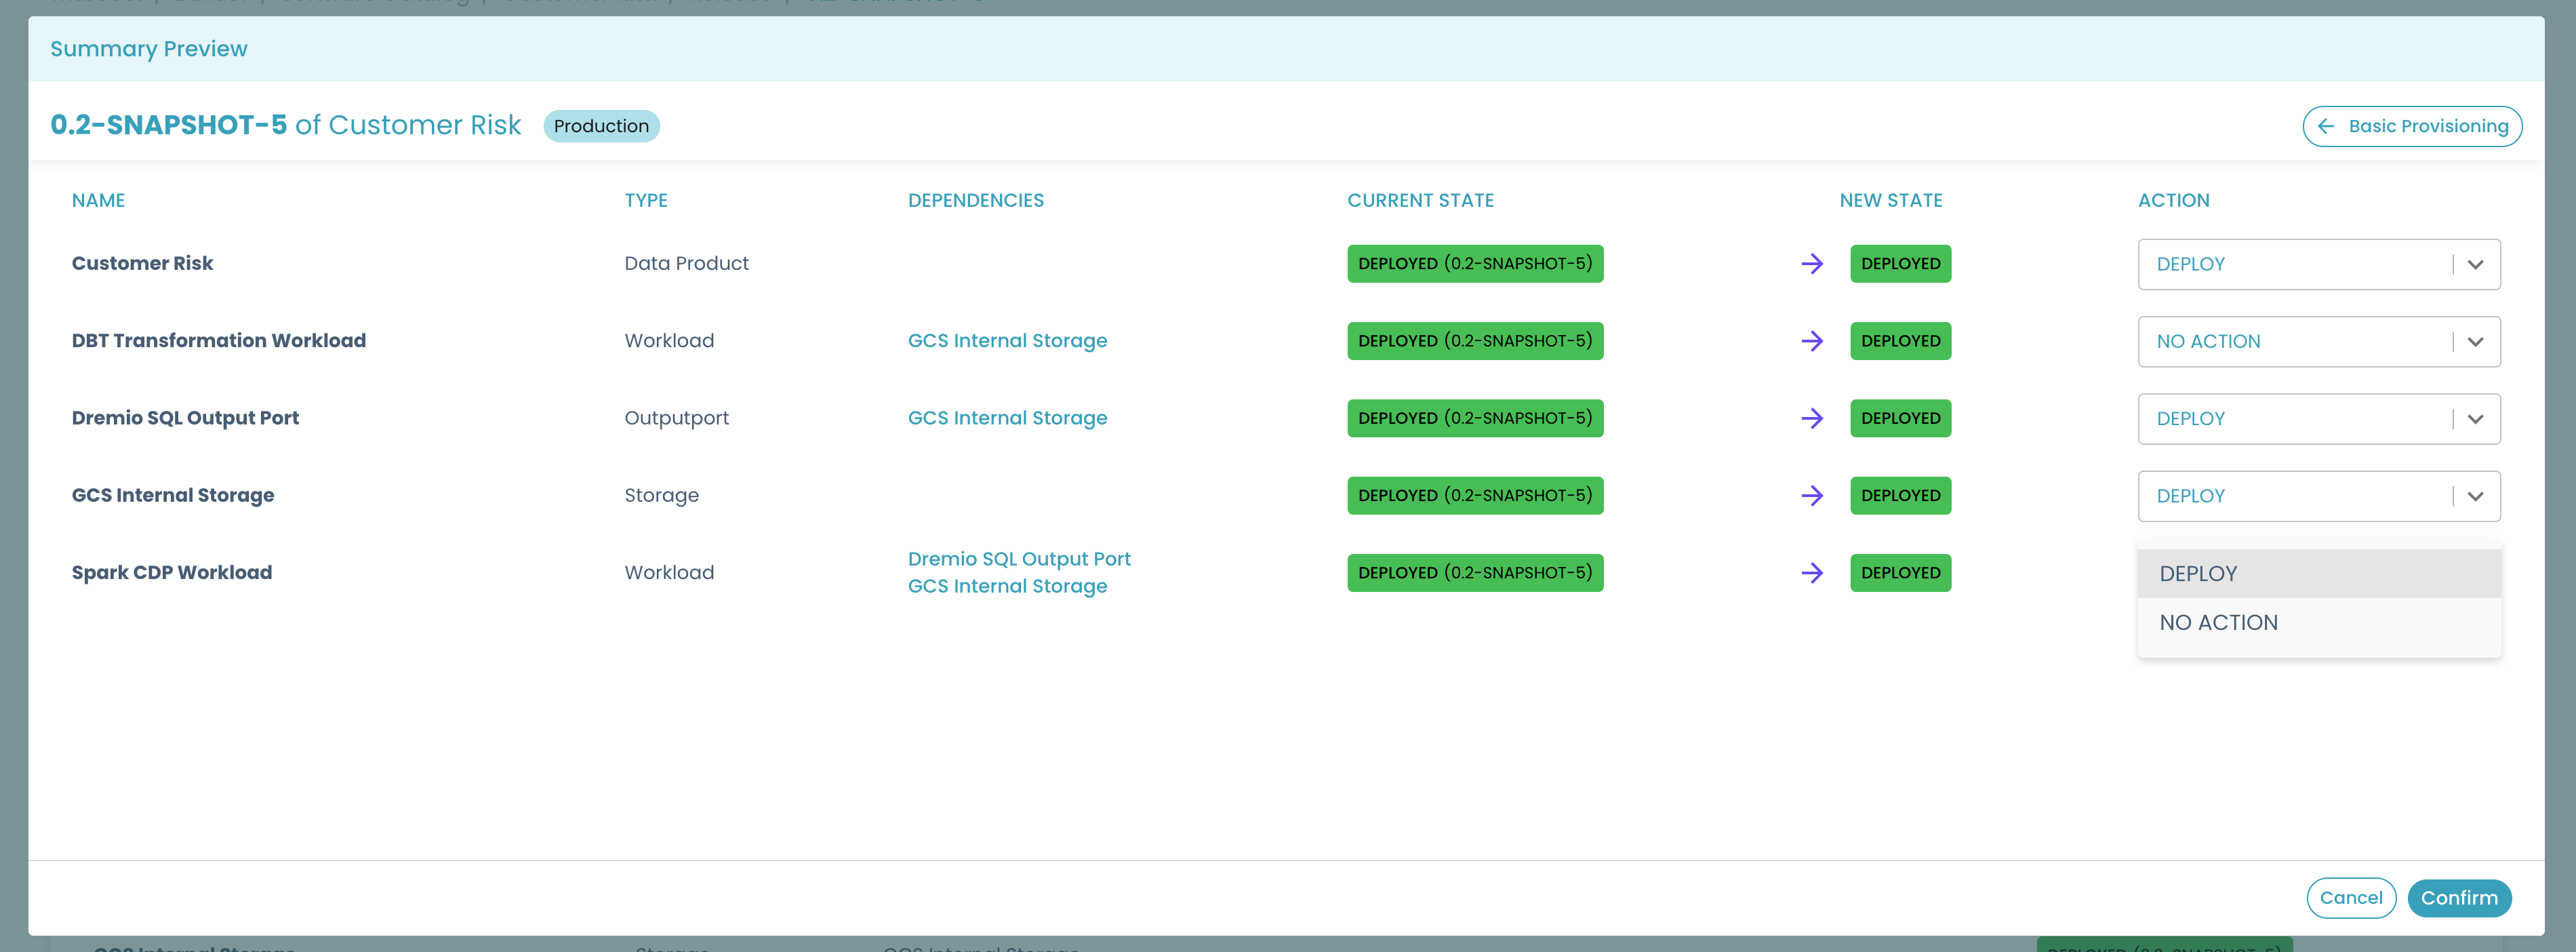
In particular, for every component you can choose to change the deployment action:
-
if the status goes from
DEPLOYEDtoDEPLOYED: you can choose if you want to perform aDEPLOYoperation or aNO ACTION. This means that since the component is already deployed, you can decide if you want to trigger the Technology Adapter again, or skip it; -
if the status goes from
DEPLOYEDtoNOT DEPLOYED: you can choose if you want to perform anUNDEPLOY,UNDEPLOY AND REMOVE DATAorDISCARDoperation. The differences between these actions are:UNDEPLOY: Sends an undeployment request to the Technology Adapter which will unprovision the componentUNDEPLOY AND REMOVE DATA: The undeploy operation will send a flag to the Technology Adapter telling it that it should undeploy the component and also remove all the data.DISCARD: Witboost will mark the component as undeployed without contacting the Tech Adapter. No actual action will be performed on the target technology.
By clicking on Confirm, the deployment operation will start using as input the actions you requested.
If you click on Basic Provisioning, you will go back to the preview modal, losing all the changes you made on the advanced panel.
Partial Provisioning
For some environments, the Platform Team can configure the partial provisioning feature.
This means that you can perform deploy operations that have different target status for different components. As an example, you could decide to undeploy some components, deploy some new ones, and not deploy the rest of them.
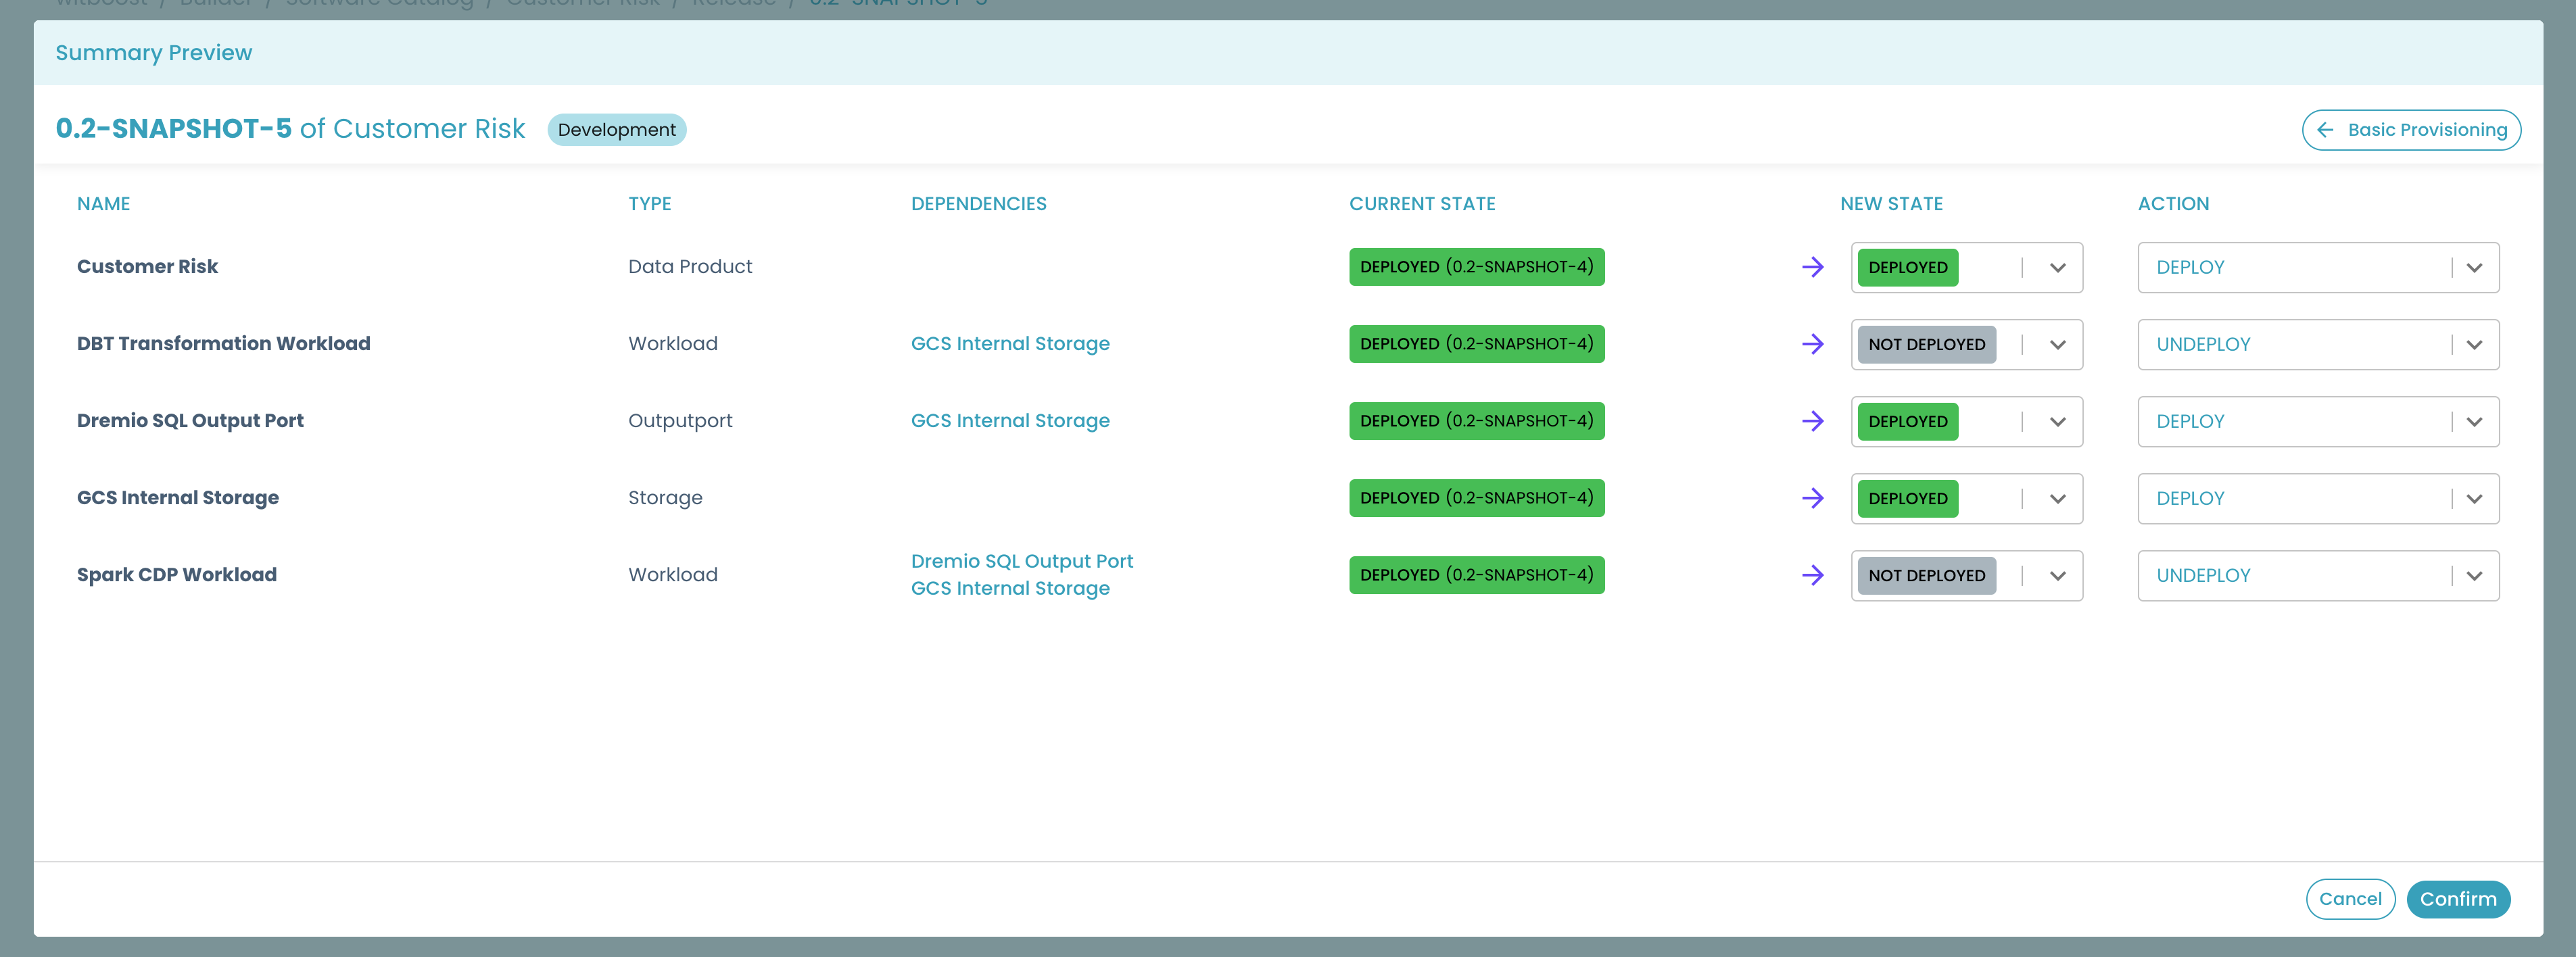
To use this feature, select an environment for which the Platform Team has enabled this feature, and open the Advanced Provisioning modal
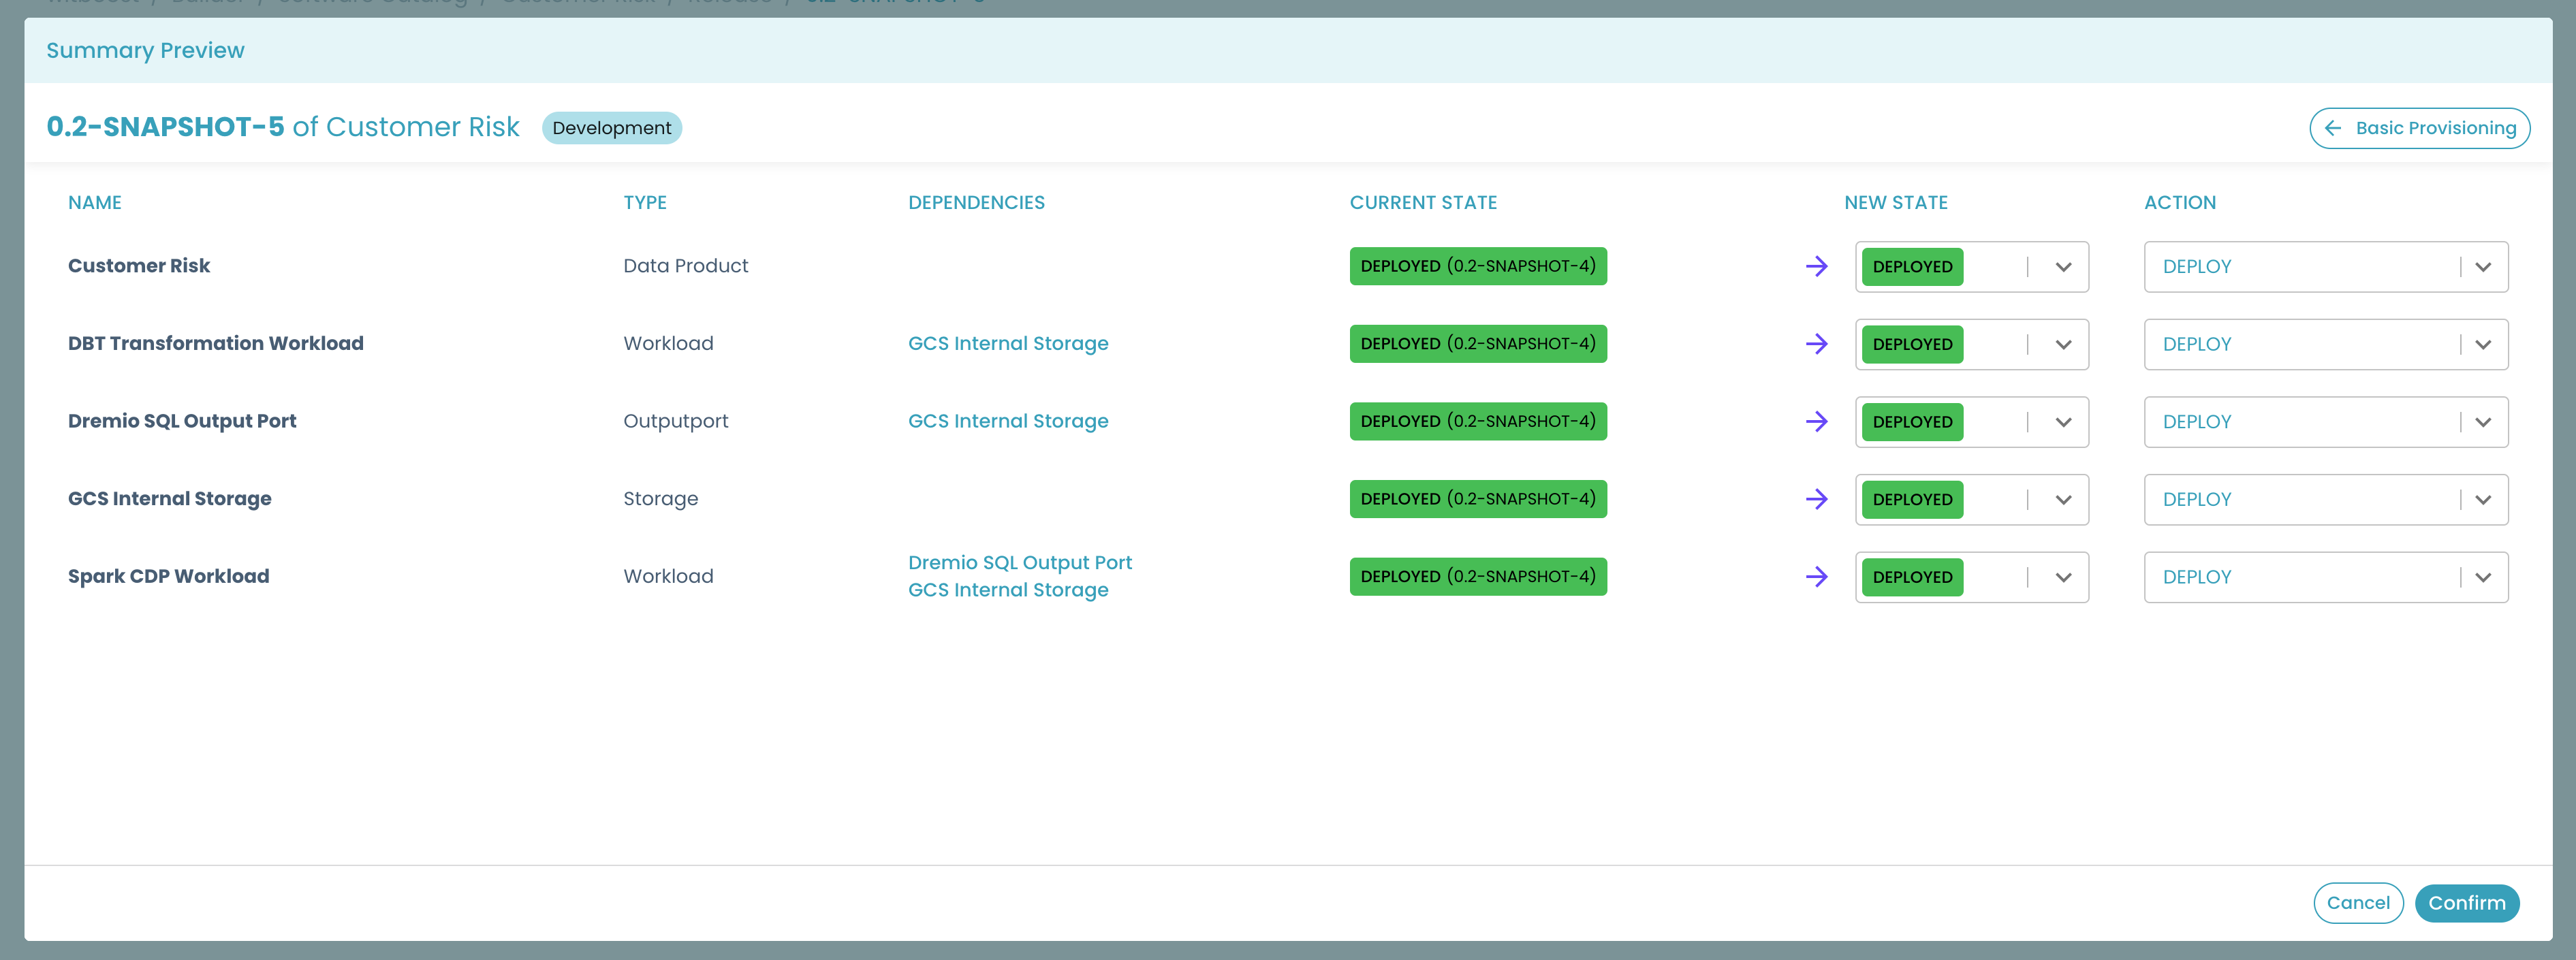
Now you should see the possibility to change the target deployment status for each component. This means that you can decide to change the desired status for each component, having a data product that is not fully deployed (for this reason we will call it "partially provisioned").
Let's make some changes to the provisioning and see what effects they will have.
To start, we can decide to not deploy one of the components
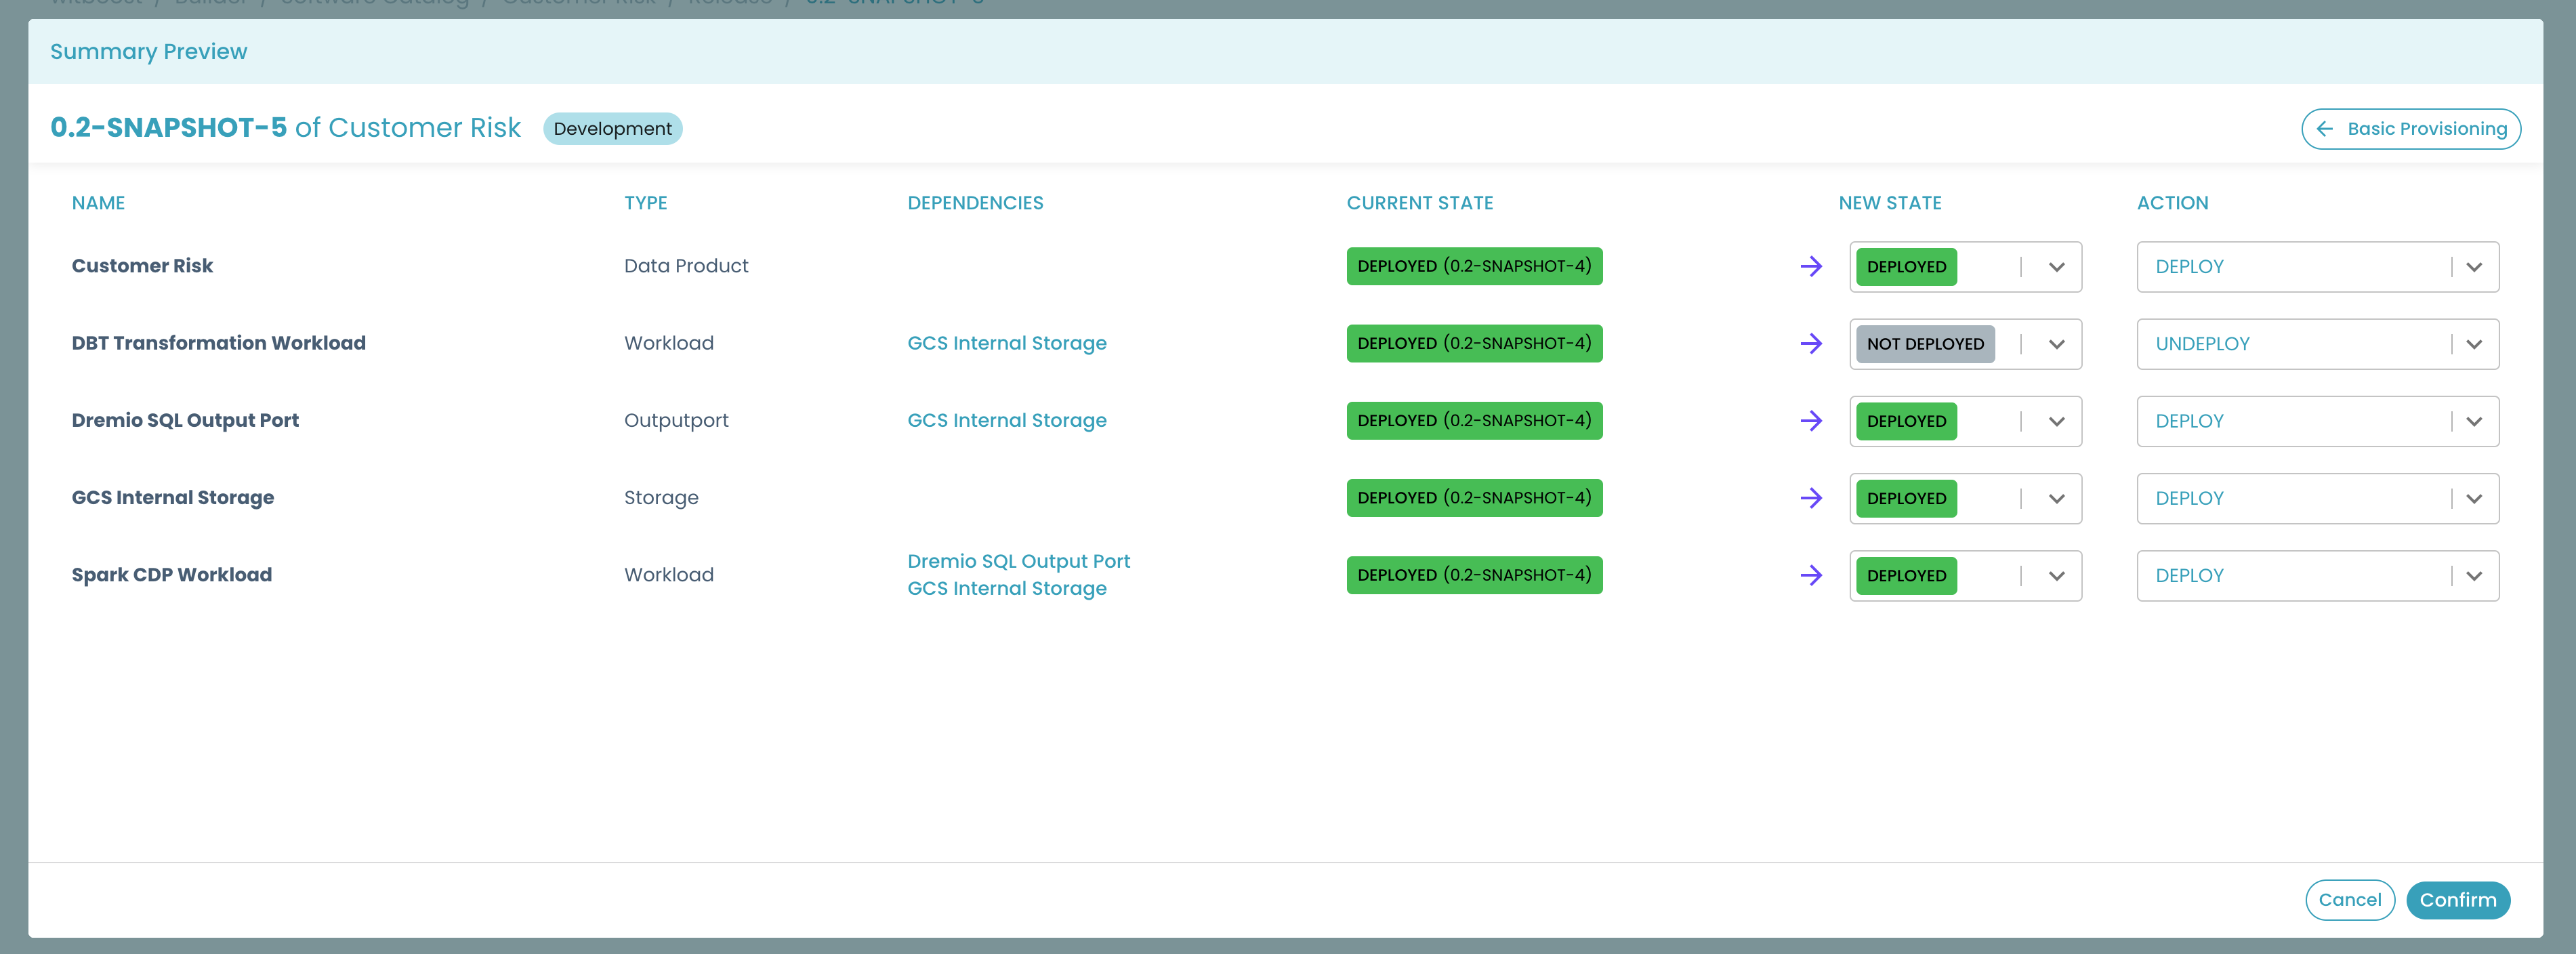
In this case, we will have a partial provisioning, since not all the components will be deployed. Please note that if we decide to undeploy a component that has another component depending on it, the status will be automatically updated to be consistent
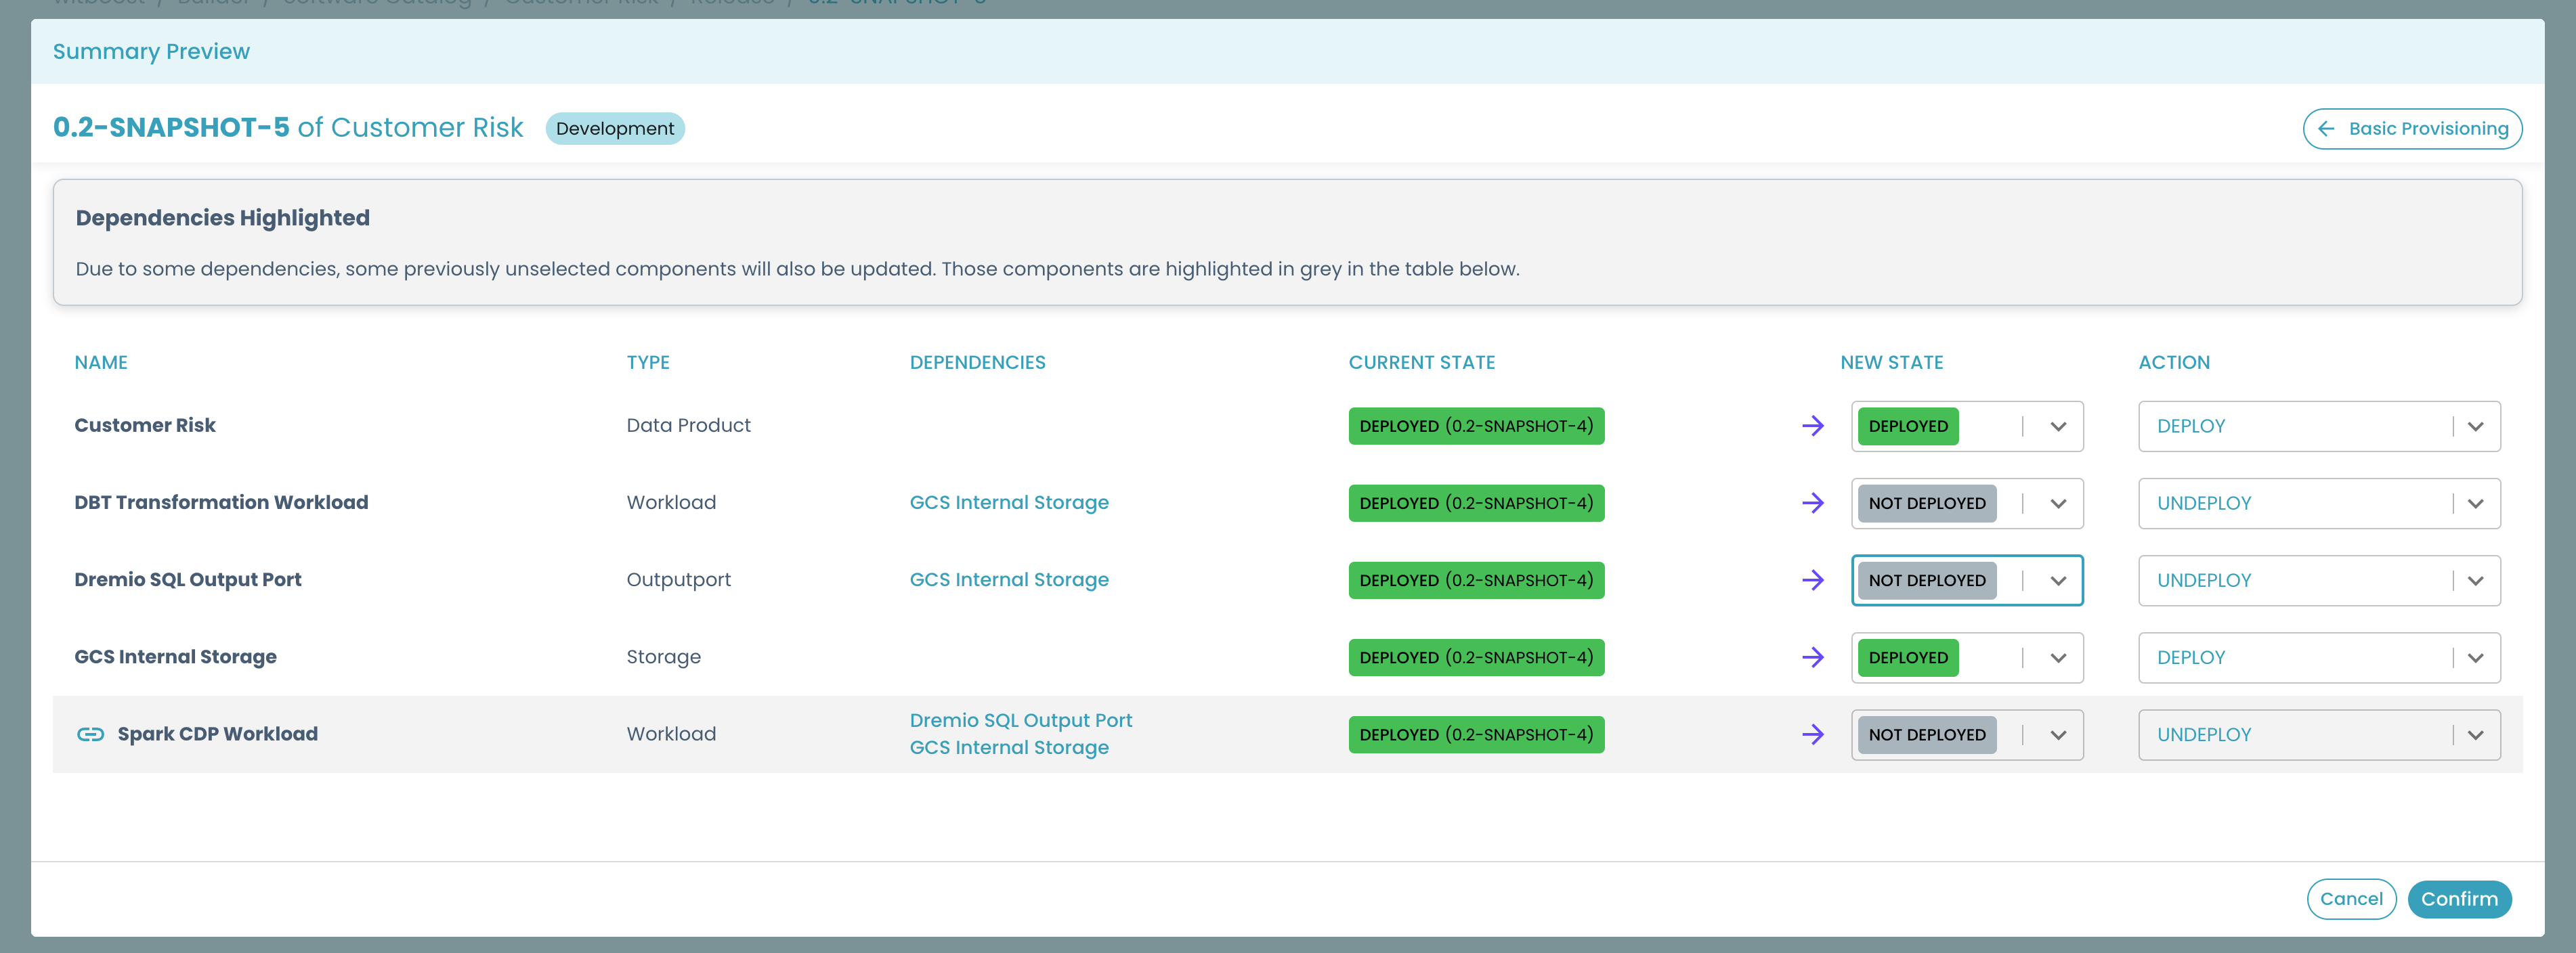
At the same time, if we deploy a component that has a dependency on a component that is not deployed, the modal will fix the inconsistency for us
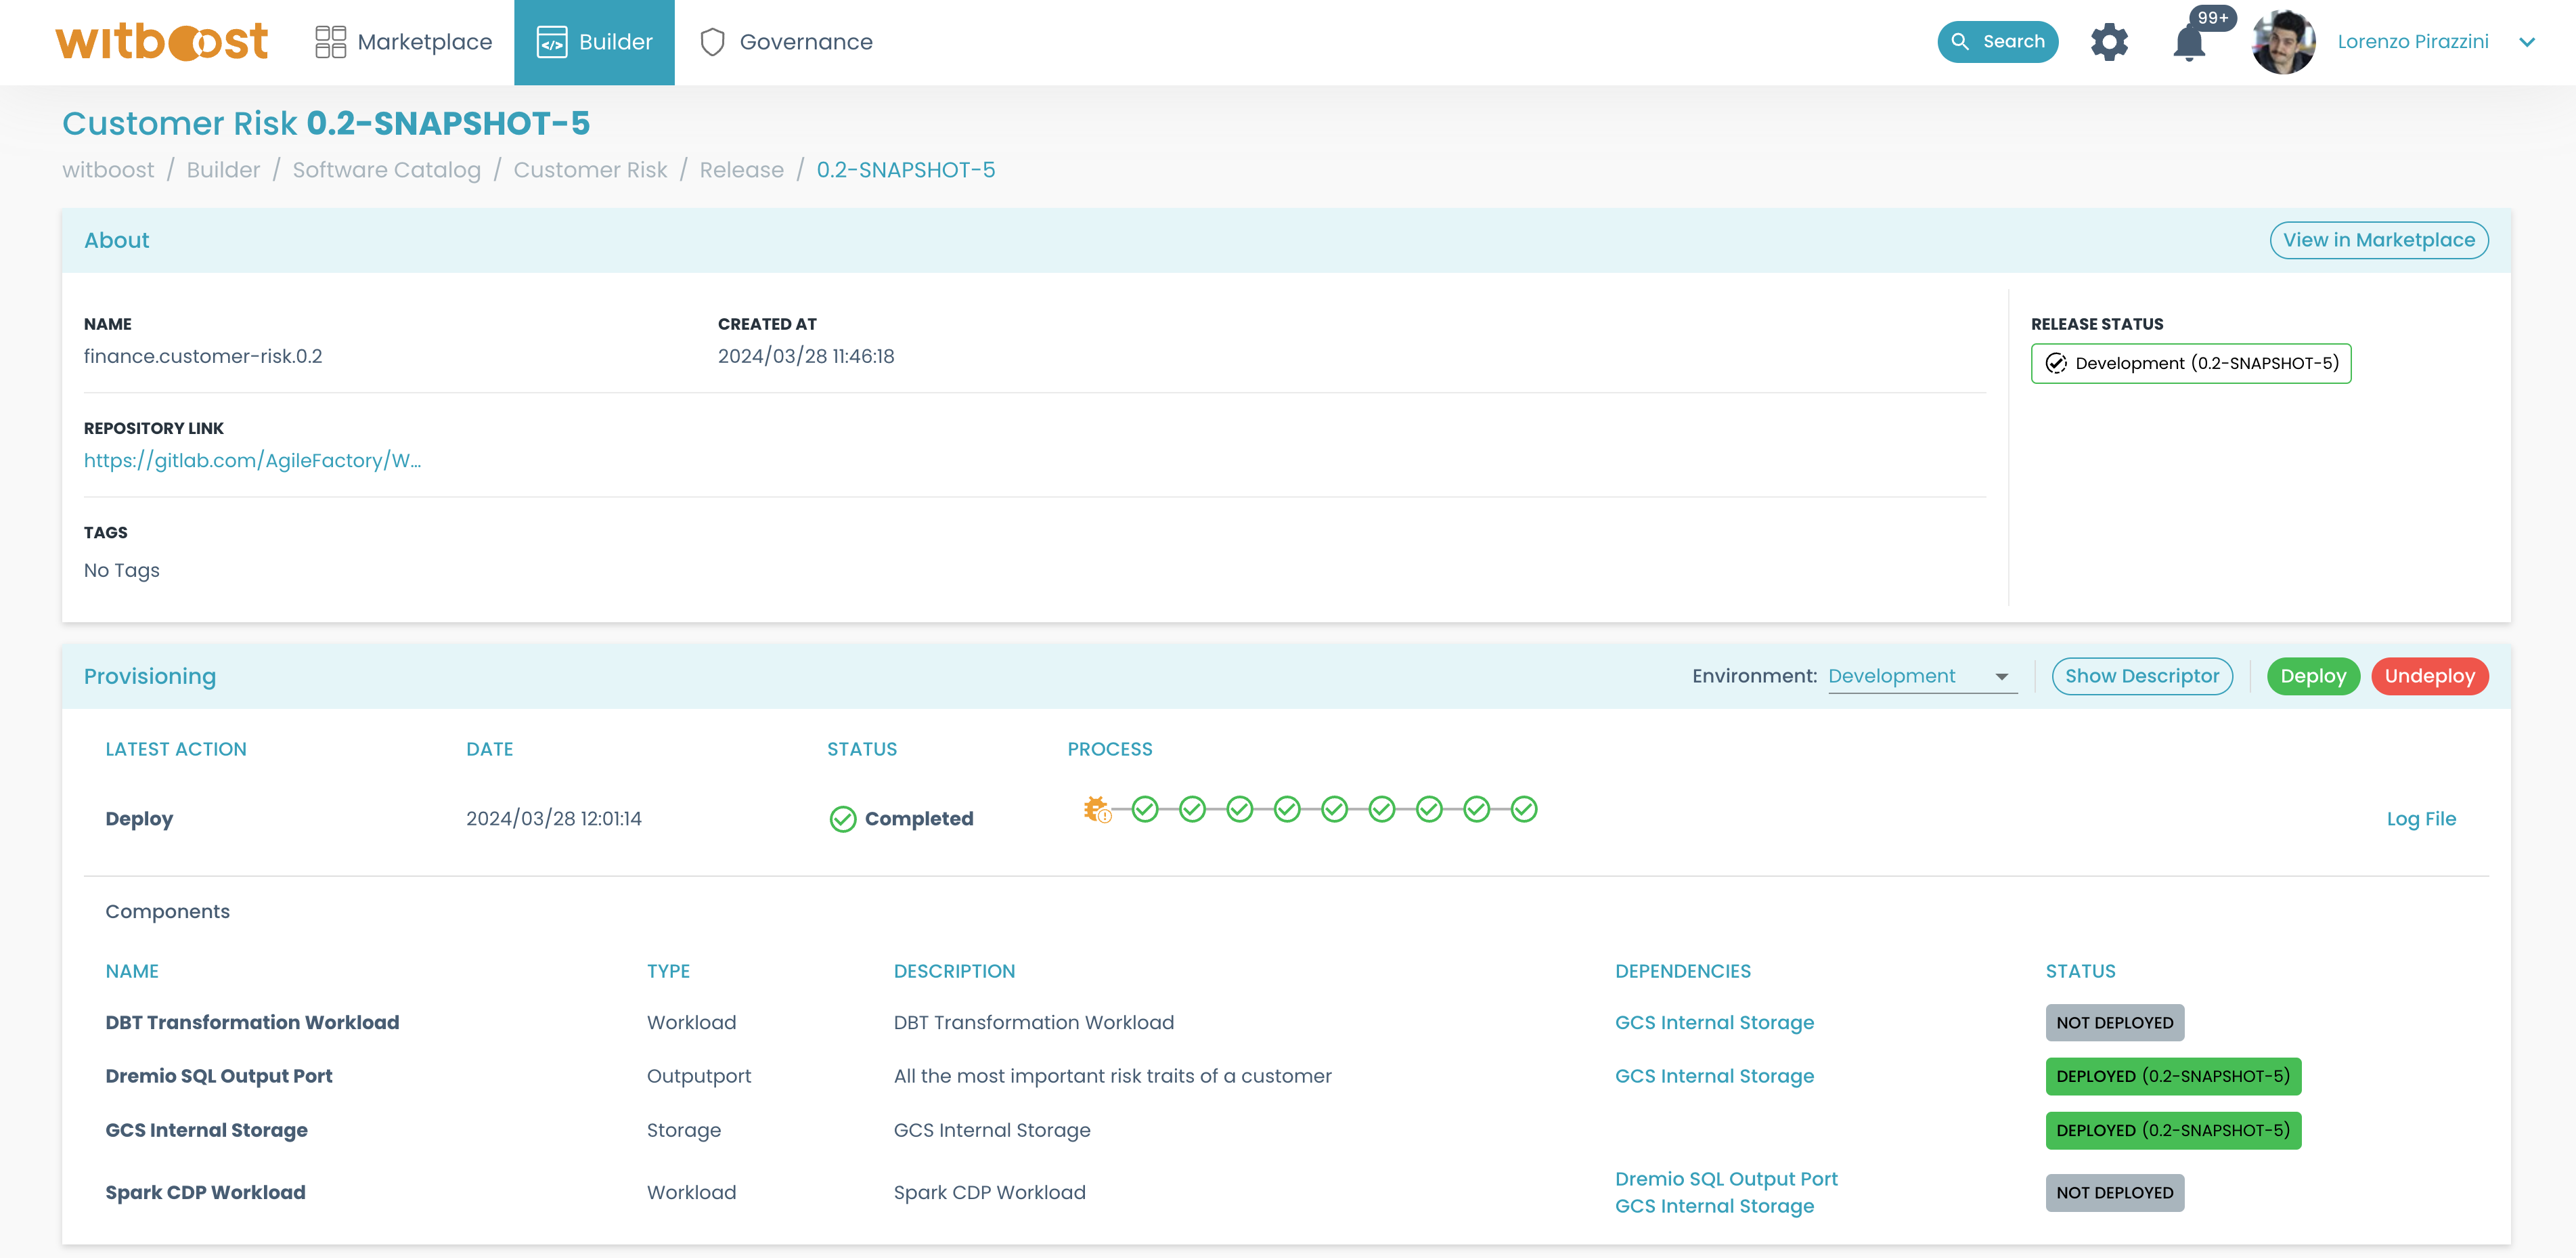
Now let's try to deploy this data product without all of its components
After the deployment operation completes, we can see that the status of the data product is "partially deployed", and not all the components of this release are deployed
Even if this feature could simplify the deployment when users are testing their work on a development environment, this feature should be used with care.
We recommend enabling the partial provisioning only in environments where users can make some tests and disabling it in production environments. Disabling this feature means that the data product is an atomic deployment unit: it can be deployed only with all of its components; in all other cases it will be in a corrupted status.